實現web數據同步的四種方式
=======================================
1、nfs實現web數據共享
2、rsync +inotify實現web數據同步
3、rsync+sersync更快更節約資源實現web數據同步
4、unison+inotify實現web數據雙向同步
=======================================
一、nfs實現web數據共享
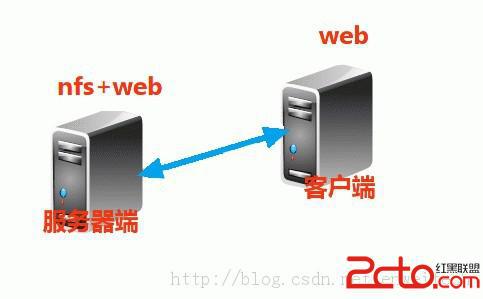
nfs能實現數據同步是通過NAS(網絡附加存儲),在服務器上共享一個文件,且服務器需要設置文件系統的權限和配置文件設置的權限,權限兩者之間取交集,然後客戶端把共享的文件掛載到本地,客戶端對文件有讀寫權限,則實現數據的同步。
nfs+web:服務器端的配置:
1)、安裝相關軟件,httpd提供web服務,nfs-utils提供nfs服務
[root@jie1 ~]# yum -y install httpd nfs-utils
2)、設置web的相關配置,使得web能夠提供web服務
. 代碼如下:
[root@jie1 ~]# vim /etc/httpd/conf/httpd.conf
########################################
ServerName 172.16.22.1:80
#DocumentRoot "/var/www/html" #提供虛擬主機,注釋默認存放網頁文件的路徑
<VirtualHost *:80>
ServerName www.jie.com
DocumentRoot /web/htdocs
</VirtualHost>
#######################################
[root@jie1 ~]# mkdir -pv /web/htdocs #創建存放網頁的目錄
[root@jie1 ~]# cd /web/htdocs/
[root@jie1 htdocs]# touch index.html test.html test.php
[root@jie1 htdocs]# ls
index.html test.html test.php
[root@jie1 htdocs]# echo "This is Jie1 Web+nfs Server" >index.html
[root@jie1 htdocs]# httpd -t #檢查web的配置文件是否有語法錯誤
Syntax OK
[root@jie1 htdocs]# service httpd start #開啟web服務
Starting httpd: [ OK ]
3)、設置nfs的相關配置,共享網頁文件
. 代碼如下:
[root@jie1 htdocs]# id apache #安裝httpd軟件後,系統會創建apache用戶,查看apache的id號
uid=48(apache) gid=48(apache) groups=48(apache)
[root@jie1 htdocs]# vim /etc/exports
######################################
/web/htdocs 172.16.22.3(rw,sync,root_squash,anonuid=48,anongid=48)
#nfs是以id號來確定是否能訪問共享的文件的,因為兩個服務器都安裝了httpd軟件,都會有apache用戶,所以apache用戶的id號能訪問共享的文件
#/web/htdocs 共享的目錄
#172.16.22.3 指定客戶端能共享此文件,多個客戶端用逗號隔開
#rw,讀寫權限
#sync,同步方式
#root_squash,壓縮root用戶的權限
#anonuid=48,指定此用戶的id能訪問共享文件
#anongid=48指定此組的id能訪問共享文件
######################################
[root@jie1 htdocs]# service nfs start #開啟nfs服務
Starting NFS services: [ OK ]
Starting NFS quotas: [ OK ]
Starting NFS mountd: [ OK ]
Stopping RPC idmapd: [ OK ]
Starting RPC idmapd: [ OK ]
Starting NFS daemon: [ OK ]
[root@jie1 htdocs]#
web:客戶端的配置
1)、安裝httpd的軟件
. 代碼如下:
[root@jie3 /]# yum -y install httpd
2)、設置web的相關配置,使得web能夠提供web服務
. 代碼如下:
[root@jie3 /]# vim /etc/httpd/conf/httpd.conf
########################################
ServerName 172.16.22.3:80
#DocumentRoot "/var/www/html"
<VirtualHost *:80>
ServerName www.jie.com
DocumentRoot /website #存放網頁文件的路徑
</VirtualHost>
#######################################
[root@jie3 /]# mkdir /website
[root@jie3 /]# httpd -t
Syntax OK
[root@jie3 /]# service httpd start
Starting httpd: [ OK ]
[root@jie3 ~]# cd /website/
[root@jie3 website]# ls #現在查看是沒有任何文件
[root@jie3 website]#
實現同步:
1)服務器端設置apache用戶對共享的文件有讀寫權限
. 代碼如下:
[root@jie1 htdocs]#setfacl -R -m u:apache:rwx /web/ #設置apache用戶對此中所有文件有讀寫可執行權限
2)客戶端掛載服務器的共享文件,查看客戶端是否已經同步服務器端的文件
. 代碼如下:
[root@jie3 website]#cd /root
[root@jie3 ~]# mount -t nfs 172.16.22.1:/web/htdocs /website/ #通過nfs掛載服務器端的文件
[root@jie3 /]#echo "172.16.22.1:/web/htdocs /website nfs defaults,_netdev 0 0" >>/etc/fstab #實現開機掛載
[root@jie3 ~]# cd /website/
[root@jie3 website]# ls #查看文件已經同步過來
index.html test.html test.php
[root@jie3 website]#
3)客戶端在共享的文件中新增文件,查看服務器端是否同步文件
. 代碼如下:
[root@jie3 ~]# cd /website/
[root@jie3 website]# ls
index.html test.html test.php
[root@jie3 website]# touch website.html #在客戶端創建此文件
[root@jie3 website]# ls
index.html test.html test.php website.html
[root@jie1 htdocs]# ls #服務器端,可以查看來著客戶端上傳的文件
index.html test.html test.php website.html
所有的數據其實都保存到了nfs服務器,不論用戶訪問哪台Web服務器,都要來nfs服務器獲取數據,這樣勢必照成nfs服務器的性能下降,而且客戶端對nfs服務器的依賴性較大,如果nfs服務器down掉之後,客戶端的web服務器就無法工作了。(動態的那種數據,而且數據量很大的數據,就不要用nfs服務器來實現數據共享了,一般適應於,靜態頁面和數據較小的文件)
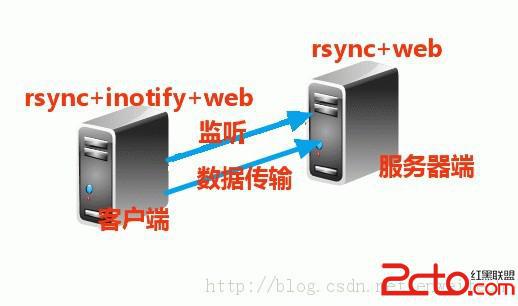
二、rsync +inotify實現web數據同步
rsync(remote sync)的特性:
可以鏡像保存整個目錄樹和文件系統
可以同步增量同步數據,文件傳輸效率高,因而同步時間很短
可以保持原有文件的權限、時間等屬性
加密傳輸數據,保證了數據的安全性
支持匿名傳輸
rsync也能實現同步,但是需要自己手動的去同步數據,當數據量非常的頻繁時,無疑是加大了運維人員的工作,inotify是一種強大的、細粒度的、異步的文件系統事件監控機制,inotify-tools工具的出現,解決了這種工作,安裝inotify軟件的主機會監聽服務器端的主機是否數據和本機不一樣,(因為在上傳數據時,運維人員先上傳到安裝inotify主機上),不一樣就用rsync命令直接把數據傳輸過去。客戶端安裝rsync軟件是為了調用rsync的命令,安裝inotify軟件是監聽和數據是否發生改變,服務器端安裝rsync軟件時為了提供rsync服務。
rsync+web服務端的配置:
1)、安裝相關軟件
. 代碼如下:
[root@jie1 ~]# yum -y install rsync xinetd httpd
#rsync服務通常基於超級守護進程xinetd管理的方式來實現,因此需要事先安裝rysnc和xinetd
2)、web的相關配置,使得web能夠提供服務
. 代碼如下:
[root@jie1 ~]# vim /etc/httpd/conf/httpd.conf
########################################
ServerName 172.16.22.1:80
#DocumentRoot "/var/www/html"
<VirtualHost *:80>
ServerName www.jie.com
DocumentRoot /web/htdocs
</VirtualHost>
#######################################
[root@jie1 ~]# mkdir -pv /web/htdocs
[root@jie1 ~]# cd /web/htdocs #服務器端,沒有任何的網頁文件
[root@jie1 ~]# ls
[root@jie1 ~]#
3)、rsync服務的相關配置
*****建立rsync的配置文件和密碼文件************
touch /etc/rsyncd.conf(rsync的配置文件)
touch /etc/rsyncd.pwd(用戶的密碼文件)
chmod 600 /etc/rsyncd.pwd(權限要設置為600,否則無法備份成功)
. 代碼如下:
[root@jie1 ~]# vim /etc/rsyncd.conf
############vim /etc/rsyncd.conf########################################
uid = nobody #備份以什麼身份進行,用戶ID
gid = nobody #備份以什麼身份進行,組ID
use chroot = no #禁锢在源目錄
max connections = 3 #最大連接數,0代表沒有限制
strict modes = yes #是否檢查口令文件的權限
pid file = /var/run/rsyncd.pid #運行進程的pid文件
log file = /var/log/rsyncd.log #日志記錄文件
[htdocs] #指定認證的備份模塊名
path = /web/htdocs #需要備份的目錄的路徑
ignore errors = yes #忽略一些無關的IO錯誤
read only = no #設置為no,即可以傳至服務器的相應目錄。
write only = no #設置為no,表示客戶端可以下載文件
hosts allow = 172.16.22.3 #可以連接rsync服務器的主機的IP地址
hosts deny = * #設置禁止連接rsync服務器的主機地址,*表示 拒絕所有除了hosts allow定義的
uid = root
gid = root
auth users = backuper #連接模塊的用戶名
secrets file = /etc/rsyncd.pwd #連接模塊用戶名的密碼文件存放路徑
#####################################################################
[root@jie1 ~]#vim /etc/rsyncd.pwd #用戶的密碼文件
#####################################################################
backuper:pwd123 #用戶名:密碼
#####################################################################
[root@jie1 ~]# chmod 600 /etc/rsyncd.pwd #權限給600
[root@jie1 ~]# chkconfig rsync on
[root@jie1 ~]# chkconfig xinetd on
[root@jie1 ~]# service xinetd start
Starting xinetd: [ OK ]
[root@jie1 ~]# netstat -pant | grep 873
tcp 0 0 :::873 :::* LISTEN 19876/xinetd
rsync+inotify+web客戶端的配置:
1)、inotify-tools軟件的安裝及設置
. 代碼如下:
[root@jie3 ~]#wget http://cloud.github.com/downloads/rvoicilas/inotify-tools/inotify-tools-3.14.tar.gz #下載inotify-tools軟件
[root@jie3 ~]# ls
anaconda-ks.cfg install.log
inotify-tools-3.14.tar.gz install.log.syslog
[root@jie3 ~]# tar xf inotify-tools-3.14.tar.gz #解壓軟件
[root@jie3 ~]# cd inotify-tools-3.14
[root@jie3 inotify-tools-3.14]# ./configure --prefix=/usr/local/inotify && make && make install #編譯安裝軟件
[root@jie3 ~]#cd /usr/local/inotify/
[root@jie3 inotify]# echo "PATH=/usr/local/inotify/bin:$PATH" >>/etc/profile.d/inotify.sh #設置能與系統關聯的path路徑
[root@jie3 inotify]# source /etc/profile.d/inotify.sh
[root@jie3 inotify]# echo "/usr/local/inotify/lib" >/etc/ld.so.conf.d/inotify.conf #設置系統能識別軟件的庫文件
[root@jie3 inotify]# ldconfig -v | grep inotify
/usr/local/inotify/lib:
libinotifytools.so.0 -> libinotifytools.so.0.4.1
[root@jie3 inotify]# ln -sv /usr/local/inotify/include/ /usr/include/inotify #鏈接頭文件到系統能識別的路徑下
`/usr/include/inotify' -> `/usr/local/inotify/include/'
[root@jie3 inotify]#
2)、web的相關配置,使得web能夠提供服務
. 代碼如下:
[root@jie3 /]# vim /etc/httpd/conf/httpd.conf
########################################
ServerName 172.16.22.3:80
#DocumentRoot "/var/www/html"
<VirtualHost *:80>
ServerName www.jie.com
DocumentRoot /website
</VirtualHost>
#######################################
[root@jie3 /]# mkdir /website
[root@jie3 /]# httpd -t
Syntax OK
[root@jie3 /]# service httpd start
Starting httpd: [ OK ]
[root@jie3 ~]# cd /website/
[root@jie3 website]# ls
[root@jie3 website]#
[root@jie3 ~]#
3)、配置能連接rsync的密碼文件和傳輸數據的腳本
. 代碼如下:
[root@jie3 ~]# vim /etc/rsyncd.pwd
#############################################
pwd123 #密碼與rsync服務器的密碼相同
###############################################
[root@jie3 ~]# chmod 600 /etc/rsyncd.pwd
[root@jie3 ~]# vim rsync.sh
#####################################################################
#!/bin/bash
host=172.16.22.1
src=/website
des=htdocs
inotifywait -mrq --timefmt '%d/%m/%y %H:%M' --format '%T %w%f%e' -e modify,delete,create,attrib $src \
| while read files
do
/usr/bin/rsync -vzrtopg --progress --password-file=/etc/rsyncd.secrets $src backuper@$host::$des
echo "${files} was rsynced" >>/tmp/rsync.log 2>&1
done
####################################################################
驗證實現同步:
. 代碼如下:
##1、先開啟監控的腳本(inotify主機上)
[root@jie3 ~]# bash -x rsync.sh &
#不放在後台可以查看同步的詳細過程,生成環境中,建議把此腳本放到後台執行,此腳本會監控客戶端數據是否方式變化,如果變化腳本就運行,數據不變化,腳本就會等待著用戶的輸入
##2、在開一個終端,在此目錄創建文件(inotify主機上)
[root@jie3 ~]# cd /website/
[root@jie3 website]# touch index.html test.php testdb.php inotify.php
[root@jie3 website]# ls
index.html testdb.php test.php inotify.php
[root@jie3 website]#
##3、看服務器端,數據是否已經同步過去
[root@jie1 ~]# cd /web/htdocs/
[root@jie1 htdocs]# ls
index.html testdb.php test.php inotify.php #數據已經被同步過來
[root@jie1 htdocs]#
rsync +inotify這種能實現數據的同步,但是當網絡很繁忙,且文件變化比較頻繁時,而且需要同步的rsync服務器端比較多時,rsync+inotify肯定是滿足不了需求的,於是rsync+sersync這種更快更節約資源實現web數據同步可以彌補rsync+inotify帶來的不足,rsync+inotify還有一個重大的缺點就是數據傳輸只是單向的,當運維人員由於“粗心”把數據直接傳輸rsync服務器端時,inotify主機是得不到rsync服務器端的數據,於是unison+inotify實現web數據雙向同步,解決了rsync+inotify的這一缺點。
三、rsync+sersync更快更節約資源實現web數據同步
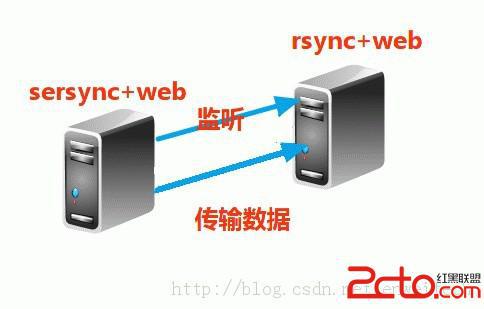
sersync與inotify相比有以下優點:
sersync是使用c++編寫,而且對linux系統文件系統產生的臨時文件和重復的文件操作進行過濾,所以在結合rsync同步的時候,節省了運行時耗和網絡資源。因此更快。
sersync配置起來很簡單,其中bin目錄下已經有基本上靜態編譯的2進制文件,配合bin目錄下的xml配置文件直接使用即可。
sersync使用多線程進行同步,尤其在同步較大文件時,能夠保證多個服務器實時保持同步狀態。
sersync有出錯處理機制,通過失敗隊列對出錯的文件重新同步,如果仍舊失敗,則按設定時長對同步失敗的文件重新同步。
sersync自帶crontab功能,只需在xml配置文件中開啟,即可按您的要求,隔一段時間整體同步一次。無需再額外配置crontab功能。
rsync+web服務器端的配置:
1)、安裝相關軟件
. 代碼如下:
[root@jie1 ~]# yum -y install rsync xinetd httpd
#rsync服務通常基於超級守護進程xinetd管理的方式來實現,因此需要事先安裝rysnc和xinetd
2)、web的相關配置,使得web能夠提供服務
. 代碼如下:
[root@jie1 ~]# vim /etc/httpd/conf/httpd.conf
########################################
ServerName 172.16.22.1:80
#DocumentRoot "/var/www/html"
<VirtualHost *:80>
ServerName www.jie.com
DocumentRoot /web/htdocs
</VirtualHost>
#######################################
[root@jie1 ~]# mkdir -pv /web/htdocs
[root@jie1 ~]# cd /web/htdocs #服務器端,沒有任何的網頁文件
[root@jie1 ~]# ls
[root@jie1 ~]#
3)、rsync服務的相關配置
. 代碼如下:
###====此配置文件的解釋,在rsync+inotify中已經解釋了=====####
[root@jie1 ~]# vim /etc/rsyncd.conf
############vim /etc/rsyncd.conf###############
uid = nobody
gid = nobody
use chroot = no
max connections = 3
strict modes = yes
pid file= /var/run/rsyncd.pid
log file= /var/log/rsyncd.log
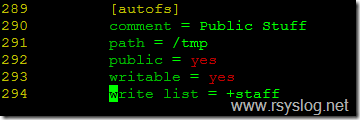
[htdocs]
path = /web/htdocs
ignore errors = yes
readonly = no
write only = no
hosts allow = 172.16.22.3
hosts deny = *
list = false
uid = root
gid = root
auth users= backuper
secrets file= /etc/rsyncd.pwd
##############################################
[root@jie1 ~]#vim /etc/rsyncd.pwd
backuper:pwd123
[root@jie1 ~]# chmod 600 /etc/rsyncd.pwd
[root@jie1 ~]# chkconfig rsync on
[root@jie1 ~]# chkconfig xinetd on
[root@jie1 ~]# service xinetd start
Starting xinetd: [ OK ]
[root@jie1 ~]# netstat -pant | grep 873
tcp 0 0 :::873 :::* LISTEN 19876/xinetd
sersync+web客戶端的配置:
1)、先下載安裝sersync軟件,做初始設置
. 代碼如下:
[root@jie3 ~]#wget --no-check-certificate https://sersync.googlecode.com/files/sersync2.5_64bit_binary_stable_final.tar.gz
[root@jie3 ~]# ls
anaconda-ks.cfg install.log.syslog
install.log sersync2.5_64bit_binary_stable_final.tar.gz
mkdir /usr/local/sersync
[root@jie3 ~]#mkdir -pv /usr/local/sersync/{conf,bin,log}
mkdir: created directory `/usr/local/sersync'
mkdir: created directory `/usr/local/sersync/conf'
mkdir: created directory `/usr/local/sersync/bin'
mkdir: created directory `/usr/local/sersync/log'
[root@jie3 ~]# tar xf sersync2.5_64bit_binary_stable_final.tar.gz
[root@jie3 ~]# cd GNU-Linux-x86/
[root@jie3 GNU-Linux-x86]# ls
confxml.xml sersync2
[root@jie3 GNU-Linux-x86]# mv confxml.xml /usr/local/sersync/conf/
[root@jie3 GNU-Linux-x86]# mv sersync2 /usr/local/sersync/bin/
[root@jie3 GNU-Linux-x86]# cd /usr/local/sersync/
[root@jie3 sersync]# echo "PATH=/usr/local/sersync/bin:$PATH" >>/etc/profile.d/sersync.sh
[root@jie3 sersync]# source /etc/profile.d/sersync.sh
[root@jie3 sersync]# echo "pwd123" >/usr/local/sersync/sersync.pwd
[root@jie3 sersync]# chmod 600 /usr/local/sersync/sersync.pwd
2)、修改sersync的配置文件
. 代碼如下:
[root@jie3 sersync]# vim /usr/local/sersync/conf/confxml.xml
#########################################################################<?xml version="1.0" encoding="ISO-8859-1"?>
<head version="2.5">
#設置本地的ip地址和監聽的端口
<host hostip="172.16.22.3" port="8008"></host>
#debug模式是否開啟
<debug start="false"/>
#xfs文件系統是否開啟
<fileSystem xfs="false"/>
#同步時,是否支持正則表達式,默認關閉
<filter start="false">
<exclude expression="(.*)\.svn"></exclude>
<exclude expression="(.*)\.gz"></exclude>
<exclude expression="^info/*"></exclude>
<exclude expression="^static/*"></exclude>
</filter>
# 設置要監控的事件
<inotify>
<delete start="true"/>
<createFolder start="true"/>
<createFile start="false"/>
<closeWrite start="true"/>
<moveFrom start="true"/>
<moveTo start="true"/>
<attrib start="false"/>
<modify start="false"/>
</inotify>
#同步的設置
<sersync>
#同步的路徑,本地的目錄
<localpath watch="/website">
#rsync服務器的ip地址和rsync配置文件裡面定義的模塊
<remote ip="172.16.22.1" name="htdocs"/>
#<!-- -->括起來表示注釋
<!--<remote ip="192.168.8.39" name="tongbu"/>-->
<!--<remote ip="192.168.8.40" name="tongbu"/>-->
</localpath>
<rsync>
#rsync指令參數
<commonParams params="-artuz"/>
#rsync同步認證設置的內容,user指定用戶名,password指定存放密碼的文件路徑
<auth start="true" users="backuper" passwordfile="/usr/local/sersync/sersync.pwd"/>
#設置rsync遠程服務端口
<userDefinedPort start="false" port="874"/><!-- port=874 -->
#設置超時時間
<timeout start="true" time="100"/><!-- timeout=100 -->
#設置ssh加密傳輸模式,默認關閉
<ssh start="false"/>
</rsync>
#設置sersync傳輸失敗日志腳本路徑
<failLog path="/tmp/rsync_fail_log.sh" timeToExecute="60"/><!--default every 60mins execute once-->
#設置rsync+crontab定時傳輸,默認關閉
<crontab start="false" schedule="600"><!--600mins-->
<crontabfilter start="false">
<exclude expression="*.php"></exclude>
<exclude expression=\'#\'" /*"></exclude>
</crontabfilter>
</crontab>
#設置sersync傳輸後調用name指定的插件腳本,默認關閉
<plugin start="false" name="command"/>
</sersync>
#插件腳本范例
<plugin name="command">
<param prefix="/bin/sh" suffix="" ignoreError="true"/> <!--prefix /opt/tongbu/mmm.sh suffix-->
<filter start="false">
<include expression="(.*)\.php"/>
<include expression="(.*)\.sh"/>
</filter>
</plugin>
</head>
#######################################################################
驗證實現同步:
. 代碼如下:
###sersync客戶端的,開啟同步機制,進行監控,然後創建文件
[root@jie3 website]# sersync2 -r -d &
[root@jie3 ~]# cd /website/
[root@jie3 website]# touch index.html testdb.php test.html test.php
###rsync服務器端,查看可以來著sersync客戶端的同步文件
[root@jie1 ~]# cd /web/htdocs/
[root@jie1 htdocs]# ls
index.html testdb.php test.html test.php
[root@jie1 htdocs]#
四、unison+inotify實現web數據雙向同步
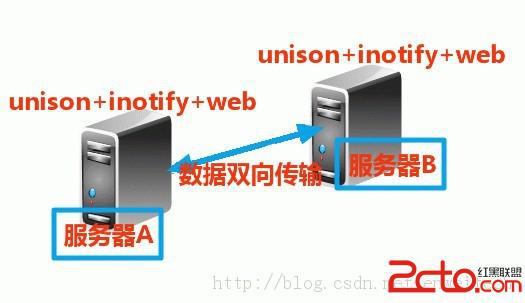
Unison是一款跨平台的文件同步對象,不僅支撐本地對本地同步,也支撐經由過程SSH、RSH和Socket等收集和談進行同步。
Unison支撐雙向同步操縱,你既可以從A同步到B,也可以從B同步到A,這些都不須要額外的設定。
1)、兩個服務器都編譯安裝這三個源碼包:(在此我只寫一台服務器的編譯安裝過程)
. 代碼如下:
[root@jie1 ~]#wget ftp://distro.ibiblio.org/slitaz/sources/packages-2.0/o/ocaml-3.10.2.tar.gz
[root@jie1~]#wget http://freebsd.ntu.edu.tw/FreeBSD/ports/distfiles/unison-2.32.52/unison-2.32.52.tar.gz
[root@jie1~]#wget http://cloud.github.com/downloads/rvoicilas/inotify-tools/inotify-tools-3.14.tar.gz
[root@jie1 ~]# ls
anaconda-ks.cfg install.log ocaml-3.10.2.tar.gz
inotify-tools-3.14.tar.gz install.log.syslog unison-2.32.52.tar.gz
[root@jie1 ~]# tar xf inotify-tools-3.14.tar.gz
[root@jie1 ~]# tar xf ocaml-3.10.2.tar.gz
[root@jie1 ~]# tar xf unison-2.32.52.tar.gz
##編譯安裝inotify
[root@jie1 ~]# cd inotify-tools-3.14
[root@jie1 inotify-tools-3.14]# ./configure --prefix=/usr/local/inotify && make && make install
[root@jie1 inotify-tools-3.14]# cd /usr/local/inotify/
##修改PATH環境變量
[root@jie1 inotify]# echo "PATH=/usr/local/inotify/bin:$PATH" >/etc/profile.d/inotify.sh
[root@jie1 inotify]# source /etc/profile.d/inotify.sh
##添加庫文件到系統識別的路徑
[root@jie1 inotify]# echo "/usr/local/inotify/lib" >/etc/ld.so.conf.d/inotify.conf
[root@jie1 inotify]# ldconfig -v | grep inotify
/usr/local/inotify/lib:
libinotifytools.so.0 -> libinotifytools.so.0.4.1
##鏈接庫文件到系統識別的路徑
[root@jie1 inotify]# ln -sv /usr/local/inotify/include/ /usr/include/inotify
`/usr/include/inotify' -> `/usr/local/inotify/include/'
##編譯安裝ocaml,unison依賴於ocaml
[root@jie1 inotify]#cd /root/ocaml-3.10.2
[root@jie1 ocaml-3.10.2]#./configure
[root@jie1 ocaml-3.10.2]#make world opt
[root@jie1 ocaml-3.10.2]#make install
##編譯安裝unison
[root@jie1 ocaml-3.10.2]# cd /root/unison-2.32.52
##安裝依賴性包
[root@jie1 unison-2.32.52]#yum -y install ctags-etags
[root@jie1 unison-2.32.52]# make UISTYLE=text
##make install會提示錯誤,此錯誤就是要你cp unison /usr/local/bin,復制即可
[root@jie1 unison-2.32.52]# make install
[root@jie1 unison-2.32.52]# cp unison /usr/local/bin
2)、服務器A生成的公鑰傳到服務器B上:
. 代碼如下:
##把服務器A生成的公鑰傳到服務器B上####
[root@jie1 ~]# ssh-keygen -t rsa #生成ssh的密鑰對
[root@jie1 ~]# scp ~/.ssh/id_rsa.pub 172.16.22.3:/root #生成的密鑰在家目錄的ssh文件中,ssh文件為隱藏文件,通過scp復制到服務器B上
[root@jie3 ~]# mv id_rsa.pub .ssh/authorized_keys #在服務器B上把服務器A傳來的公鑰文件改名並存放到ssh目錄下
[root@jie3 ~]# chmod 600 .ssh/authorized_keys #給公鑰文件改權限為600
[root@jie1 ~]# service sshd restart #重啟sshd服務
Stopping sshd: [ OK ]
Starting sshd: [ OK ]
[root@jie1 ~]#
3)、服務器B生成的公鑰傳到服務器A上:
. 代碼如下:
##把服務器B生成的公鑰傳到服務器A上####
[root@jie3 ~]# ssh-keygen -t rsa #生成ssh的密鑰對
[root@jie3 ~]# scp ~/.ssh/id_rsa.pub 172.16.22.1:/root #生成的密鑰在家目錄的ssh文件中,ssh文件為隱藏文件,通過scp復制到服務器B上
[root@jie1 ~]# mv id_rsa.pub .ssh/authorized_keys #在服務器A上把服務器B傳來的公鑰文件改名並存放到ssh目錄下
[root@jie1 ~]# chmod 600 .ssh/authorized_keys #給公鑰文件改權限為600
[root@jie3 ~]# service sshd restart #重啟sshd服務
Stopping sshd: [ OK ]
Starting sshd: [ OK ]
[root@jie3 ~]#
4)、分別搭建web服務,服務器A的網頁文件存放路徑為/web/htdocs,服務器B的網頁存放路徑為/website
. 代碼如下:
##服務器A搭建web的配置
[root@jie1 /]# vim /etc/httpd/conf/httpd.conf
########################################
ServerName 172.16.22.1:80
#DocumentRoot "/var/www/html"
<VirtualHost *:80>
ServerName www.jie.com
DocumentRoot /web/htdocs
</VirtualHost>
#######################################
[root@jie1 ~]# mkdir -pv /web/htdocs
[root@jie1 ~]# cd /web/htdocs/
[root@jie1 htdocs]# ls
[root@jie1 htdocs]#
##服務器B搭建web的配置
[root@jie3 /]# vim /etc/httpd/conf/httpd.conf
########################################
ServerName 172.16.22.3:80
#DocumentRoot "/var/www/html"
<VirtualHost *:80>
ServerName www.jie.com
DocumentRoot /website
</VirtualHost>
#######################################
[root@jie3 /]# mkdir /website
[root@jie3 /]# httpd -t
Syntax OK
[root@jie3 /]# service httpd start
Starting httpd: [ OK ]
[root@jie3 ~]# cd /website/
[root@jie3 website]# ls
[root@jie3 website]#
5)、編unison同步的腳本進行測試
. 代碼如下:
##服務器A的腳本
[root@jie1 ~]# vim serA.sh
######################################################################
#/bin/bash
ipB="172.16.22.3"
srcA="/web/htdocs"
dstB="/website"
/usr/local/inotify/bin/inotifywait -mrq -e create,delete,modify,move $srcA | while read line; do
/usr/local/bin/unison -batch $srcA ssh://$ipB/$dstB
echo -n "$line " >> /var/log/inotify.log
echo `date | cut -d " " -f1-4` >> /var/log/inotify.log
done
#####################################################################
##服務器B的腳本
[root@jie3 ~]# vim serB.sh
#####################################################################
#/bin/bash
ipA="172.16.22.1"
srcB="/website"
dstA="/web/htdocs"
/usr/local/inotify/bin/inotifywait -mrq -e create,delete,modify,move $srcB | while read line; do
/usr/local/bin/unison -batch $srcB ssh://$ipA/$dstA
echo -n "$line " >> /var/log/inotify.log
echo `date | cut -d " " -f1-4` >> /var/log/inotify.log
done
#####################################################################
##服務器A的測試
[root@jie1 ~]# sh -x serA.sh #先運行unison同步腳本,查看過程
[root@jie1 ~]# cd /web/htdocs/
[root@jie1 htdocs]# touch serA.txt SerA.html SerA.php #然後創建文件
[root@jie1 htdocs]# ls
SerA.html SerA.php serA.txt SerB.html SerB.php SerB.txt
##服務器B的測試
[root@jie3 ~]# sh -x serB.sh
[root@jie3 ~]# cd /website/
[root@jie3 website]# touch SerB.txt SerB.html SerB.php
[root@jie3 website]# ls
SerA.html SerA.php serA.txt SerB.html SerB.php SerB.txt
###=====可以把腳本設置開機自啟,放到rc.local文件中,且放在後台運行