今天看到群裡有人提到openvpn,剛好放假在家,就順帶的研究了下。
2年前自己還是小白的時候就在老單位連總部OA時用過openvpn這個客戶端,感覺還挺好用,而且覺得以後項目應該也能用得上,SO google了網上大量零碎資料,折騰了大半天,按照自己的理解就整理了如下文檔,給有興趣的朋友分享一下。
最近一直想把自己的短板,也就是LINUX編程這塊好好研究下。。
不扯了,開始干活。。
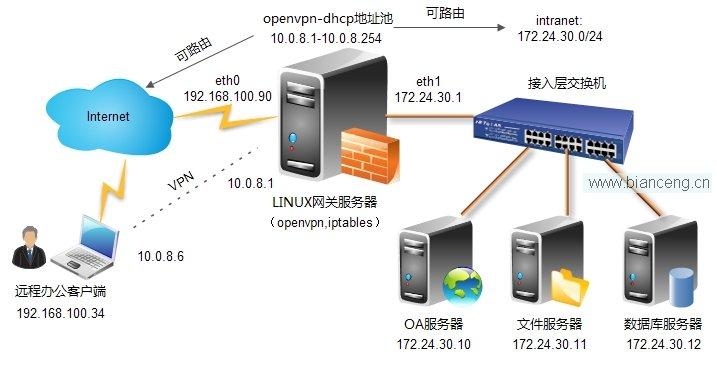
openvpn是一款在LINUX網關服務器使用的開源的VPN軟件,顧名思義,其實就是用來打通一條安全的虛擬專用通道,實現用戶遠程辦公,獲取內網資源。
該軟件可跨平台在在Linux、xBSD、Mac OS X與Windows間使用,並利用openssl作為加密庫,使用加密證書或用戶名/密碼來實現身份驗證,是一款不可多得的開源VPN解決方案。
我們做這個實驗的目的就是模擬線上常見的公司外出人員在外需要訪問公司內網OA,實現遠程辦公自動化。
解決方案:
系統環境:centos6.3 x64
OPENVPN: openvpn-2.3.0(附件有下載)
vpn server: eth0:192.168.100.90,eth1:172.24.30.1
vpn client: 192.168.100.34
intranet server: 172.24.30.10
部署環境:
1.清空默認策略並重啟iptables
# iptables -t NAT -F
# iptables -F
# service iptables save
# service iptables restart
2.關閉SELINUX
# setenforce 0
# vi /etc/sysconfig/selinux
---------------
SELINUX=disabled
---------------
server端(路由模式):
一.網絡設置
1.開啟服務器端路由轉發功能
# vi /etc/sysctl.conf
---------------------
net.ipv4.ip_forward = 1
---------------------
# sysctl -p
2.設置nat轉發:
注:保證VPN地址池可路由出外網
# iptables -t nat -A POSTROUTING -s 10.8.0.0/24 -o eth0 -j MASQUERADE
3.設置openvpn端口通過:
# iptables -A INPUT -p TCP --dport 1194 -j ACCEPT
# iptables -A INPUT -m state --state ESTABLISHED,RELATED -j ACCEPT
重啟iptables:
注:這裡提一下,INPUT策略是執行後即時生效的,POSTROUTING需要保存並重啟服務才能生效
# service iptables save
# service iptables restart
注:若想讓該服務器只提供openvpn等基本服務,可參照本文檔附件iptables腳本
3.時間同步(重要):
# ntpdate asia.pool.ntp.org
二.安裝依賴庫
# yum install -y openssl openssl-devel lzo lzo-devel pam pam-devel automake pkgconfig
三.安裝openvpn:
# wget -c http://swupdate.openvpn.org/community/releases/openvpn-2.3.0.tar.gz
# tar zxvf openvpn-2.3.0.tar.gz
# cd openvpn-2.3.0
# ./configure --prefix=/usr/local/openvpn
# make && make install
# mkdir -p /etc/openvpn
復制模板到openvpn配置目錄:
# cp -rf sample /etc/openvpn/
復制openvpn配置文件到主目錄:
# cp /etc/openvpn/sample/sample-config-files/server.conf /etc/openvpn/
# cd ..
四.下載easy-rsa:
注:該包用來制作ca證書,服務端證書,客戶端證書,openvpn2.3.0該版本源碼不包含easy-rsa,所以需要單獨下載安裝用來配合openvpn實現證書生成。
# wget -c https://github.com/OpenVPN/easy-rsa/archive/master.zip
# unzip master
# mv easy-rsa-master easy-rsa
# cp -rf easy-rsa /etc/openvpn
# cd /etc/openvpn/easy-rsa/easy-rsa/2.0
修改證書變量
# vi vars
修改如下參數
注:在後面生成服務端ca證書時,這裡的配置會作為缺省配置
---------------------
export KEY_COUNTRY="CN"
export KEY_PROVINCE="SX"
export KEY_CITY="Xian"
export KEY_ORG="example"
export KEY_EMAIL="[email protected]"
---------------------
做SSL配置文件軟鏈:
# ln -s openssl-1.0.0.cnf openssl.cnf
修改vars文件可執行並調用
# chmod +x vars
# source ./vars
-----------------
NOTE: If you run ./clean-all, I will be doing a rm -rf on /etc/openvpn/easy-rsa/easy-rsa/2.0/keys
-----------------
注:也就是如果執行./clean-all,就會清空/etc/openvpn/easy-rsa/easy-rsa/2.0/keys下所有文件
開始配置證書:
1.清空原有證書:
# ./clean-all
注:下面這個命令在第一次安裝時可以運行,以後在添加完客戶端後慎用,因為這個命令會清除所有已經生成的證書密鑰,和上面的提示對應
2.生成服務器端ca證書
# ./build-ca
注:由於之前做過缺省配置,這裡一路回車即可
3.生成服務器端密鑰證書, 後面這個openvpn.example.com就是服務器名,也可以自定義
# ./build-key-server openvpn.example.com
---------------------------
Generating a 2048 bit RSA private key
...................................................+++
..................................+++
writing new private key to 'openvpn.example.com.key'
-----
You are about to be asked to enter information that will be
incorporated
into your certificate request.
What you are about to enter is what is called a Distinguished Name or
a DN.
There are quite a few fields but you can leave some blank
For some fields there will be a default value,
If you enter '.', the field will be left blank.
-----
Country Name (2 letter code) [CN]:
State or Province Name (full name) [SX]:
Locality Name (eg, city) [Xian]:
Organization Name (eg, company) [example]:
Organizational Unit Name (eg, section) []:
Common Name (eg, your name or your server's hostname)
[openvpn.example.com]:
Name [EasyRSA]:
Email Address [[email protected]]:
Please enter the following 'extra' attributes
to be sent with your certificate request
A challenge password []:123456
An optional company name []:example
Using configuration from /etc/openvpn/easy-rsa/easy-rsa/2.0/openssl-1.0.0.cnf
Check that the request matches the signature
Signature ok
The Subject's Distinguished Name is as follows
countryName :PRINTABLE:'CN'
stateOrProvinceName :PRINTABLE:'SX'
localityName :PRINTABLE:'Xian'
organizationName :PRINTABLE:'example'
commonName :PRINTABLE:'openvpn.example.com'
name :PRINTABLE:'EasyRSA'
emailAddress :IA5STRING:'[email protected]'
Certificate is to be certified until Jun 10 21:58:49 2023 GMT (3650 days)
Sign the certificate? [y/n]:y
1 out of 1 certificate requests certified, commit? [y/n]y
Write out database with 1 new entries
Data Base Updated
---------------------------
4.生成所需客戶端證書密鑰文件(名字任意,建議寫成你要發給的人的姓名,方便管理):
# ./build-key client1
# ./build-key client2
注:這裡與生成服務端證書配置類似,中間一步提示輸入服務端密碼,其他按照缺省提示一路回車即可。
5.再生成diffie hellman參數,用於增強openvpn安全性(生成需要漫長等待)
# ./build-dh
6.打包keys
# tar zcvf keys.tar.gz keys/
7.終端發送到客戶端備用
# yum install lrzsz -y
# sz keys.tar.gz
五.配置openvpn server:
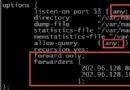
# vi /etc/openvpn/server.conf
注:可按照默認模板配置,本例為自定義配置文件:
--------------------------
# 設置監聽IP,默認是監聽所有IP
;local a.b.c.d
# 設置監聽端口,必須要對應的在防火牆裡面打開
port 1194
# 設置用TCP還是UDP協議?
;proto tcp
proto tcp
# 設置創建tun的路由IP通道,還是創建tap的以太網通道
# 路由IP容易控制,所以推薦使用它;但如果如IPX等必須
# 使用第二層才能通過的通訊,則可以用tap方式,tap也
# 就是以太網橋接
;dev tap
dev tun
# Windows需要給網卡一個名稱,這裡設置,linux不需要
;dev-node MyTap
# 這裡是重點,必須指定SSL/TLS root certificate (ca),
# certificate(cert), and private key (key)
# ca文件是服務端和客戶端都必須使用的,但不需要ca.key
# 服務端和客戶端指定各自的.crt和.key
# 請注意路徑,可以使用以配置文件開始為根的相對路徑,
# 也可以使用絕對路徑
# 請小心存放.key密鑰文件
ca /etc/openvpn/easy-rsa/easy-rsa/2.0/keys/ca.crt
cert /etc/openvpn/easy-rsa/easy-rsa/2.0/keys/openvpn.example.com.crt
key /etc/openvpn/easy-rsa/easy-rsa/2.0/keys/openvpn.example.com.key
# This file should be kept secret
# 指定Diffie hellman parameters.
dh /etc/openvpn/easy-rsa/easy-rsa/2.0/keys/dh2048.pem
# 配置VPN使用的網段,OpenVPN會自動提供基於該網段的DHCP
# 服務,但不能和任何一方的局域網段重復,保證唯一
server 10.8.0.0 255.255.255.0
# 維持一個客戶端和virtual IP的對應表,以方便客戶端重新
# 連接可以獲得同樣的IP
ifconfig-pool-persist ipp.txt
# 配置為以太網橋模式,但需要使用系統的橋接功能
# 這裡不需要使用
;server-bridge 10.8.0.4 255.255.255.0 10.8.0.50 10.8.0.100
# 為客戶端創建對應的路由,以另其通達公司網內部服務器
# 但記住,公司網內部服務器也需要有可用路由返回到客戶端
;push "route 192.168.20.0 255.255.255.0"
push "route 172.24.30.0 255.255.255.0"
# 為特定的客戶端指定IP或指定路由,該路由通常是客戶端後面的
# 內網網段,而不是服務端連接的網段
# ccd是/etc/openvpn下的目錄,其中建有希望限制的客戶端Common
# Name為文件名的文件,並通過下面的命令寫入固定IP地址
# 例如Common Name為client1,則在/etc/openvpn/ccd/client1寫有:
# ifconfig-push 10.9.0.1 10.9.0.2
;client-config-dir ccd
;route 192.168.40.128 255.255.255.248
# 為可以對不同的客戶端設置防火牆等權限
# 可以讓其自動運行對應腳本,可參考man
;learn-address ./script
# 若客戶端希望所有的流量都通過VPN傳輸,則可以使用該語句
# 其會自動改變客戶端的網關為VPN服務器,推薦關閉
# 一旦設置,請小心服務端的DHCP設置問題
;push "redirect-gateway"
# 用OpenVPN的DHCP功能為客戶端提供指定的DNS、WINS等
;push "dhcp-option DNS 10.8.0.1"
;push "dhcp-option WINS 10.8.0.1"
# 默認客戶端之間是不能直接通訊的,除非把下面的語句注釋掉
client-to-client
# 如果您希望有相同Common Name的客戶端都可以登陸
# 也可以注釋下面的語句,推薦每個客戶端都使用不用的Common Name
# 常用於測試
;duplicate-cn
# 設置服務端檢測的間隔和超時時間
keepalive 10 120
# 下面是一些對安全性增強的措施
# For extra security beyond that provided
# by SSL/TLS, create an "HMAC firewall"
# to help block DoS attacks and UDP port flooding.
#
# Generate with:
# openvpn --genkey --secret ta.key
#
# The server and each client must have
# a copy of this key.
# The second parameter should be 0
# on the server and 1 on the clients.
;tls-auth ta.key 0 # This file is secret
# Select a cryptographic cipher.
# This config item must be copied to
# the client config file as well.
;cipher BF-CBC # Blowfish (default)
;cipher AES-128-CBC # AES
;cipher DES-EDE3-CBC # Triple-DES
# 使用lzo壓縮的通訊,服務端和客戶端都必須配置
comp-lzo
# 設置最大用戶數
;max-clients 100
# 讓OpenVPN以nobody用戶和組來運行(安全)
;user nobody
;group nobody
# The persist options will try to avoid
# accessing certain resources on restart
# that may no longer be accessible because
# of the privilege downgrade.
persist-key
persist-tun
# 輸出短日志,每分鐘刷新一次,以顯示當前的客戶端
status /var/log/openvpn/openvpn-status.log
# 缺省日志會記錄在系統日志中,但也可以導向到其他地方
# 建議調試的使用先不要設置,調試完成後再定義
log /var/log/openvpn/openvpn.log
log-append /var/log/openvpn/openvpn.log
# 設置日志的級別
#
# 0 is silent, except for fatal errors
# 4 is reasonable for general usage
# 5 and 6 can help to debug connection problems
# 9 is extremely verbose
verb 3
# Silence repeating messages. At most 20
# sequential messages of the same message
# category will be output to the log.
;mute 20
--------------------------
創建日志目錄:
# mkdir -p /var/log/openvpn/
啟動openvpn server
# /usr/local/openvpn/sbin/openvpn --config /etc/openvpn/server.conf &
設置開機啟動:
# echo "/usr/local/openvpn/sbin/openvpn --config /etc/openvpn/server.conf > /dev/null 2>&1 &" >> /etc/rc.local
client端:
六.安裝WINDOWS客戶端(WIN7 64bit)
1.下載客戶端,並默認安裝:
http://vpntech.googlecode.com/files/openvpn-2.1.1-gui-1.0.3-install-cn-64bit.zip
2.將服務端打包文件解壓,並將包內ca.crt、client1.crt、client1.key復制到客戶端C:\Program Files\OpenVPN\config下.
3.在C:\Program Files\OpenVPN\config下創建client.ovpn文件
內容如下:
-----------------------
# 定義是一個客戶端
client
# 定義使用路由IP模式,與服務端一致
;dev tap
dev tun
# 定義Windows下使用的網卡名稱,linux不需要
;dev-node MyTap
# 定義使用的協議,與服務端一致
;proto tcp
proto tcp
# 指定服務端地址和端口,可以用多行指定多台服務器
# 實現負載均衡(從上往下嘗試)
remote 192.168.100.90 1194
;remote my-server-2 1194
# 若上面配置了多台服務器,讓客戶端隨機連接
;remote-random
# 解析服務器域名
# Keep trying indefinitely to resolve the
# host name of the OpenVPN server. Very useful
# on machines which are not permanently connected
# to the internet such as laptops.
resolv-retry infinite
# 客戶端不需要綁定端口
# Most clients do not need to bind to
# a specific local port number.
nobind
# 也是為了讓Openvpn也nobody運行(安全)
# 注意:Windows不能設置
;user nobody
;group nobody
# Try to preserve some state across restarts.
persist-key
persist-tun
# 若客戶端通過HTTP Proxy,在這裡設置
# 要使用Proxy,不能使用UDP為VPN的通訊協議
;http-proxy-retry # retry on connection failures
;http-proxy [proxy server] [proxy port #]
# 無線網絡有很多多余的頭文件,設置忽略它
;mute-replay-warnings
# 重點,就是指定ca和客戶端的證書
ca ca.crt
cert client1.crt
key client1.key
# 如果服務端打開了PAM認證模塊,客戶端需要另其有效
;auth-user-pass
# 一些安全措施
# Verify server certificate by checking
# that the certicate has the nsCertType
# field set to "server". This is an
# important precaution to protect against
# a potential attack discussed here:
# http://openvpn.net/howto.html#mitm
#
# To use this feature, you will need to generate
# your server certificates with the nsCertType
# field set to "server". The build-key-server
# script in the easy-rsa folder will do this.
;ns-cert-type server
# If a tls-auth key is used on the server
# then every client must also have the key.
;tls-auth ta.key 1
# Select a cryptographic cipher.
# If the cipher option is used on the server
# then you must also specify it here.
;cipher x
# 使用lzo壓縮,與服務端一致
comp-lzo
# Set log file verbosity.
verb 3
# Silence repeating messages
;mute 20
-----------------------
5.連接:
在右下角的openvpn圖標上右擊,選擇“Connect”,若能正常分配IP,則連接成功。
6.最終測試:
C:\Users\Administrator>ipconfig/all
---------------------------------------
...............
以太網適配器 本地連接* 12:
連接特定的 DNS 後綴 . . . . . . . :
描述. . . . . . . . . . . . . . . : TAP-Win32 Adapter V9
物理地址. . . . . . . . . . . . . : 00-FF-45-FB-F5-E2
DHCP 已啟用 . . . . . . . . . . . : 是
自動配置已啟用. . . . . . . . . . : 是
本地鏈接 IPv6 地址. . . . . . . . : fe80::848d:bd1d:c1f4:fb51%27(首選)
IPv4 地址 . . . . . . . . . . . . : 10.8.0.6(首選)
子網掩碼 . . . . . . . . . . . . : 255.255.255.252
獲得租約的時間 . . . . . . . . . : 2013年6月15日 22:36:59
租約過期的時間 . . . . . . . . . : 2014年6月15日 22:36:59
默認網關. . . . . . . . . . . . . :
DHCP 服務器 . . . . . . . . . . . : 10.8.0.5
DHCPv6 IAID . . . . . . . . . . . : 453050181
.....................
----------------------------------
在vpn client上ping intranet server 主機IP:172.24.30.10
C:\Users\Administrator>ping 172.24.30.10
-------------------------
正在 Ping 172.24.30.10 具有 32 字節的數據:
來自 172.24.30.10 的回復: 字節=32 時間=2ms TTL=63
來自 172.24.30.10 的回復: 字節=32 時間<1ms TTL=63
來自 172.24.30.10 的回復: 字節=32 時間<1ms TTL=63
來自 172.24.30.10 的回復: 字節=32 時間<1ms TTL=63
--------------------------
大功告成。。。
七.注意事項:
(這裡參考並感謝酒哥的“構建高可用LINUX服務器”一書)
1.公司如果有同事離職,如何注銷該用戶VPN證書:
注:這裡需保持openvpn服務正常開啟
# cd /etc/openvpn/easy-rsa/easy-rsa/2.0
# ./revoke-full client2
如果報錯,則注釋掉該目錄下openssl.cnf文件若干行內容,如下:
(實際情況執行上面的操作,直接可注銷該用戶)
-------------------------
#[pkcs11_section]
#engine_id = pkcs11
#dynamic_path = /usr/lib/engines/engine_pkcs11.so
#MODULE_PATH = $EVN::PKCS11_MODULE_PATH
#PIN = $ EVN::PKCS!!_PIN
#init =0
-------------------------
重新注銷:
# ./revoke-full client2
若末行返回error23則賬號注銷成功,但需完全注銷掉還需做如下配置:
# vi /etc/openvpn/server.conf
末行添加如下內容保證每次在重啟加載openvpn配置文件時都會重新加載crl.pem文件:
-----------------------
crl-verify /etc/openvpn/easy-rsa/easy-rsa/2.0/keys/crl.pem
-----------------------
注:crl.pem為注銷的用戶的黑名單,可以理解為每次啟動openvpn時,加載一次黑名單操作,保證最新被吊銷的證書無法使用。
重啟openvpn:
# killall openvpn
# /usr/local/openvpn/sbin/openvpn --config /etc/openvpn/server.conf &
在客戶端服務器使用client2證書驗證該證書是否能夠使用
最終確定該證書無法連接openvpn服務器
2.更改證書有效期,提高證書的安全性:
默認證書的有效期是3650天,也就是10年
# cd /etc/openvpn/easy-rsa/easy-rsa/2.0
# vi pkitool
搜索到兩處默認有效期天數"3650",修改該為你需要設置的天數保存即可
下次執行該腳本制作客戶端證書時,期限就會更改為新的天數。
進階:
openvpn作為內網server提供遠程VPN服務解決方案:
有充裕預算的公司可以搭建openvpn的負載均衡,這裡可以把兩台服務器掛到內網交換機上,利用一台防火牆隔離內外網,並做分別作到內網這兩台openvpn服務器的兩條端口映射,保證兩台服務器與其他內網服務器同網段,且兩台openvpn配置相同。
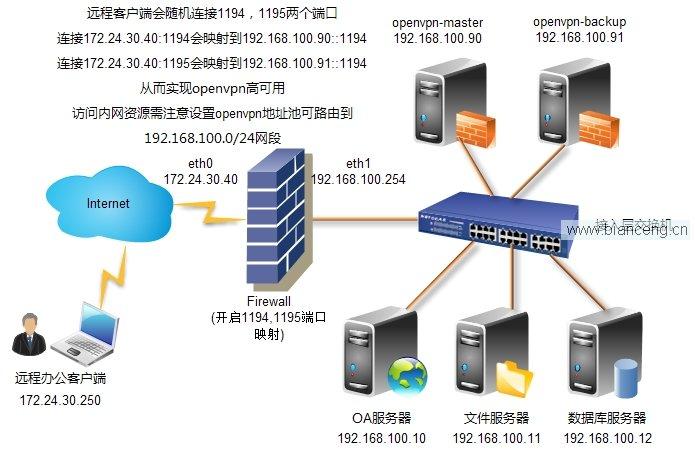
這個方案其實適用於在項目後期,如果已經架設好防火牆,在既保留現有防火牆的情況下又想遠程客戶端訪問內網資源,其實就可以利用原有防火牆做一個到內網openvpn服務器1194端口的映射,只要能保證openvpn服務器與其他內網資源在同一網段,或者可路由網段,就能起到遠程VPN訪問功能。
(openvpn-server)
1.打開ip_forward(略)
2.做openvpn地址池網段數據可轉發出eth0口的策略
# iptables -t nat -A POSTROUTING -s 10.8.0.0/24 -o eth0 -j MASQUERADE
3.保證openvpn配置文件做了到內網的路由
---------------------
push "route 192.168.100.0 255.255.255.0"
---------------------
其他配置與網關openvpn模式一致。
最後在客戶端配置文件(C:\Program Files\OpenVPN\config\client.ovpn)裡添加如下內容:
------------------
remote 172.24.30.40 1194
remote 172.24.30.40 1195
.....
remote-random
------------------
這行客戶端會隨機連接這2台服務器地址,從而利用其作為代理訪問網內其他資源。
--------大功告成----------
作者:51cto博客 一路向北