系統環境: Centos7 vmware
redis版本:redis3.2.5
redis3.2.5需要高版本的ruby和gem,我這邊ruby用的最新版本2.3.3,低版本的ruby創建集群的時候會出錯
安裝步驟:
一、所需工具初始化
1、安裝開發包
#yum install openssl* openssl-devel zlib-devel gcc gcc-c++ make autoconf readline-devel curl-devel expat-devel gettext-developenssl、zlib、gcc在安裝ruby和gem的時候需要 2、安裝ruby
# wget https://cache.ruby-lang.org/pub/ruby/2.3/ruby-2.3.3.tar.gz# tar zxvf ruby-2.0.0-p247.tar.gz# cd ruby-2.0.0-p247# ./configure # make && make install# ruby -v 3、安裝redis-gem
# wget https://rubygems.global.ssl.fastly.net/gems/redis-3.2.1.gem# gem install redis-3.2.1.gem 二、rediscluster構建 1、redis下載安裝
# wget http://download.redis.io/releases/redis-3.2.5.tar.gz # tar -zxf redis-3.2.5.tar.gz# cd redis-3.2.5# make && make install2、集群配置 創建6個redis.conf文件(cluster最少需要6個節點)
# mkdir conf# cd conf# vi redis-6379.conf# cp redis-6379.conf redis-6380.conf # cp redis-6379.conf redis-6381.conf # cp redis-6379.conf redis-6382.conf # cp redis-6379.conf redis-6383.conf # cp redis-6379.conf redis-6384.confport 6379daemonize yesdir /data/redis/redis-6379logfile /data/redis/redis-7000/redis-6379.logpidfile /var/run/redis-6379.pid dbfilename dump-6379.rdb appendonly yes appendfilename "appendonly-6379.aof" cluster-enabled yes cluster-config-file nodes-6379.conf cluster-node-timeout 5000 protected-mode no#關閉保護模式說明:protected-mode 功能參考如下鏈接
http://arui.me/index.php/archives/151/
3、啟動服務
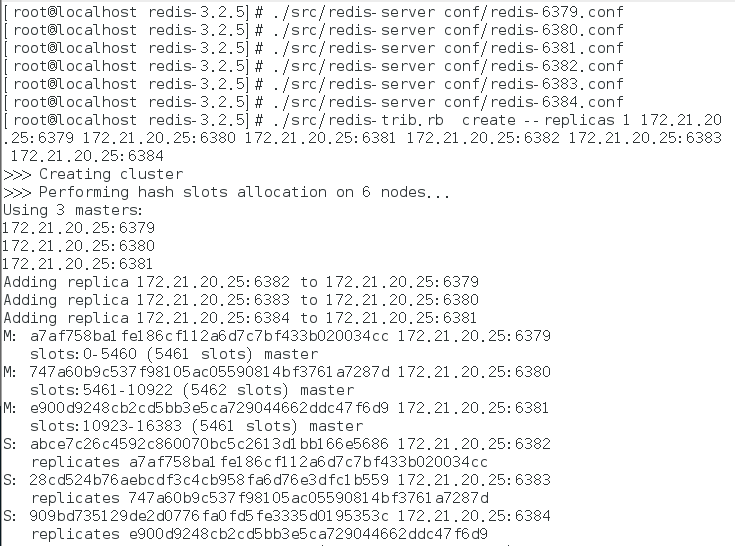
# ./src/redis-server conf/redis-6379.conf# ./src/redis-server conf/redis-6380.conf# ./src/redis-server conf/redis-6381.conf# ./src/redis-server conf/redis-6382.conf# ./src/redis-server conf/redis-6383.conf# ./src/redis-server conf/redis-6384.conf4、創建集群 使用第二個(IP)創建,用127.0.0.1創建的jediscluster連接不上; –replicas 1的意思是每個master有1個slave
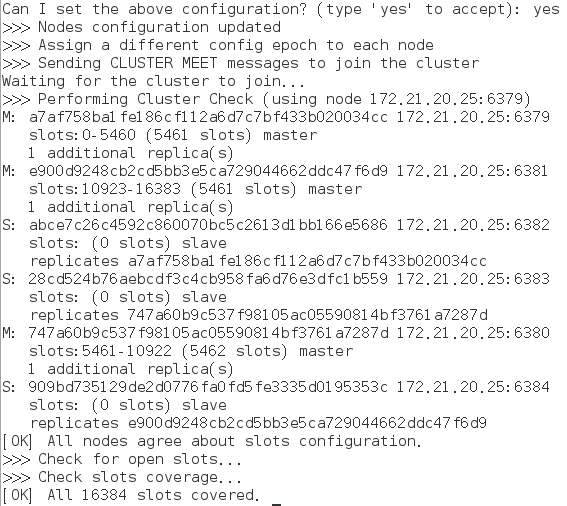
# ./src/redis-trib.rb create --replicas 1 127.0.0.1:6379 127.0.0.1:6380 127.0.0.1:6381 127.0.0.1:6382 127.0.0.1:6383 127.0.0.1:6384# ./src/redis-trib.rb create --replicas 1 172.21.20.25:6379 172.21.20.25:6380 172.21.20.25:6381 172.21.20.25:6382 172.21.20.25:6383 172.21.20.25:6384
 5、集群檢測
#redis-cli -h 172.21.20.25 -p 6379三、客戶端鏈接 客戶端采用的jediscluster,采用的springboot 1、maven jar
<dependency> <groupId>redis.clients</groupId> <artifactId>jedis</artifactId> <version>2.9.0</version><!--$NO-MVN-MAN-VER$--></dependency>2、bean注入
package com.hive.data.redis.config;import org.apache.commons.pool2.impl.GenericObjectPoolConfig;import org.springframework.beans.factory.annotation.Autowired;import org.springframework.boot.context.properties.EnableConfigurationProperties;import org.springframework.context.annotation.Bean;import org.springframework.context.annotation.Configuration;import redis.clients.jedis.HostAndPort;import redis.clients.jedis.JedisCluster;import java.util.HashSet;import java.util.List;import java.util.Set;@Configuration@EnableConfigurationProperties(RedisSettings.class)public class JedisClusterConfig { @Autowired private RedisSettings redisSettings; @Bean public JedisCluster jedisCluster() { Set<HostAndPort> set = new HashSet<HostAndPort>(); List<String> hostPorts = redisSettings.getNodes(); if (null != hostPorts && hostPorts.size() > 0) { String[] ipPortPair; for (String hostPort : hostPorts) { ipPortPair = hostPort.split(":"); set.add(new HostAndPort(ipPortPair[0], Integer.parseInt(ipPortPair[1]))); } } return new JedisCluster(set,300000); } @Bean public GenericObjectPoolConfig genericObjectPoolConfig(){ GenericObjectPoolConfig config=new GenericObjectPoolConfig(); config.setMaxTotal(500); config.setMaxIdle(5); config.setMaxWaitMillis(1000*100); config.setTestOnBorrow(true); return config; }}package com.hive.data.redis.config;import org.springframework.boot.context.properties.ConfigurationProperties;import java.util.List;@ConfigurationProperties(locations = "classpath:redis.properties",prefix = "redis.cluster")public class RedisSettings { private List<String> nodes; public List<String> getNodes() { return nodes; } public void setNodes(List<String> nodes) { this.nodes = nodes; }}redis.propertiesredis.cluster.nodes[0] =172.21.20.25:6379redis.cluster.nodes[1] =172.21.20.25:6380redis.cluster.nodes[2] =172.21.20.25:6381redis.cluster.nodes[3] =172.21.20.25:6382redis.cluster.nodes[4] =172.21.20.25:6383redis.cluster.nodes[5] =172.21.20.25:6384四、防火牆關閉
我的虛擬機是centos7的默認防火牆,7以下默認是iptables的。
systemctl stop firewalld.service # 關閉防火牆systemctl stop firewalld.service #停止firewallsystemctl disable firewalld.service #禁止firewall開機啟動iptables設置方法 重啟後永久性生效: 開啟:chkconfig iptables on 關閉:chkconfig iptables off 即時生效,重啟後失效: 開啟:service iptables start
關閉: service iptables stop 重啟:service iptables restart 保存配置:service iptables save 或者/etc/rc.d/init.d/iptables save 設置防火牆開機啟動 systemctl enable iptables.service 禁止防火牆在系統啟動時啟動 /sbin/chkconfig –level 2345 iptables off
參考文獻:
cluster密碼設置>http://www.07net01.com/2016/10/1691935.html
http://xxxxxx/Linuxjc/1184784.html TechArticle