Linux輸入設備總類繁雜,常見的包括有按鍵、鍵盤、觸摸屏、鼠標、搖桿等等,他們本身就是字符設備,而linux內核將這些設備的共同性抽象出來,簡化驅動開發建立了一個input子系統。子系統共分為三層,如圖1所示。
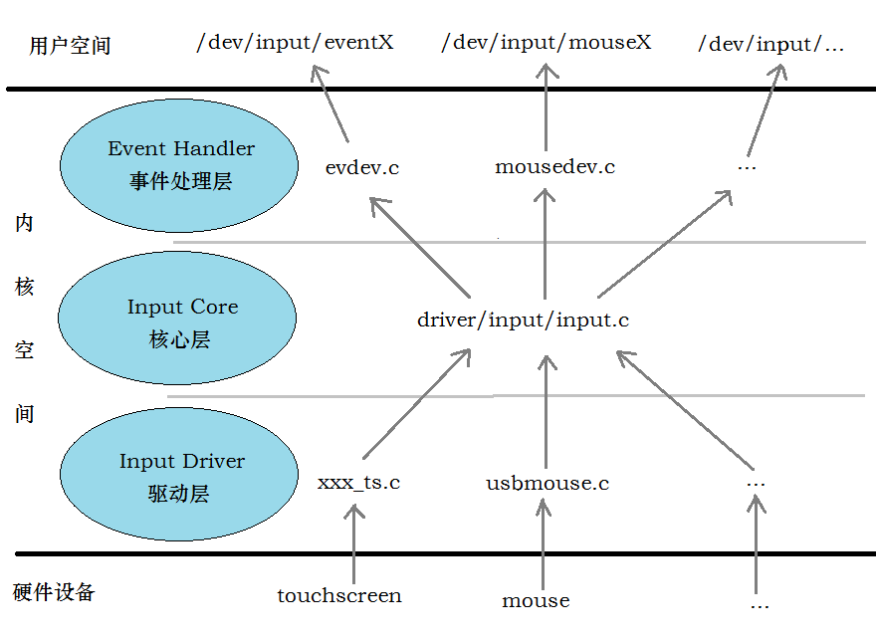
圖1 input輸入子系統
驅動層和硬件相關,直接捕捉和獲取硬件設備的數據信息等(包括觸摸屏被按下、按下位置、鼠標移動、鍵盤按下等等),然後將數據信息報告到核心層。核心層負責連接驅動層和事件處理層,設備驅動(device
driver)和處理程序(handler)的注冊需要通過核心層來完成,核心層接收來自驅動層的數據信息,並將數據信息選擇對應的handler去處理,最終handler將數據復制到用戶空間。
先了解三個定義在/linux/input.h下重要的結構體input_dev、input_handler、input_handle。
struct input_dev {
void *private;
const char *name;
const char *phys;
const char *uniq;
struct input_id id; //與input_handler匹配用的id unsigned long evbit[NBITS(EV_MAX)]; //設備支持的事件類型 unsigned long keybit[NBITS(KEY_MAX)]; //按鍵事件支持的子事件類型 unsigned long relbit[NBITS(REL_MAX)];
unsigned long absbit[NBITS(ABS_MAX)]; //絕對坐標事件支持的子事件類型 unsigned long mscbit[NBITS(MSC_MAX)];
unsigned long ledbit[NBITS(LED_MAX)];
unsigned long sndbit[NBITS(SND_MAX)];
unsigned long ffbit[NBITS(FF_MAX)];
unsigned long swbit[NBITS(SW_MAX)];
int ff_effects_max;
unsigned int keycodemax;
unsigned int keycodesize;
void *keycode;
unsigned int repeat_key;
struct timer_list timer;
struct pt_regs *regs;
int state;
int sync;
int abs[ABS_MAX + 1];
int rep[REP_MAX + 1];
unsigned long key[NBITS(KEY_MAX)];
unsigned long led[NBITS(LED_MAX)];
unsigned long snd[NBITS(SND_MAX)];
unsigned long sw[NBITS(SW_MAX)];
int absmax[ABS_MAX + 1]; //絕對坐標事件的最大鍵值 int absmin[ABS_MAX + 1]; //絕對坐標事件的最小鍵值 int absfuzz[ABS_MAX + 1];
int absflat[ABS_MAX + 1];
int (*open)(struct input_dev *dev);
void (*close)(struct input_dev *dev);
int (*accept)(struct input_dev *dev, struct file *file);
int (*flush)(struct input_dev *dev, struct file *file);
int (*event)(struct input_dev *dev, unsigned int type, unsigned int code, int value);
int (*upload_effect)(struct input_dev *dev, struct ff_effect *effect);
int (*erase_effect)(struct input_dev *dev, int effect_id);
struct input_handle *grab; //當前占有該設備的handle struct mutex mutex; /* serializes open and close operations */
unsigned int users; //打開該設備的用戶量
struct class_device cdev;
struct device *dev; /* will be removed soon */
int dynalloc; /* temporarily */
struct list_head h_list; //該鏈表頭用於鏈接該設備所關聯的input_handle struct list_head node; //該鏈表頭用於將設備鏈接到input_dev_list};
Input_dev是一個很強大的結構體,它把所有的input設備(觸摸屏、鍵盤、鼠標等)的信息都考慮到了,對於觸摸屏來說只用到它裡面的一部分而已,尤其是加粗的部分,注意該結構體中最後兩行定義的兩個list_head結構體,list_head在/linux/list.h中有定義,深入跟蹤
struct list_head {
struct list_head *next, *prev;
};
該結構體內部並沒有定義數據而只定義了兩個指向本身結構體的指針,預先說明一下,所有的input device在注冊後會加入一個input_dev_list(輸入設備鏈表),所有的eventhandler在注冊後會加入一個input_handler_list(輸入處理程序鏈表),這裡的list_head主要的作用是作為input_dev_list和input_handler_list的一個節點來保存地址。Input_dev_list和input_handler_list之間的對應關系由input_handle結構體橋接,具體後面說明。
struct input_handler {
void *private;
void (*event)(struct input_handle *handle, unsigned int type, unsigned int code, int value);
struct input_handle* (*connect)(struct input_handler *handler, struct input_dev *dev, struct input_device_id *id);
void (*disconnect)(struct input_handle *handle);
const struct file_operations *fops; //提供給用戶對設備操作的函數指針 int minor;
char *name;
struct input_device_id *id_table; //與input_dev匹配用的id struct input_device_id *blacklist; //標記的黑名單
struct list_head h_list; //用於鏈接和該handler相關的handle struct list_head node; //用於將該handler鏈入input_handler_list};
input_handler顧名思義,它是用來處理input_dev的一個結構體,相關的處理函數在結構裡內部都有定義,最後兩行定義的list_head結構體作用同input_dev所定義的一樣,這裡不再說明。
注:input_device_id結構體在/linux/mod_devicetable.h中有定義
struct input_handle {
void *private;
int open; //記錄設備打開次數
char *name;
struct input_dev *dev; //指向所屬的input_dev struct input_handler *handler; //指向所屬的input_handler struct list_head d_node; //用於鏈入所指向的input_dev的handle鏈表 struct list_head h_node; //用於鏈入所指向的input_handler的handle鏈表};
可以看到input_handle中擁有指向input_dev和input_handler的指針,即input_handle是用來關聯input_dev和input_handler。為什麼用input_handle來關聯input_dev和input_handler而不將input_dev和input_handler直接對應呢?因為一個device可以對應多個handler,而一個handler也可處理多個device。就如一個觸摸屏設備可以對應event
handler也可以對應tseve handler。
input_dev、input_handler、input_handle的關系如下圖2所示。
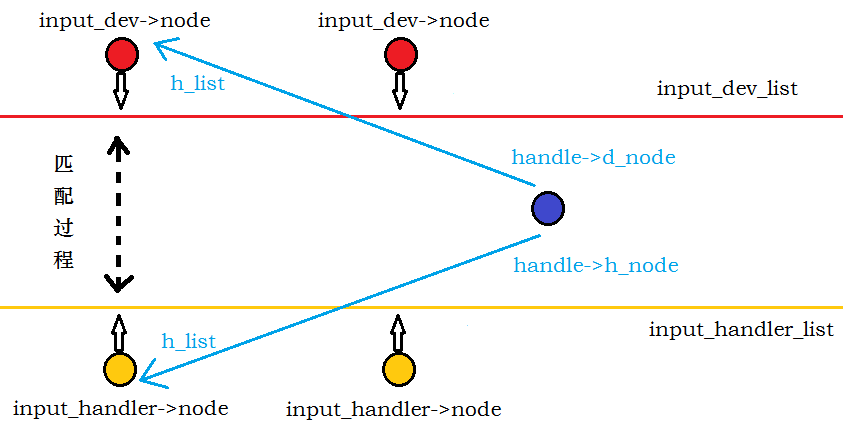
圖2 input_dev,input_handler,input_handle關系圖
第二章、input device的注冊 Input device的注冊實際上僅僅只有幾行代碼,因為在input.c中已經將大量的代碼封裝好了,主需要調用幾個關鍵的函數就能完成對input
device的注冊。
在xxx_ts.c中預先定義全局變量struct
input_dev tsdev;然後進入到初始化函數
static int __init xxx_probe(struct platform_device *pdev)
{
…
if (!(tsdev = input_allocate_device()))
{
printk(KERN_ERR "tsdev: not enough memory\n");
err = -ENOMEM;
goto fail;
}
…
tsdev->name = "xxx TouchScreen"; //xxx為芯片型號
tsdev ->phys = "xxx/event0";
tsdev ->id.bustype = BUS_HOST; //設備id,用於匹配handler的id
tsdev ->id.vendor = 0x0005;
tsdev ->id.product = 0x0001;
tsdev ->id.version = 0x0100;
tsdev ->open = xxx_open;
tsdev ->close =xxx_close;
tsdev ->evbit[0] = BIT(EV_KEY) | BIT(EV_ABS) | BIT(EV_SYN); //設置支持的事件類型
tsdev ->keybit[LONG(BTN_TOUCH)] = BIT(BTN_TOUCH);
input_set_abs_params(tsdev,
ABS_X, 0, 0x400, 0, 0); //限定絕對坐標X的取值范圍
input_set_abs_params(tsdev, ABS_Y, 0, 0x400, 0, 0); //同上
input_set_abs_params(tsdev, ABS_PRESSURE, 0, 1000, 0, 0); //觸摸屏壓力值范圍
…
If(input_register_device(tsdev) == error) //注冊設備
goto fail;
…
fail:
input_free_device(tsdev);
printk(“ts probe failed\n”);
return err;
}
先看該函數中的tsdev = input_allocate_device(),深入最終,該函數在input.c中有定義
struct input_dev *input_allocate_device(void)
{
struct input_dev *dev;
dev = kzalloc(sizeof(struct input_dev), GFP_KERNEL); if (dev) {
dev->dynalloc = 1;
dev->cdev.class = &input_class;
class_device_initialize(&dev->cdev);
INIT_LIST_HEAD(&dev->h_list);
INIT_LIST_HEAD(&dev->node);
}
return dev;
}
學過C語言應該都知道malloc函數(開辟內存空間),而這裡的kzalloc也類似於C語言中的malloc一樣,是linux內核空間分配內存函數,後面的GFP_KERNEL標志意為常規的內存分配,更多的分配標志可參閱先關資料(我也不懂)。再回到前面的函數中來,接著後面的代碼為對tsdev結構體中的成員進行賦值初始化,賦值完成後就要開始進入主題:注冊設備了,進入到函數input_register_device(tsdev),該函數在input.c中有定義。
int input_register_device(struct input_dev *dev)
{
static atomic_t input_no = ATOMIC_INIT(0); //定義原子變量,禁止線程並發訪問
struct input_handle *handle; //定義一些變量備後文使用
struct input_handler *handler;
struct input_device_id *id;
const char *path;
int error;
if (!dev->dynalloc) {
printk(KERN_WARNING "input: device %s is statically allocated, will not register\n"
"Please convert to input_allocate_device() or contact dtor_core@ameritech.net\n",
dev->name ? dev->name : "<Unknown>");
return -EINVAL;
}
mutex_init(&dev->mutex); //互斥鎖初始化,防止臨界區代碼被並發訪問 set_bit(EV_SYN, dev->evbit); //設置支持同步事件,input設備全部默認支持同步事件 /*
* If delay and period are pre-set by the driver, then autorepeating
* is handled by the driver itself and we don't do it in input.c.
*/
init_timer(&dev->timer);
if (!dev->rep[REP_DELAY] && !dev->rep[REP_PERIOD]) {
dev->timer.data = (long) dev;
dev->timer.function = input_repeat_key;
dev->rep[REP_DELAY] = 250;
dev->rep[REP_PERIOD] = 33;
}
INIT_LIST_HEAD(&dev->h_list); //初始化需要關聯的handle鏈表頭 list_add_tail(&dev->node, &input_dev_list); //將設備添加到input_dev_list中 dev->cdev.class = &input_class;
snprintf(dev->cdev.class_id, sizeof(dev->cdev.class_id),
"input%ld", (unsigned long) atomic_inc_return(&input_no) - 1);
error = class_device_add(&dev->cdev);
if (error)
return error;
error = sysfs_create_group(&dev->cdev.kobj, &input_dev_attr_group);
if (error)
goto fail1;
error = sysfs_create_group(&dev->cdev.kobj, &input_dev_id_attr_group);
if (error)
goto fail2;
error = sysfs_create_group(&dev->cdev.kobj, &input_dev_caps_attr_group);
if (error)
goto fail3;
__module_get(THIS_MODULE);
path = kobject_get_path(&dev->cdev.kobj, GFP_KERNEL);
printk(KERN_INFO "input: %s as %s\n",
dev->name ? dev->name : "Unspecified device", path ? path : "N/A");
kfree(path);
/*** 遍歷input_handler_list上全部的handler,尋找與該設備匹配的handler ***/ list_for_each_entry(handler, &input_handler_list, node) if (!handler->blacklist || !input_match_device(handler->blacklist, dev)) if ((id = input_match_device(handler->id_table, dev))) if ((handle = handler->connect(handler, dev, id))) input_link_handle(handle); input_wakeup_procfs_readers();
return 0;
fail3: sysfs_remove_group(&dev->cdev.kobj, &input_dev_id_attr_group);
fail2: sysfs_remove_group(&dev->cdev.kobj, &input_dev_attr_group);
fail1: class_device_del(&dev->cdev);
return error;
}
先看函數中前面代碼加粗的部分
mutex_init(&dev->mutex),與互斥鎖相關的東西(我也不太懂),
set_bit(EV_SYN,
dev->evbit)設置支持同步事件,linux的input子系統默認要支持同步事件。
接著看中間代碼加粗的部分,有關list操作的在/linux/list.h中有定義
static inline void INIT_LIST_HEAD(struct list_head *list)
{
list->next = list;
list->prev = list;
}
static inline void list_add_tail(struct list_head *new, struct list_head *head)
{
__list_add(new, head->prev, head);
}
static inline void __list_add(struct list_head *new,
struct list_head *prev,
struct list_head *next)
{
next->prev = new;
new->next = next;
new->prev = prev;
prev->next = new;
}
可以看得出INIT_LIST_HEAD(struct list_head *list)就是讓list指向結構體的成員再指向其本身完成初始化操作,list_add_tail(struct
list_head *new, struct list_head *head)是將new所指向的結構體作為一節點插入到head所指向鏈表節點之前。因此函數中的
list_add_tail(&dev->node,
&input_dev_list)就是將該設備添加到input_dev_list中。而input_dev_list這個雙向鏈表在什麼時候被定義了呢,且看input.c源代碼開始部分全局部分有定義:
static LIST_HEAD(input_dev_list);static LIST_HEAD(input_handler_list);而LIST_HEAD的宏定義:#define LIST_HEAD_INIT(name) { &(name), &(name) }#define LIST_HEAD(name) \ struct list_head name = LIST_HEAD_INIT(name)顯然這在最開始就已經定義了input_dev_list和input_handler_list這兩個鏈表,且這兩個鏈表都只有一個節點,而在device和handler注冊的時候會在這兩條鏈表中加入節點,
list_add_tail(&dev->node,
&input_dev_list)就是將該設備添加到input_dev_list中。
注意最後代碼加粗的部分,該部分完成了input_dev和input_handler的橋接。先看
list_for_each_entry(handler,
&input_handler_list, node),
list_for_each_entry在list.h中有定義,其作用相當於一個for循環。其約等價於:(個人理解)
for(handler = input_handler_list表頭所屬的input_handler結構體地址;
handler != input_handler_list表尾所屬的input_handler結構體地址;
handler++)
即handler第一次指向input_handler_list的頭部所在的input_handler地址。每循環一次handler就沿著input_handler_list移動到下一個節點,得到下一節點所屬的handler地址,直到input_handler_list的結尾。而每次的循環需要做什麼呢?要做的就是遍歷input_handler_list上的每一個handler,看有哪些handler能與該設備匹配的上。匹配過程:
if (!handler->blacklist || !input_match_device(handler->blacklist, dev))//判斷該handler沒有被列入黑名單或者黑名單匹配不成功的話則繼續
if ((id = input_match_device(handler->id_table, dev))) //將設備id與handler的id進行匹配,成功則繼續往下
if ((handle = handler->connect(handler, dev, id))) //鏈接device與handler,成功則繼續往下
input_link_handle(handle); //將handle鏈入input_handler_list和input_dev_list
繼續跟蹤進這些函數
static struct input_device_id *input_match_device(struct input_device_id *id, struct input_dev *dev){ int i; for (; id->flags || id->driver_info; id++) { if (id->flags & INPUT_DEVICE_ID_MATCH_BUS) //匹配handler和device id的flag標志位 if (id->bustype != dev->id.bustype) continue; if (id->flags & INPUT_DEVICE_ID_MATCH_VENDOR) if (id->vendor != dev->id.vendor) continue; if (id->flags & INPUT_DEVICE_ID_MATCH_PRODUCT) if (id->product != dev->id.product) continue; if (id->flags & INPUT_DEVICE_ID_MATCH_VERSION) if (id->version != dev->id.version) continue; MATCH_BIT(evbit, EV_MAX); //匹配id相關標志位 MATCH_BIT(keybit, KEY_MAX); MATCH_BIT(relbit, REL_MAX); MATCH_BIT(absbit, ABS_MAX); MATCH_BIT(mscbit, MSC_MAX); MATCH_BIT(ledbit, LED_MAX); MATCH_BIT(sndbit, SND_MAX); MATCH_BIT(ffbit, FF_MAX); MATCH_BIT(swbit, SW_MAX); return id; } return NULL;}該函數用於匹配input_dev結構體和input_handler結構體裡面定義的input_device_id,若兩者裡面有任何相關變量不一樣則匹配失敗(條件真苛刻)。
再看
handle = handler->connect(handler, dev, id),connect函數即為static
struct input_handle *evdev_connect(struct input_handler *handler, struct input_dev *dev, struct input_device_id *id),為什麼呢會是這個呢,我們先看evdev.c中的input_handler結構體定義:
static struct input_handler evdev_handler = {
.event = evdev_event,
.connect = evdev_connect,
.disconnect = evdev_disconnect,
.fops = &evdev_fops,
.minor = EVDEV_MINOR_BASE,
.name = "evdev",
.id_table = evdev_ids,
};
可只這裡input_handler結構體裡邊的connect函數即為evdev_connect函數
static struct input_handle *evdev_connect(struct input_handler *handler, struct input_dev *dev, struct input_device_id *id)
{
1 struct evdev *evdev; //定義一個evdev結構體指針 struct class_device *cdev;
int minor;
2 for (minor = 0; minor < EVDEV_MINORS && evdev_table[minor]; minor++); if (minor == EVDEV_MINORS) {
printk(KERN_ERR "evdev: no more free evdev devices\n");
return NULL;
}
3
if (!(evdev = kzalloc(sizeof(struct evdev), GFP_KERNEL))) return NULL; INIT_LIST_HEAD(&evdev->list);
init_waitqueue_head(&evdev->wait);
evdev->exist = 1;
evdev->minor = minor;
evdev->handle.dev = dev;
evdev->handle.name = evdev->name;
evdev->handle.handler = handler;
evdev->handle.private = evdev;
sprintf(evdev->name, "event%d", minor);
evdev_table[minor] = evdev;
cdev = class_device_create(&input_class, &dev->cdev,
MKDEV(INPUT_MAJOR, EVDEV_MINOR_BASE + minor),
dev->cdev.dev, evdev->name);
/* temporary symlink to keep userspace happy */
sysfs_create_link(&input_class.subsys.kset.kobj, &cdev->kobj,
evdev->name);
return &evdev->handle;
}
先看1處,這裡有個定義在evdev.c裡邊的新面孔
struct evdev {
int exist;
int open;
int minor;
char name[16];
struct input_handle handle; //關聯input_handler和input_dev的input_handle wait_queue_head_t wait;
struct evdev_list *grab; struct list_head list;
};
evdev這個結構體就是拿來應用開發操作的,在這裡就是觸摸屏對應的設備文件實體,結構體前邊定義了記錄設備的一些信息(設備號,打開狀態、設備名字等),這裡還定義了一個input_handle的實體handle,沒錯這個handle就是要用來關聯input_dev和input_handler的,後面還有一行加粗的部分後面再做介紹。
再看2處,
evdev_table[]是一個全局變量的數組,在evdev.c中有定義
#define EVDEV_MINORS 32
static struct evdev *evdev_table[EVDEV_MINORS];
在前面已經說明了,一個device可以對應多個handler,而一個handler也可處理多個device,這裡體現出了後者。既然evdev這個結構體是對應的設備文件實體,因為這個handler可能會處理多個device,因此該handler要處理n個device就會應該有n個evdev實體,而這些實體的地址存放在evdev_table[]這個指針數組中,也就是說該handler最多只能處理EVDEV_MINORS個device,而2處的這幾句代碼就是要遍歷evdev_table[]這個數組看還有沒有空著的位置,有的話才會繼續進行下面的程序。
再看3處,開辟一個evdev結構體的內存空間,前面有說明過kzalloc函數,這裡不再說明。
後面的代碼就是為evdev結構體變量賦初始值了,其中init_waitqueue_head(&evdev->wait)初始化等待隊列,具體介紹結合/linux/wait.h和查看相關資料(本人不懂)。
函數最後得到evdev結構體內的hanlde地址並返回,此時返回到我們的int
input_register_device(struct input_dev *dev)函數裡面,最後一句
input_link_handle(handle),進入到該函數中發現
static void input_link_handle(struct input_handle *handle)
{
list_add_tail(&handle->d_node, &handle->dev->h_list);
list_add_tail(&handle->h_node, &handle->handler->h_list);
}
在該函數中也只是將handle中的d_node和h_node分別接入到input_dev和input_handler的h_list中,此時input_dev、input_handler、input_handle三者形成了如圖2所示的關系。
至此設備注冊過程算是全部完成了,但是貌似還有點亂。在整個設備的注冊過程中函數的嵌套一個接著一個,不僅函數嵌套,結構體也使用了結構體和函數嵌套等,在各個函數內也用了大量的結構體指針等等。但是在整個過程中input_dev、input_handler、input_handle這三個結構體變量的實體也都只有一個。其中input_dev結構體實體在xxx_ts.c中直接定義了一個input_dev的指針全局變量:struct input_dev *tsdev;並在初始化函數中開辟了一個input_dev的內存空間並讓tsdev指針指向它:w55fa95_dev = input_allocate_device();input_handler結構體在evdev.c中也直接被定義了並初始化了static struct input_handler evdev_handler = { .event = evdev_event, .connect = evdev_connect, .disconnect = evdev_disconnect, .fops = &evdev_fops, .minor = EVDEV_MINOR_BASE, .name = "evdev", .id_table = evdev_ids,};而關聯input_dev和input_handler的input_handle則是在調用鏈接連接函數static
struct input_handle *evdev_connect(struct input_handler *handler, struct input_dev *dev, struct input_device_id *id)的時候,在該函數的內部調用evdev
= kzalloc(sizeof(struct evdev), GFP_KERNEL)開辟了一個evdev結構體的內存空間時創建了,input_handle就是使用了evdev結構體內部定義的input_handle。 一個完整input設備系統不僅要有設備,還需要有處理程序input_handler,而上文中主要介紹的是設備注冊、生成、以及和handler搭配的一個過程,而handler在何時生成的?第三章、input_handler的注冊。 Input_handler是要和用戶層打交道的,在evdev.c中直接定義了一個input_handler結構體並初始化了一些內部成員變量。
static struct input_handler evdev_handler = {
.event = evdev_event,
.connect = evdev_connect,
.disconnect = evdev_disconnect,
.fops = &evdev_fops, //用戶對設備操作的函數指針 .minor = EVDEV_MINOR_BASE,
.name = "evdev",
.id_table = evdev_ids, //指向一個evedev的指針數組};
先看第一行加粗的代碼,evedev_fops結構體的定義如下
static struct file_operations evdev_fops = {
.owner = THIS_MODULE,
.read = evdev_read,
.write = evdev_write,
.poll = evdev_poll,
.open = evdev_open,
.release = evdev_release,
.unlocked_ioctl = evdev_ioctl,
#ifdef CONFIG_COMPAT
.compat_ioctl = evdev_ioctl_compat,
#endif
.fasync = evdev_fasync,
.flush = evdev_flush
};
相信做過linux設備驅動編程的對這都很熟悉了,就是一大堆的用戶接口函數,包括對設備的open、close、read、write、ioctl等函數。
再看第二行代碼加粗的部分
.id_table
= evdev_ids, id.table就是前面所說過要和input_dev的id匹配的這麼一個結構體,這裡讓它初始化為evdev_ids,在看evdev_ids的定義:
static struct input_device_id evdev_ids[] = {
{ .driver_info = 1 }, /* Matches all devices */
{ }, /* Terminating zero entry */
};
MODULE_DEVICE_TABLE(input, evdev_ids);
這裡是一個結構體數組,令數組中第一個結構體的該成員變量driver_info的值為1,其他成員變量均未定義,說明這個handler對所有device的id都能匹配得上。數組中的第二個結構體為空表示結束,用來標識結束配合下面的MODULE_DEVICE_TABLE(input,
evdev_ids)使用,關於MODULE_DEVICE_TABLE宏定義介紹自行查看相關文獻(我也不懂)。
接下來進入正題,input_handler的注冊!
Input_handler的注冊和input_dev的注冊很相似,大同小異罷了,在evdev.c源碼中顯示定義並初始化了一個input_handler結構體並直接給相關的成員變量賦值了,就是本章開始所將的部分,然後再初始化函數中注冊一個input_handler:
static int __init evdev_init(void)
{
input_register_handler(&evdev_handler);
return 0;
}
這裡只調用了一個input_register_handler()函數,看起來應該是很簡單的樣子(相比input_dev的注冊),繼續跟蹤進入到該函數中:
void input_register_handler(struct input_handler *handler)
{
struct input_dev *dev;
struct input_handle *handle;
struct input_device_id *id;
if (!handler) return;
INIT_LIST_HEAD(&handler->h_list); if (handler->fops != NULL)
input_table[handler->minor >> 5] = handler;
list_add_tail(&handler->node, &input_handler_list); list_for_each_entry(dev, &input_dev_list, node) if (!handler->blacklist || !input_match_device(handler->blacklist, dev)) if ((id = input_match_device(handler->id_table, dev))) if ((handle = handler->connect(handler, dev, id))) input_link_handle(handle); input_wakeup_procfs_readers();
}
該函數中代碼加粗的部分,與input_register_device()函數裡的如出一轍,這裡不再做說明。
至此input_handler的注冊已經結束。
第四章、input子系統數據結構 下圖3是以觸摸屏設備為例子的input子系統數據結構圖。
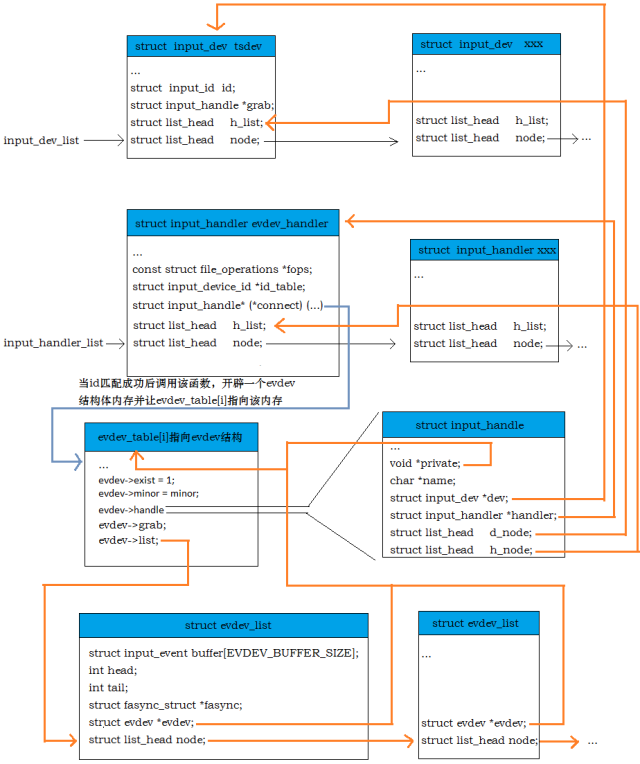
圖3 input子系統數據結構圖進行到這裡,又多冒出來了一個struct evdev_list的結構體,這在之前並沒有提到過,因為在注冊input_dev和input_handler過程中並沒有用到過,查看該結構體:
struct evdev_list {
struct input_event buffer[EVDEV_BUFFER_SIZE]; //存放設備數據信息 int head; //buffer的下標,標識從設備中過來要存放到buffer的數據的位置 int tail; //buffer的下標,標識用戶讀取buffer中數據的下標位置 struct fasync_struct *fasync;
struct evdev *evdev;
struct list_head node;
};
注意裡面的input_event結構體,在/linux/input.h中有定義:
struct input_event {
struct timeval time;
__u16 type;
__u16 code;
__s32 value;
};
該input_event結構體就是存放著用戶層所需的數據信息,這裡想必我們都明白,則在struct
evdev_list結構體中的
struct input_event buffer[EVDEV_BUFFER_SIZE];就是存放著用戶所需的數據信息,從硬件設備(觸摸屏)獲取得到的數據信息最終會存放到該數組中,而struct
evdev_list結構體是在什麼時候定義的呢?
當然是在被open的時候,查看open函數:
static int evdev_open(struct inode * inode,
struct file * file)
{
struct
evdev_list *list; //定義一個evdev_list結構體 int i = iminor(inode) - EVDEV_MINOR_BASE;
int accept_err;
if (i >= EVDEV_MINORS || !evdev_table[
i] || !evdev_table[ i]->exist)
return -ENODEV;
if ((accept_err = input_accept_process(&(evdev_table[
i]->handle), file)))
return accept_err;
if (!(list = kzalloc(sizeof(struct
evdev_list), GFP_KERNEL))) //開辟evdev_list結構體內存空間 return -ENOMEM; list->evdev
= evdev_table[ i]; //令結構體中的evdev指針指向evdec_table[
i] list_add_tail(&list->node,
&evdev_table[ i]->list); //加入鏈表 file->private_data = list;
if
(!list->evdev->open++) //如果設備沒有被open,則繼續if操作 if (list->evdev->exist) input_open_device(&list->evdev->handle); //打開設備 return 0;
}
注意函數中代碼加粗的部分,都有注釋說明,在最後以一個操作
input_open_device(&list->evdev->handle);繼續跟蹤進入該函數
int input_open_device(struct input_handle
*handle)
{
struct input_dev *dev = handle->dev;
int err;
err = mutex_lock_interruptible(&dev->mutex);
if (err)
return err;
handle->open++; //handle的內部成員open++ if (!dev->users++ && dev->open)
err = dev->open(dev);
if (err)
handle->open--;
mutex_unlock(&dev->mutex);
return err;
}
函數中加粗的部分,為什麼要讓open++呢?因為數據要從device傳到handler過程中有一個環節需要判斷handle->open是否為真,為真表示設備已經打開數據可以傳遞,這點在下一章將會介紹到。
第四章、數據傳遞過程 正如圖1所示,從硬件設備(觸摸屏)中獲得的數據需要經過input.c選擇相應的handler進行處理,最後上報到用戶空間。如何從硬件設備(觸摸屏)中獲得數據,那就得看xxx_ts.c中的代碼了,在xxx_ts.c中的源代碼是直接和硬件設備相關的。在xxx_ts.c中我們一方面要完成觸摸屏設備相關的寄存器配置,另一方面要完成將獲得的數據上報。
至於設備初始化配置方面,根據每個人使用的ARM芯片的Datasheet去初始化配置寄存器,這裡也不需要多說了。不管是通過查詢法還是中斷法(我沒見過用查詢的),當觸摸屏按下時候我們會得到觸摸屏被按下的相關數據(主要是被按下的X和Y坐標值),然後需要將數據信息上報,在觸摸屏被按下的時候需要上報:
input_report_key(tsdev, BTN_TOUCH,
1); //報告按鍵被按下事件
input_report_abs(tsdev, ABS_X,
x); //報告觸摸屏被按下的x坐標值
input_report_abs(tsdev, ABS_Y,
y); //報告觸摸屏被按下的y坐標值
input_report_abs(tsdev, ABS_PRESSURE,
1); //報告觸摸屏被按下的壓力值(0或者1)
input_sync(tsdev); //報告同步事件,表示一次事件結束
當觸筆從觸摸屏上抬起時需要上報:
input_report_key(tsdev, BTN_TOUCH,
0); //報告按鍵被松開事件
input_report_abs(tsdev, ABS_PRESSURE,
0); //報告觸摸屏被按下的壓力值(0或者1)
input_sync(tsdev); //報告同步事件,表示一次事件結束
先不管input_sync()函數,先來看input_report_key()和input_report_abs(),這兩個函數在/linux/input.h中有定義:
static inline void input_report_key(struct
input_dev *dev, unsigned int code, int value)
{
input_event(dev, EV_KEY, code, !!value);
}
static inline void input_report_abs(struct
input_dev *dev, unsigned int code, int value)
{
input_event(dev, EV_ABS, code, value);
}
太坑爹了,這兩個函數裡面也就值調用了一個函數(我也不明白linux內核開發者為什麼要這麼做),繼續跟蹤查看input_event()函數,在input.c中有定義:
void input_event(struct input_dev *dev, unsigned
int type, unsigned int code, int value)
{
struct input_handle *handle;
if (type > EV_MAX || !test_bit(type,
dev->evbit))
return;
add_input_randomness(type, code, value);
switch (type) {
…
case
EV_KEY: //判斷為按鍵事件 if (code > KEY_MAX
|| !test_bit(code, dev->keybit) || !!test_bit(code, dev->key) == value) return; if (value == 2) break; change_bit(code,
dev->key); if (test_bit(EV_REP,
dev->evbit) && dev->rep[REP_PERIOD] && dev->rep[REP_DELAY] && dev->timer.data && value) { dev->repeat_key
= code; mod_timer(&dev->timer,
jiffies + msecs_to_jiffies(dev->rep[REP_DELAY])); } case EV_ABS: //判斷為絕對坐標事件 if (code > ABS_MAX
|| !test_bit(code, dev->absbit)) return; if (dev->absfuzz[code])
{ if ((value
> dev->abs[code] - (dev->absfuzz[code] >> 1)) && (value
< dev->abs[code] + (dev->absfuzz[code] >> 1))) return; if ((value
> dev->abs[code] - dev->absfuzz[code]) && (value
< dev->abs[code] + dev->absfuzz[code])) value
= (dev->abs[code] * 3 + value) >> 2; if ((value
> dev->abs[code] - (dev->absfuzz[code] << 1)) && (value
< dev->abs[code] + (dev->absfuzz[code] << 1))) value
= (dev->abs[code] + value) >> 1; }
if
(dev->abs[code] == value) return; dev->abs[code] =
value; break; …
}
if (type != EV_SYN)
dev->sync = 0;
if (dev->grab) //判斷有沒有聲明自定義的處理函數(初始化過程中顯然沒有定義)
dev->grab->handler->event(dev->grab,
type, code, value);
else
list_for_each_entry(handle,
&dev->h_list, d_node) //遍歷handle鏈表 if (handle->open) //如果某節點上的處理程序被打開了 handle->handler->event(handle,
type, code, value); //調用處理函數}
先看該函數中的一個switch結構,這裡只列出了EV_KEY和EV_ABS兩個事件的處理,經過switch選擇處理後看最後代碼加粗的部分。
list_for_each_entry(handle,
&dev->h_list, d_node) 這句類似的前面已經介紹過,這裡不再說明,接下來
if
(handle->open),判斷處理程序是否被打開,還記得是什麼時候打開的嗎?前面有介紹過在evdev.c中的open函數裡面調用了input_open_device(&list->evdev->handle),而在input_open_device()中有這麼一句
handle->open++;沒有錯,只有在經過evdev_open之後才能這裡的條件才能為真,接著看下面的
handle->handler->event(handle,
type, code, value);繼續深入跟蹤:
static void evdev_event(struct input_handle
*handle, unsigned int type, unsigned int code, int value)
{
struct
evdev *evdev = handle->private; struct evdev_list *list;
if (evdev->grab) { //顯然grab並沒有被設置,該條件為假
list = evdev->grab;
do_gettimeofday(&list->buffer[list->head].time);
list->buffer[list->head].type
= type;
list->buffer[list->head].code
= code;
list->buffer[list->head].value
= value;
list->head = (list->head + 1)
& (EVDEV_BUFFER_SIZE - 1);
kill_fasync(&list->fasync, SIGIO,
POLL_IN);
} else
list_for_each_entry(list,
&evdev->list, node) {
do_gettimeofday(&list->buffer[list->head].time); //給buffer成員賦值 list->buffer[list->head].type
= type; list->buffer[list->head].code
= code; list->buffer[list->head].value
= value; list->head = (list->head
+ 1) & (EVDEV_BUFFER_SIZE - 1); kill_fasync(&list->fasync,
SIGIO, POLL_IN);
}
wake_up_interruptible(&evdev->wait); //用來喚醒一個等待隊列(我也不懂)
}
先看前面的
struct
evdev *evdev = handle->private,還記得handler->private嗎,在input_handle結構體中它是一個空指針,在前面有講到在執行static
struct input_handle *evdev_connect(struct input_handler *handler, struct input_dev *dev, struct input_device_id *id)函數的時候就被賦值了(evdev->handle.private
= evdev;)。
再看最後代碼加粗的部分,顯然是給evdev_list結構體中的buffer成員賦上從設備中傳過來的數據,當數據存放好了之後,head加1,當head的值達到EVDEV_BUFFER_SIZE時又回到0;
至此數據的傳遞就算是結束了,接下來就是等著被讀走,只要在用戶空間進行read操作即可。
第五章、數據讀取過程 讀取就變得很簡單了,做過linux編程的都能知道,只要在應用中定義了個input_event結構體,通過open打開設備,然後進行read即可,再來看該設備的read函數:
static ssize_t evdev_read(struct file * file,
char __user * buffer, size_t count, loff_t *ppos)
{
struct evdev_list *list = file->private_data;
int retval;
if (count < evdev_event_size())//每次讀取的字節數至少是input_event的大小
return -EINVAL;
if (list->head == list->tail && list->evdev->exist
&& (file->f_flags & O_NONBLOCK)) //是否滿足讀取條件
return -EAGAIN;
retval = wait_event_interruptible(list->evdev->wait,
list->head != list->tail || (!list->evdev->exist)); //等待喚醒,和前面說的等待隊列對應(我也不懂)
if (retval)
return retval;
if (!list->evdev->exist)
return -ENODEV;
while (list->head != list->tail && retval
+ evdev_event_size() <= count) {
struct input_event *event = (struct
input_event *) list->buffer + list->tail;
if
(evdev_event_to_user(buffer + retval, event)) //復制數據到用戶空間 return -EFAULT;
list->tail = (list->tail + 1)
& (EVDEV_BUFFER_SIZE - 1);
retval += evdev_event_size();
}
return retval;
}
函數前面基本上都是在做一系列的條件判斷,判斷是否符合讀取的條件,
evdev_event_to_user(buffer
+ retval, event)這句是真正的把數據復制到用戶空間,進入查看:
static int evdev_event_to_user(char __user
*buffer, const struct input_event *event)
{
if (copy_to_user(buffer, event, sizeof(struct
input_event)))
return -EFAULT;
return 0;
}
該函裡面也只是調用了copy_to_user()函數而已,該函數相比我們都不會陌生了,就是把event所指向地址空間的數據復制到buffer所指向的地址空間中而已。
再回到read函數中來,函數在末尾返回讀取到的字節數,至於要把這些數據拿去干什麼用,那就是應用層的事情了。
可以看到接口函數中除了read以外還有write、ioctl等函數,因為對於觸摸屏來說我們主要就是要獲取觸筆在觸摸屏上點擊的坐標位置而已,所以write、ioctl等函數會很少用到,這裡就不再做介紹。
注:本文只在一定的層面(本人的理解)上對linux下的input子系統的介紹,裡邊還有很多要點沒有辦法去涉及,只是一個入門級的學習過程,緊限於在在完善的input子系統下進行做驅動修改,而不具備做驅動開發的能力。
--以觸摸屏驅動為例第一章、了解linux input子系統 Linux輸入設備總類繁雜,常見的包括有按鍵、鍵盤、觸摸屏、鼠標、搖桿等等,他們本身就是字符設備,而linux內核將這些設備的共同性抽象出來,簡化驅動開發建立了一個input子系統。子系統共分為三層,如圖1所示。
圖1 input輸入子系統
驅動層和硬件相關,直接捕捉和獲取硬件設備的數據信息等(包括觸摸屏被按下、按下位置、鼠標移動、鍵盤按下等等),然後將數據信息報告到核心層。核心層負責連接驅動層和事件處理層,設備驅動(device
driver)和處理程序(handler)的注冊需要通過核心層來完成,核心層接收來自驅動層的數據信息,並將數據信息選擇對應的handler去處理,最終handler將數據復制到用戶空間。
先了解三個定義在/linux/input.h下重要的結構體input_dev、input_handler、input_handle。
struct input_dev {
void *private;
const char *name;
const char *phys;
const char *uniq;
struct input_id id; //與input_handler匹配用的id unsigned long evbit[NBITS(EV_MAX)]; //設備支持的事件類型 unsigned long keybit[NBITS(KEY_MAX)]; //按鍵事件支持的子事件類型 unsigned long relbit[NBITS(REL_MAX)];
unsigned long absbit[NBITS(ABS_MAX)]; //絕對坐標事件支持的子事件類型 unsigned long mscbit[NBITS(MSC_MAX)];
unsigned long ledbit[NBITS(LED_MAX)];
unsigned long sndbit[NBITS(SND_MAX)];
unsigned long ffbit[NBITS(FF_MAX)];
unsigned long swbit[NBITS(SW_MAX)];
int ff_effects_max;
unsigned int keycodemax;
unsigned int keycodesize;
void *keycode;
unsigned int repeat_key;
struct timer_list timer;
struct pt_regs *regs;
int state;
int sync;
int abs[ABS_MAX + 1];
int rep[REP_MAX + 1];
unsigned long key[NBITS(KEY_MAX)];
unsigned long led[NBITS(LED_MAX)];
unsigned long snd[NBITS(SND_MAX)];
unsigned long sw[NBITS(SW_MAX)];
int absmax[ABS_MAX + 1]; //絕對坐標事件的最大鍵值 int absmin[ABS_MAX + 1]; //絕對坐標事件的最小鍵值 int absfuzz[ABS_MAX + 1];
int absflat[ABS_MAX + 1];
int (*open)(struct input_dev *dev);
void (*close)(struct input_dev *dev);
int (*accept)(struct input_dev *dev, struct file *file);
int (*flush)(struct input_dev *dev, struct file *file);
int (*event)(struct input_dev *dev, unsigned int type, unsigned int code, int value);
int (*upload_effect)(struct input_dev *dev, struct ff_effect *effect);
int (*erase_effect)(struct input_dev *dev, int effect_id);
struct input_handle *grab; //當前占有該設備的handle struct mutex mutex; /* serializes open and close operations */
unsigned int users; //打開該設備的用戶量
struct class_device cdev;
struct device *dev; /* will be removed soon */
int dynalloc; /* temporarily */
struct list_head h_list; //該鏈表頭用於鏈接該設備所關聯的input_handle struct list_head node; //該鏈表頭用於將設備鏈接到input_dev_list};
Input_dev是一個很強大的結構體,它把所有的input設備(觸摸屏、鍵盤、鼠標等)的信息都考慮到了,對於觸摸屏來說只用到它裡面的一部分而已,尤其是加粗的部分,注意該結構體中最後兩行定義的兩個list_head結構體,list_head在/linux/list.h中有定義,深入跟蹤
struct list_head {
struct list_head *next, *prev;
};
該結構體內部並沒有定義數據而只定義了兩個指向本身結構體的指針,預先說明一下,所有的input device在注冊後會加入一個input_dev_list(輸入設備鏈表),所有的eventhandler在注冊後會加入一個input_handler_list(輸入處理程序鏈表),這裡的list_head主要的作用是作為input_dev_list和input_handler_list的一個節點來保存地址。Input_dev_list和input_handler_list之間的對應關系由input_handle結構體橋接,具體後面說明。
struct input_handler {
void *private;
void (*event)(struct input_handle *handle, unsigned int type, unsigned int code, int value);
struct input_handle* (*connect)(struct input_handler *handler, struct input_dev *dev, struct input_device_id *id);
void (*disconnect)(struct input_handle *handle);
const struct file_operations *fops; //提供給用戶對設備操作的函數指針 int minor;
char *name;
struct input_device_id *id_table; //與input_dev匹配用的id struct input_device_id *blacklist; //標記的黑名單
struct list_head h_list; //用於鏈接和該handler相關的handle struct list_head node; //用於將該handler鏈入input_handler_list};
input_handler顧名思義,它是用來處理input_dev的一個結構體,相關的處理函數在結構裡內部都有定義,最後兩行定義的list_head結構體作用同input_dev所定義的一樣,這裡不再說明。
注:input_device_id結構體在/linux/mod_devicetable.h中有定義
struct input_handle {
void *private;
int open; //記錄設備打開次數
char *name;
struct input_dev *dev; //指向所屬的input_dev struct input_handler *handler; //指向所屬的input_handler struct list_head d_node; //用於鏈入所指向的input_dev的handle鏈表 struct list_head h_node; //用於鏈入所指向的input_handler的handle鏈表};
可以看到input_handle中擁有指向input_dev和input_handler的指針,即input_handle是用來關聯input_dev和input_handler。為什麼用input_handle來關聯input_dev和input_handler而不將input_dev和input_handler直接對應呢?因為一個device可以對應多個handler,而一個handler也可處理多個device。就如一個觸摸屏設備可以對應event
handler也可以對應tseve handler。
input_dev、input_handler、input_handle的關系如下圖2所示。
圖2 input_dev,input_handler,input_handle關系圖
第二章、input device的注冊 Input device的注冊實際上僅僅只有幾行代碼,因為在input.c中已經將大量的代碼封裝好了,主需要調用幾個關鍵的函數就能完成對input
device的注冊。
在xxx_ts.c中預先定義全局變量struct
input_dev tsdev;然後進入到初始化函數
static int __init xxx_probe(struct platform_device *pdev)
{
…
if (!(tsdev = input_allocate_device()))
{
printk(KERN_ERR "tsdev: not enough memory\n");
err = -ENOMEM;
goto fail;
}
…
tsdev->name = "xxx TouchScreen"; //xxx為芯片型號
tsdev ->phys = "xxx/event0";
tsdev ->id.bustype = BUS_HOST; //設備id,用於匹配handler的id
tsdev ->id.vendor = 0x0005;
tsdev ->id.product = 0x0001;
tsdev ->id.version = 0x0100;
tsdev ->open = xxx_open;
tsdev ->close =xxx_close;
tsdev ->evbit[0] = BIT(EV_KEY) | BIT(EV_ABS) | BIT(EV_SYN); //設置支持的事件類型
tsdev ->keybit[LONG(BTN_TOUCH)] = BIT(BTN_TOUCH);
input_set_abs_params(tsdev,
ABS_X, 0, 0x400, 0, 0); //限定絕對坐標X的取值范圍
input_set_abs_params(tsdev, ABS_Y, 0, 0x400, 0, 0); //同上
input_set_abs_params(tsdev, ABS_PRESSURE, 0, 1000, 0, 0); //觸摸屏壓力值范圍
…
If(input_register_device(tsdev) == error) //注冊設備
goto fail;
…
fail:
input_free_device(tsdev);
printk(“ts probe failed\n”);
return err;
}
先看該函數中的tsdev = input_allocate_device(),深入最終,該函數在input.c中有定義
struct input_dev *input_allocate_device(void)
{
struct input_dev *dev;
dev = kzalloc(sizeof(struct input_dev), GFP_KERNEL); if (dev) {
dev->dynalloc = 1;
dev->cdev.class = &input_class;
class_device_initialize(&dev->cdev);
INIT_LIST_HEAD(&dev->h_list);
INIT_LIST_HEAD(&dev->node);
}
return dev;
}
學過C語言應該都知道malloc函數(開辟內存空間),而這裡的kzalloc也類似於C語言中的malloc一樣,是linux內核空間分配內存函數,後面的GFP_KERNEL標志意為常規的內存分配,更多的分配標志可參閱先關資料(我也不懂)。再回到前面的函數中來,接著後面的代碼為對tsdev結構體中的成員進行賦值初始化,賦值完成後就要開始進入主題:注冊設備了,進入到函數input_register_device(tsdev),該函數在input.c中有定義。
int input_register_device(struct input_dev *dev)
{
static atomic_t input_no = ATOMIC_INIT(0); //定義原子變量,禁止線程並發訪問
struct input_handle *handle; //定義一些變量備後文使用
struct input_handler *handler;
struct input_device_id *id;
const char *path;
int error;
if (!dev->dynalloc) {
printk(KERN_WARNING "input: device %s is statically allocated, will not register\n"
"Please convert to input_allocate_device() or contact dtor_core@ameritech.net\n",
dev->name ? dev->name : "<Unknown>");
return -EINVAL;
}
mutex_init(&dev->mutex); //互斥鎖初始化,防止臨界區代碼被並發訪問 set_bit(EV_SYN, dev->evbit); //設置支持同步事件,input設備全部默認支持同步事件 /*
* If delay and period are pre-set by the driver, then autorepeating
* is handled by the driver itself and we don't do it in input.c.
*/
init_timer(&dev->timer);
if (!dev->rep[REP_DELAY] && !dev->rep[REP_PERIOD]) {
dev->timer.data = (long) dev;
dev->timer.function = input_repeat_key;
dev->rep[REP_DELAY] = 250;
dev->rep[REP_PERIOD] = 33;
}
INIT_LIST_HEAD(&dev->h_list); //初始化需要關聯的handle鏈表頭 list_add_tail(&dev->node, &input_dev_list); //將設備添加到input_dev_list中 dev->cdev.class = &input_class;
snprintf(dev->cdev.class_id, sizeof(dev->cdev.class_id),
"input%ld", (unsigned long) atomic_inc_return(&input_no) - 1);
error = class_device_add(&dev->cdev);
if (error)
return error;
error = sysfs_create_group(&dev->cdev.kobj, &input_dev_attr_group);
if (error)
goto fail1;
error = sysfs_create_group(&dev->cdev.kobj, &input_dev_id_attr_group);
if (error)
goto fail2;
error = sysfs_create_group(&dev->cdev.kobj, &input_dev_caps_attr_group);
if (error)
goto fail3;
__module_get(THIS_MODULE);
path = kobject_get_path(&dev->cdev.kobj, GFP_KERNEL);
printk(KERN_INFO "input: %s as %s\n",
dev->name ? dev->name : "Unspecified device", path ? path : "N/A");
kfree(path);
/*** 遍歷input_handler_list上全部的handler,尋找與該設備匹配的handler ***/ list_for_each_entry(handler, &input_handler_list, node) if (!handler->blacklist || !input_match_device(handler->blacklist, dev)) if ((id = input_match_device(handler->id_table, dev))) if ((handle = handler->connect(handler, dev, id))) input_link_handle(handle); input_wakeup_procfs_readers();
return 0;
fail3: sysfs_remove_group(&dev->cdev.kobj, &input_dev_id_attr_group);
fail2: sysfs_remove_group(&dev->cdev.kobj, &input_dev_attr_group);
fail1: class_device_del(&dev->cdev);
return error;
}
先看函數中前面代碼加粗的部分
mutex_init(&dev->mutex),與互斥鎖相關的東西(我也不太懂),
set_bit(EV_SYN,
dev->evbit)設置支持同步事件,linux的input子系統默認要支持同步事件。
接著看中間代碼加粗的部分,有關list操作的在/linux/list.h中有定義
static inline void INIT_LIST_HEAD(struct list_head *list)
{
list->next = list;
list->prev = list;
}
static inline void list_add_tail(struct list_head *new, struct list_head *head)
{
__list_add(new, head->prev, head);
}
static inline void __list_add(struct list_head *new,
struct list_head *prev,
struct list_head *next)
{
next->prev = new;
new->next = next;
new->prev = prev;
prev->next = new;
}
可以看得出INIT_LIST_HEAD(struct list_head *list)就是讓list指向結構體的成員再指向其本身完成初始化操作,list_add_tail(struct
list_head *new, struct list_head *head)是將new所指向的結構體作為一節點插入到head所指向鏈表節點之前。因此函數中的
list_add_tail(&dev->node,
&input_dev_list)就是將該設備添加到input_dev_list中。而input_dev_list這個雙向鏈表在什麼時候被定義了呢,且看input.c源代碼開始部分全局部分有定義:
static LIST_HEAD(input_dev_list);static LIST_HEAD(input_handler_list);而LIST_HEAD的宏定義:#define LIST_HEAD_INIT(name) { &(name), &(name) }#define LIST_HEAD(name) \ struct list_head name = LIST_HEAD_INIT(name)顯然這在最開始就已經定義了input_dev_list和input_handler_list這兩個鏈表,且這兩個鏈表都只有一個節點,而在device和handler注冊的時候會在這兩條鏈表中加入節點,
list_add_tail(&dev->node,
&input_dev_list)就是將該設備添加到input_dev_list中。
注意最後代碼加粗的部分,該部分完成了input_dev和input_handler的橋接。先看
list_for_each_entry(handler,
&input_handler_list, node),
list_for_each_entry在list.h中有定義,其作用相當於一個for循環。其約等價於:(個人理解)
for(handler = input_handler_list表頭所屬的input_handler結構體地址;
handler != input_handler_list表尾所屬的input_handler結構體地址;
handler++)
即handler第一次指向input_handler_list的頭部所在的input_handler地址。每循環一次handler就沿著input_handler_list移動到下一個節點,得到下一節點所屬的handler地址,直到input_handler_list的結尾。而每次的循環需要做什麼呢?要做的就是遍歷input_handler_list上的每一個handler,看有哪些handler能與該設備匹配的上。匹配過程:
if (!handler->blacklist || !input_match_device(handler->blacklist, dev))//判斷該handler沒有被列入黑名單或者黑名單匹配不成功的話則繼續
if ((id = input_match_device(handler->id_table, dev))) //將設備id與handler的id進行匹配,成功則繼續往下
if ((handle = handler->connect(handler, dev, id))) //鏈接device與handler,成功則繼續往下
input_link_handle(handle); //將handle鏈入input_handler_list和input_dev_list
繼續跟蹤進這些函數
static struct input_device_id *input_match_device(struct input_device_id *id, struct input_dev *dev){ int i; for (; id->flags || id->driver_info; id++) { if (id->flags & INPUT_DEVICE_ID_MATCH_BUS) //匹配handler和device id的flag標志位 if (id->bustype != dev->id.bustype) continue; if (id->flags & INPUT_DEVICE_ID_MATCH_VENDOR) if (id->vendor != dev->id.vendor) continue; if (id->flags & INPUT_DEVICE_ID_MATCH_PRODUCT) if (id->product != dev->id.product) continue; if (id->flags & INPUT_DEVICE_ID_MATCH_VERSION) if (id->version != dev->id.version) continue; MATCH_BIT(evbit, EV_MAX); //匹配id相關標志位 MATCH_BIT(keybit, KEY_MAX); MATCH_BIT(relbit, REL_MAX); MATCH_BIT(absbit, ABS_MAX); MATCH_BIT(mscbit, MSC_MAX); MATCH_BIT(ledbit, LED_MAX); MATCH_BIT(sndbit, SND_MAX); MATCH_BIT(ffbit, FF_MAX); MATCH_BIT(swbit, SW_MAX); return id; } return NULL;}該函數用於匹配input_dev結構體和input_handler結構體裡面定義的input_device_id,若兩者裡面有任何相關變量不一樣則匹配失敗(條件真苛刻)。
再看
handle = handler->connect(handler, dev, id),connect函數即為static
struct input_handle *evdev_connect(struct input_handler *handler, struct input_dev *dev, struct input_device_id *id),為什麼呢會是這個呢,我們先看evdev.c中的input_handler結構體定義:
static struct input_handler evdev_handler = {
.event = evdev_event,
.connect = evdev_connect,
.disconnect = evdev_disconnect,
.fops = &evdev_fops,
.minor = EVDEV_MINOR_BASE,
.name = "evdev",
.id_table = evdev_ids,
};
可只這裡input_handler結構體裡邊的connect函數即為evdev_connect函數
static struct input_handle *evdev_connect(struct input_handler *handler, struct input_dev *dev, struct input_device_id *id)
{
1 struct evdev *evdev; //定義一個evdev結構體指針 struct class_device *cdev;
int minor;
2 for (minor = 0; minor < EVDEV_MINORS && evdev_table[minor]; minor++); if (minor == EVDEV_MINORS) {
printk(KERN_ERR "evdev: no more free evdev devices\n");
return NULL;
}
3
if (!(evdev = kzalloc(sizeof(struct evdev), GFP_KERNEL))) return NULL; INIT_LIST_HEAD(&evdev->list);
init_waitqueue_head(&evdev->wait);
evdev->exist = 1;
evdev->minor = minor;
evdev->handle.dev = dev;
evdev->handle.name = evdev->name;
evdev->handle.handler = handler;
evdev->handle.private = evdev;
sprintf(evdev->name, "event%d", minor);
evdev_table[minor] = evdev;
cdev = class_device_create(&input_class, &dev->cdev,
MKDEV(INPUT_MAJOR, EVDEV_MINOR_BASE + minor),
dev->cdev.dev, evdev->name);
/* temporary symlink to keep userspace happy */
sysfs_create_link(&input_class.subsys.kset.kobj, &cdev->kobj,
evdev->name);
return &evdev->handle;
}
先看1處,這裡有個定義在evdev.c裡邊的新面孔
struct evdev {
int exist;
int open;
int minor;
char name[16];
struct input_handle handle; //關聯input_handler和input_dev的input_handle wait_queue_head_t wait;
struct evdev_list *grab; struct list_head list;
};
evdev這個結構體就是拿來應用開發操作的,在這裡就是觸摸屏對應的設備文件實體,結構體前邊定義了記錄設備的一些信息(設備號,打開狀態、設備名字等),這裡還定義了一個input_handle的實體handle,沒錯這個handle就是要用來關聯input_dev和input_handler的,後面還有一行加粗的部分後面再做介紹。
再看2處,
evdev_table[]是一個全局變量的數組,在evdev.c中有定義
#define EVDEV_MINORS 32
static struct evdev *evdev_table[EVDEV_MINORS];
在前面已經說明了,一個device可以對應多個handler,而一個handler也可處理多個device,這裡體現出了後者。既然evdev這個結構體是對應的設備文件實體,因為這個handler可能會處理多個device,因此該handler要處理n個device就會應該有n個evdev實體,而這些實體的地址存放在evdev_table[]這個指針數組中,也就是說該handler最多只能處理EVDEV_MINORS個device,而2處的這幾句代碼就是要遍歷evdev_table[]這個數組看還有沒有空著的位置,有的話才會繼續進行下面的程序。
再看3處,開辟一個evdev結構體的內存空間,前面有說明過kzalloc函數,這裡不再說明。
後面的代碼就是為evdev結構體變量賦初始值了,其中init_waitqueue_head(&evdev->wait)初始化等待隊列,具體介紹結合/linux/wait.h和查看相關資料(本人不懂)。
函數最後得到evdev結構體內的hanlde地址並返回,此時返回到我們的int
input_register_device(struct input_dev *dev)函數裡面,最後一句
input_link_handle(handle),進入到該函數中發現
static void input_link_handle(struct input_handle *handle)
{
list_add_tail(&handle->d_node, &handle->dev->h_list);
list_add_tail(&handle->h_node, &handle->handler->h_list);
}
在該函數中也只是將handle中的d_node和h_node分別接入到input_dev和input_handler的h_list中,此時input_dev、input_handler、input_handle三者形成了如圖2所示的關系。
至此設備注冊過程算是全部完成了,但是貌似還有點亂。在整個設備的注冊過程中函數的嵌套一個接著一個,不僅函數嵌套,結構體也使用了結構體和函數嵌套等,在各個函數內也用了大量的結構體指針等等。但是在整個過程中input_dev、input_handler、input_handle這三個結構體變量的實體也都只有一個。其中input_dev結構體實體在xxx_ts.c中直接定義了一個input_dev的指針全局變量:struct input_dev *tsdev;並在初始化函數中開辟了一個input_dev的內存空間並讓tsdev指針指向它:w55fa95_dev = input_allocate_device();input_handler結構體在evdev.c中也直接被定義了並初始化了static struct input_handler evdev_handler = { .event = evdev_event, .connect = evdev_connect, .disconnect = evdev_disconnect, .fops = &evdev_fops, .minor = EVDEV_MINOR_BASE, .name = "evdev", .id_table = evdev_ids,};而關聯input_dev和input_handler的input_handle則是在調用鏈接連接函數static
struct input_handle *evdev_connect(struct input_handler *handler, struct input_dev *dev, struct input_device_id *id)的時候,在該函數的內部調用evdev
= kzalloc(sizeof(struct evdev), GFP_KERNEL)開辟了一個evdev結構體的內存空間時創建了,input_handle就是使用了evdev結構體內部定義的input_handle。 一個完整input設備系統不僅要有設備,還需要有處理程序input_handler,而上文中主要介紹的是設備注冊、生成、以及和handler搭配的一個過程,而handler在何時生成的?第三章、input_handler的注冊。 Input_handler是要和用戶層打交道的,在evdev.c中直接定義了一個input_handler結構體並初始化了一些內部成員變量。
static struct input_handler evdev_handler = {
.event = evdev_event,
.connect = evdev_connect,
.disconnect = evdev_disconnect,
.fops = &evdev_fops, //用戶對設備操作的函數指針 .minor = EVDEV_MINOR_BASE,
.name = "evdev",
.id_table = evdev_ids, //指向一個evedev的指針數組};
先看第一行加粗的代碼,evedev_fops結構體的定義如下
static struct file_operations evdev_fops = {
.owner = THIS_MODULE,
.read = evdev_read,
.write = evdev_write,
.poll = evdev_poll,
.open = evdev_open,
.release = evdev_release,
.unlocked_ioctl = evdev_ioctl,
#ifdef CONFIG_COMPAT
.compat_ioctl = evdev_ioctl_compat,
#endif
.fasync = evdev_fasync,
.flush = evdev_flush
};
相信做過linux設備驅動編程的對這都很熟悉了,就是一大堆的用戶接口函數,包括對設備的open、close、read、write、ioctl等函數。
再看第二行代碼加粗的部分
.id_table
= evdev_ids, id.table就是前面所說過要和input_dev的id匹配的這麼一個結構體,這裡讓它初始化為evdev_ids,在看evdev_ids的定義:
static struct input_device_id evdev_ids[] = {
{ .driver_info = 1 }, /* Matches all devices */
{ }, /* Terminating zero entry */
};
MODULE_DEVICE_TABLE(input, evdev_ids);
這裡是一個結構體數組,令數組中第一個結構體的該成員變量driver_info的值為1,其他成員變量均未定義,說明這個handler對所有device的id都能匹配得上。數組中的第二個結構體為空表示結束,用來標識結束配合下面的MODULE_DEVICE_TABLE(input,
evdev_ids)使用,關於MODULE_DEVICE_TABLE宏定義介紹自行查看相關文獻(我也不懂)。
接下來進入正題,input_handler的注冊!
Input_handler的注冊和input_dev的注冊很相似,大同小異罷了,在evdev.c源碼中顯示定義並初始化了一個input_handler結構體並直接給相關的成員變量賦值了,就是本章開始所將的部分,然後再初始化函數中注冊一個input_handler:
static int __init evdev_init(void)
{
input_register_handler(&evdev_handler);
return 0;
}
這裡只調用了一個input_register_handler()函數,看起來應該是很簡單的樣子(相比input_dev的注冊),繼續跟蹤進入到該函數中:
void input_register_handler(struct input_handler *handler)
{
struct input_dev *dev;
struct input_handle *handle;
struct input_device_id *id;
if (!handler) return;
INIT_LIST_HEAD(&handler->h_list); if (handler->fops != NULL)
input_table[handler->minor >> 5] = handler;
list_add_tail(&handler->node, &input_handler_list); list_for_each_entry(dev, &input_dev_list, node) if (!handler->blacklist || !input_match_device(handler->blacklist, dev)) if ((id = input_match_device(handler->id_table, dev))) if ((handle = handler->connect(handler, dev, id))) input_link_handle(handle); input_wakeup_procfs_readers();
}
該函數中代碼加粗的部分,與input_register_device()函數裡的如出一轍,這裡不再做說明。
至此input_handler的注冊已經結束。
第四章、input子系統數據結構 下圖3是以觸摸屏設備為例子的input子系統數據結構圖。
圖3 input子系統數據結構圖進行到這裡,又多冒出來了一個struct evdev_list的結構體,這在之前並沒有提到過,因為在注冊input_dev和input_handler過程中並沒有用到過,查看該結構體:
struct evdev_list {
struct input_event buffer[EVDEV_BUFFER_SIZE]; //存放設備數據信息 int head; //buffer的下標,標識從設備中過來要存放到buffer的數據的位置 int tail; //buffer的下標,標識用戶讀取buffer中數據的下標位置 struct fasync_struct *fasync;
struct evdev *evdev;
struct list_head node;
};
注意裡面的input_event結構體,在/linux/input.h中有定義:
struct input_event {
struct timeval time;
__u16 type;
__u16 code;
__s32 value;
};
該input_event結構體就是存放著用戶層所需的數據信息,這裡想必我們都明白,則在struct
evdev_list結構體中的
struct input_event buffer[EVDEV_BUFFER_SIZE];就是存放著用戶所需的數據信息,從硬件設備(觸摸屏)獲取得到的數據信息最終會存放到該數組中,而struct
evdev_list結構體是在什麼時候定義的呢?
當然是在被open的時候,查看open函數:
static int evdev_open(struct inode * inode,
struct file * file)
{
struct
evdev_list *list; //定義一個evdev_list結構體 int i = iminor(inode) - EVDEV_MINOR_BASE;
int accept_err;
if (i >= EVDEV_MINORS || !evdev_table ||
!evdev_table->exist)
return
-ENODEV;
if
((accept_err = input_accept_process(&(evdev_table->handle), file)))
return
accept_err;
if
(!(list = kzalloc(sizeof(struct evdev_list), GFP_KERNEL))) //開辟evdev_list結構體內存空間 return
-ENOMEM; list->evdev
= evdev_table; //令結構體中的evdev指針指向evdec_table list_add_tail(&list->node,
&evdev_table->list); //加入鏈表 file->private_data
= list;
if
(!list->evdev->open++) //如果設備沒有被open,則繼續if操作 if
(list->evdev->exist) input_open_device(&list->evdev->handle); //打開設備 return
0;
}
注意函數中代碼加粗的部分,都有注釋說明,在最後以一個操作
input_open_device(&list->evdev->handle);繼續跟蹤進入該函數
int
input_open_device(struct input_handle *handle)
{
struct
input_dev *dev = handle->dev;
int
err;
err
= mutex_lock_interruptible(&dev->mutex);
if
(err)
return
err;
handle->open++; //handle的內部成員open++ if
(!dev->users++ && dev->open)
err
= dev->open(dev);
if
(err)
handle->open--;
mutex_unlock(&dev->mutex);
return
err;
}
函數中加粗的部分,為什麼要讓open++呢?因為數據要從device傳到handler過程中有一個環節需要判斷handle->open是否為真,為真表示設備已經打開數據可以傳遞,這點在下一章將會介紹到。
第四章、數據傳遞過程 正如圖1所示,從硬件設備(觸摸屏)中獲得的數據需要經過input.c選擇相應的handler進行處理,最後上報到用戶空間。如何從硬件設備(觸摸屏)中獲得數據,那就得看xxx_ts.c中的代碼了,在xxx_ts.c中的源代碼是直接和硬件設備相關的。在xxx_ts.c中我們一方面要完成觸摸屏設備相關的寄存器配置,另一方面要完成將獲得的數據上報。
至於設備初始化配置方面,根據每個人使用的ARM芯片的Datasheet去初始化配置寄存器,這裡也不需要多說了。不管是通過查詢法還是中斷法(我沒見過用查詢的),當觸摸屏按下時候我們會得到觸摸屏被按下的相關數據(主要是被按下的X和Y坐標值),然後需要將數據信息上報,在觸摸屏被按下的時候需要上報:
input_report_key(tsdev,
BTN_TOUCH, 1); //報告按鍵被按下事件
input_report_abs(tsdev,
ABS_X, x); //報告觸摸屏被按下的x坐標值
input_report_abs(tsdev,
ABS_Y, y); //報告觸摸屏被按下的y坐標值
input_report_abs(tsdev,
ABS_PRESSURE, 1); //報告觸摸屏被按下的壓力值(0或者1)
input_sync(tsdev); //報告同步事件,表示一次事件結束
當觸筆從觸摸屏上抬起時需要上報:
input_report_key(tsdev,
BTN_TOUCH, 0); //報告按鍵被松開事件
input_report_abs(tsdev,
ABS_PRESSURE, 0); //報告觸摸屏被按下的壓力值(0或者1)
input_sync(tsdev); //報告同步事件,表示一次事件結束
先不管input_sync()函數,先來看input_report_key()和input_report_abs(),這兩個函數在/linux/input.h中有定義:
static
inline void input_report_key(struct input_dev *dev, unsigned int code, int value)
{
input_event(dev,
EV_KEY, code, !!value);
}
static
inline void input_report_abs(struct input_dev *dev, unsigned int code, int value)
{
input_event(dev,
EV_ABS, code, value);
}
太坑爹了,這兩個函數裡面也就值調用了一個函數(我也不明白linux內核開發者為什麼要這麼做),繼續跟蹤查看input_event()函數,在input.c中有定義:
void
input_event(struct input_dev *dev, unsigned int type, unsigned int code, int value)
{
struct
input_handle *handle;
if
(type > EV_MAX || !test_bit(type, dev->evbit))
return;
add_input_randomness(type,
code, value);
switch
(type) {
…
case
EV_KEY: //判斷為按鍵事件 if
(code > KEY_MAX || !test_bit(code, dev->keybit) || !!test_bit(code, dev->key) == value) return; if
(value == 2) break; change_bit(code,
dev->key); if
(test_bit(EV_REP, dev->evbit) && dev->rep[REP_PERIOD] && dev->rep[REP_DELAY] && dev->timer.data && value) { dev->repeat_key
= code; mod_timer(&dev->timer,
jiffies + msecs_to_jiffies(dev->rep[REP_DELAY])); } case
EV_ABS: //判斷為絕對坐標事件 if
(code > ABS_MAX || !test_bit(code, dev->absbit)) return; if
(dev->absfuzz[code]) { if
((value > dev->abs[code] - (dev->absfuzz[code] >> 1)) && (value
< dev->abs[code] + (dev->absfuzz[code] >> 1))) return; if
((value > dev->abs[code] - dev->absfuzz[code]) && (value
< dev->abs[code] + dev->absfuzz[code])) value
= (dev->abs[code] * 3 + value) >> 2; if
((value > dev->abs[code] - (dev->absfuzz[code] << 1)) && (value
< dev->abs[code] + (dev->absfuzz[code] << 1))) value
= (dev->abs[code] + value) >> 1; }
if
(dev->abs[code] == value) return; dev->abs[code]
= value; break; …
}
if
(type != EV_SYN)
dev->sync
= 0;
if
(dev->grab) //判斷有沒有聲明自定義的處理函數(初始化過程中顯然沒有定義)
dev->grab->handler->event(dev->grab,
type, code, value);
else
list_for_each_entry(handle,
&dev->h_list, d_node) //遍歷handle鏈表 if
(handle->open) //如果某節點上的處理程序被打開了 handle->handler->event(handle,
type, code, value); //調用處理函數}
先看該函數中的一個switch結構,這裡只列出了EV_KEY和EV_ABS兩個事件的處理,經過switch選擇處理後看最後代碼加粗的部分。
list_for_each_entry(handle,
&dev->h_list, d_node) 這句類似的前面已經介紹過,這裡不再說明,接下來
if
(handle->open),判斷處理程序是否被打開,還記得是什麼時候打開的嗎?前面有介紹過在evdev.c中的open函數裡面調用了input_open_device(&list->evdev->handle),而在input_open_device()中有這麼一句
handle->open++;沒有錯,只有在經過evdev_open之後才能這裡的條件才能為真,接著看下面的
handle->handler->event(handle,
type, code, value);繼續深入跟蹤:
static
void evdev_event(struct input_handle *handle, unsigned int type, unsigned int code, int value)
{
struct
evdev *evdev = handle->private; struct
evdev_list *list;
if
(evdev->grab) { //顯然grab並沒有被設置,該條件為假
list
= evdev->grab;
do_gettimeofday(&list->buffer[list->head].time);
list->buffer[list->head].type
= type;
list->buffer[list->head].code
= code;
list->buffer[list->head].value
= value;
list->head
= (list->head + 1) & (EVDEV_BUFFER_SIZE - 1);
kill_fasync(&list->fasync,
SIGIO, POLL_IN);
}
else
list_for_each_entry(list,
&evdev->list, node) {
do_gettimeofday(&list->buffer[list->head].time); //給buffer成員賦值 list->buffer[list->head].type
= type; list->buffer[list->head].code
= code; list->buffer[list->head].value
= value; list->head
= (list->head + 1) & (EVDEV_BUFFER_SIZE - 1); kill_fasync(&list->fasync,
SIGIO, POLL_IN);
}
wake_up_interruptible(&evdev->wait); //用來喚醒一個等待隊列(我也不懂)
}
先看前面的
struct
evdev *evdev = handle->private,還記得handler->private嗎,在input_handle結構體中它是一個空指針,在前面有講到在執行static
struct input_handle *evdev_connect(struct input_handler *handler, struct input_dev *dev, struct input_device_id *id)函數的時候就被賦值了(evdev->handle.private
= evdev;)。
再看最後代碼加粗的部分,顯然是給evdev_list結構體中的buffer成員賦上從設備中傳過來的數據,當數據存放好了之後,head加1,當head的值達到EVDEV_BUFFER_SIZE時又回到0;
至此數據的傳遞就算是結束了,接下來就是等著被讀走,只要在用戶空間進行read操作即可。
第五章、數據讀取過程 讀取就變得很簡單了,做過linux編程的都能知道,只要在應用中定義了個input_event結構體,通過open打開設備,然後進行read即可,再來看該設備的read函數:
static
ssize_t evdev_read(struct file * file, char __user * buffer, size_t count, loff_t *ppos)
{
struct
evdev_list *list = file->private_data;
int
retval;
if (count < evdev_event_size())//每次讀取的字節數至少是input_event的大小
return
-EINVAL;
if
(list->head == list->tail && list->evdev->exist && (file->f_flags & O_NONBLOCK)) //是否滿足讀取條件
return
-EAGAIN;
retval
= wait_event_interruptible(list->evdev->wait,
list->head
!= list->tail || (!list->evdev->exist)); //等待喚醒,和前面說的等待隊列對應(我也不懂)
if
(retval)
return
retval;
if
(!list->evdev->exist)
return
-ENODEV;
while
(list->head != list->tail && retval + evdev_event_size() <= count) {
struct
input_event *event = (struct input_event *) list->buffer + list->tail;
if
(evdev_event_to_user(buffer + retval, event)) //復制數據到用戶空間 return
-EFAULT;
list->tail
= (list->tail + 1) & (EVDEV_BUFFER_SIZE - 1);
retval
+= evdev_event_size();
}
return
retval;
}
函數前面基本上都是在做一系列的條件判斷,判斷是否符合讀取的條件,
evdev_event_to_user(buffer
+ retval, event)這句是真正的把數據復制到用戶空間,進入查看:
static
int evdev_event_to_user(char __user *buffer, const struct input_event *event)
{
if
(copy_to_user(buffer, event, sizeof(struct input_event)))
return
-EFAULT;
return
0;
}
該函裡面也只是調用了copy_to_user()函數而已,該函數相比我們都不會陌生了,就是把event所指向地址空間的數據復制到buffer所指向的地址空間中而已。
再回到read函數中來,函數在末尾返回讀取到的字節數,至於要把這些數據拿去干什麼用,那就是應用層的事情了。
可以看到接口函數中除了read以外還有write、ioctl等函數,因為對於觸摸屏來說我們主要就是要獲取觸筆在觸摸屏上點擊的坐標位置而已,所以write、ioctl等函數會很少用到,這裡就不再做介紹。
注:本文只在一定的層面(本人的理解)上對linux下的input子系統的介紹,裡邊還有很多要點沒有辦法去涉及,只是一個入門級的學習過程,緊限於在在完善的input子系統下進行做驅動修改,而不具備做驅動開發的能力。


