


一、linux系統將設備分為3類:字符設備、塊設備、網絡設備。
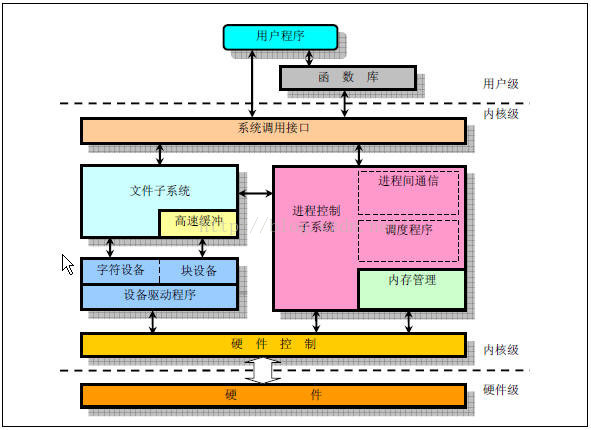
應用程序調用的流程框圖:
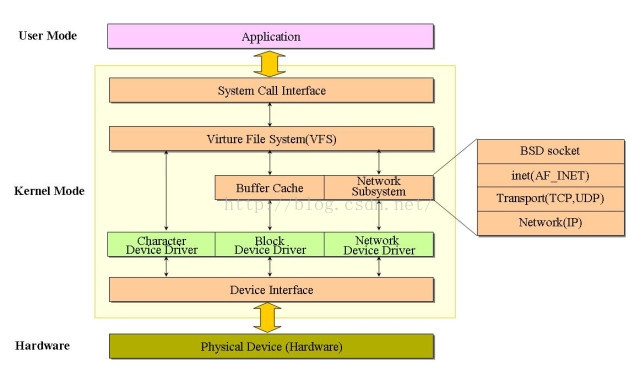
三種設備的定義分別如下,
字符設備:只能一個字節一個字節的讀寫的設備,不能隨機讀取設備內存中的某一數據,讀取數據需要按照先後順序進行。字符設備是面向流的設備,常見的字符設備如鼠標、鍵盤、串口、控制台、LED等。
塊設備:是指可以從設備的任意位置讀取一定長度的數據設備。塊設備如硬盤、磁盤、U盤和SD卡等存儲設備。
網絡設備:網絡設備比較特殊,不在是對文件進行操作,而是由專門的網絡接口來實現。應用程序不能直接訪問網絡設備驅動程序。在/dev目錄下也沒有文件來表示網絡設備。
對於字符設備和塊設備來說,在/dev目錄下都有對應的設備文件。linux用戶程序通過設備文件或叫做設備節點來使用驅動程序操作字符設備和塊設備。
二、字符設備和快設備啟動與用戶控件訪問該設備的程序 ,三者之間的關系。
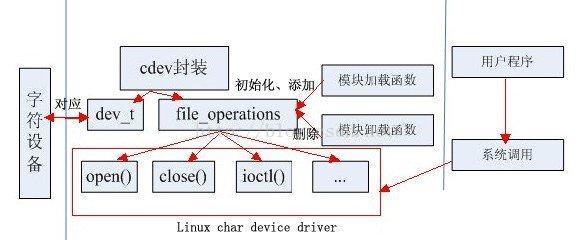
如上圖,在linux內核中使用cdev結構體來描述字符設備,通過其成員dev_t來定義設備號,以確定字符設備的唯一性。通過其成員file_operations來定義字符設備驅動提供給VFS的接口函數,如常見的open()、read()、write()等。
在Linux字符設備驅動中,模塊加載函數通過register_chrdev_region( ) 或alloc_chrdev_region( )來靜態或者動態獲取設備號,通過cdev_init( )建立cdev與file_operations之間的連接,通過cdev_add( )向系統添加一個cdev以完成注冊。模塊卸載函數通過cdev_del( )來注銷cdev,通過unregister_chrdev_region( )來釋放設備號。
用戶空間訪問該設備的程序通過Linux系統調用,如open( )、read( )、write( ),來“調用”file_operations來定義字符設備驅動提供給VFS的接口函數。
三、字符設備驅動模板
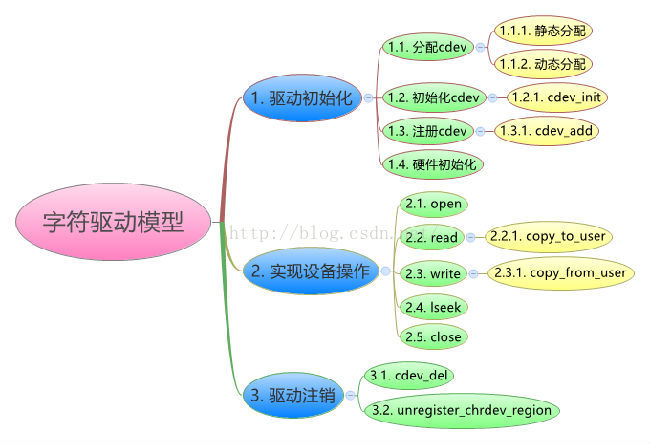
這張圖基本表示了字符驅動所需要的模板,只是缺少class的相關內容,class主要是用來自動創建設備節點的,還有就是一個比較常用的ioctl()函數沒有列在上邊。
下面具體說一下每個步驟的詳細內容。
1.驅動初始化
1.1分配cdev
在2.6的內核中使用cdev結構體來描述字符設備,在驅動中分配cdev,主要是分配一個cdev結構體與申請設備號。
例如:
/*……*/
/* 分配cdev*/
struct cdev btn_cdev;
/*……*/
/* 1.1 申請設備號*/
if(major){
	//靜態
	dev_id = MKDEV(major, 0);
	register_chrdev_region(dev_id, 1, "button");
} else {
	//動態
	alloc_chardev_region(&dev_id, 0, 1, "button");
	major = MAJOR(dev_id);
}
/*……*/
從上面的代碼可以看出,申請設備號有動靜之分,其實設備號還有主次之分。
int register_chrdev_region(dev_t from, unsigned count, const char *name);
/*功能:申請使用從from開始的count 個設備號(主設備號不變,次設備號增加)*/
靜態申請相對較簡單,但是一旦驅動被廣泛使用,這個隨機選定的主設備號可能會導致設備號沖突,而使驅動程序無法注冊。
int alloc_chrdev_region(dev_t *dev, unsigned baseminor, unsigned count,const char *name);
/*功能:請求內核動態分配count個設備號,且次設備號從baseminor開始。*/
動態申請簡單,易於驅動推廣,但是無法在安裝驅動前創建設備文件(因為安裝前還沒有分配到主設備號)。
1.2.初始化cdev
1 void cdev_init(struct cdev *, struct file_operations *);
2 cdev_init()函數用於初始化 cdev 的成員,並建立 cdev 和 file_operations 之間的連接。
1.3.注冊cdev
1 int cdev_add(struct cdev *, dev_t, unsigned);
2      cdev_add()函數向系統添加一個 cdev,完成字符設備的注冊。
硬件初始化主要是硬件資源的申請與配置,主要涉及地址映射,寄存器讀寫等相關操作,每一個開發板不同都有不同的實現方式,這裡以FS4412為例:
	/* 地址映射 */
	gpx2con = ioremap(GPX2CON, 4);
	if (gpx2con == NULL)
	{
		printk("gpx2con ioremap err\n");
		goto err3;
	}
	gpx2dat = ioremap(GPX2DAT, 4);
	if (gpx2dat == NULL)
	{
		printk("gpx2dat ioremap err\n");
		goto err4;
	}

	gpx1con = ioremap(GPX1CON, 4);
	gpx1dat = ioremap(GPX1DAT, 4);

	gpf3con = ioremap(GPF3CON, 4);
	gpf3dat = ioremap(GPF3DAT, 4);

	writel(readl(gpx2con)&(~(0xf<<28))|(0x1<<28), gpx2con);
	writel((0x1<<7), gpx2dat);
	writel(readl(gpx1con)&(~(0xf<<0))|(0x1<<0), gpx1con);
	writel((0x1<<0), gpx1dat);
	writel(readl(gpf3con)&(~(0xf<<16))|(0x1<<16), gpf3con);
	writel(readl(gpf3dat)|(0x1<<4), gpf3dat);
	writel(readl(gpf3con)&(~(0xf<<20))|(0x1<<20), gpf3con);
	writel(readl(gpf3dat)|(0x1<<5), gpf3dat);
struct file_operations hello_fops = {
	.owner = THIS_MODULE,
	.open = hello_open,
	.release = hello_release,
	.read = hello_read,
	.write = hello_write,
};
1 int(*open)(struct inode *, struct file*);
2 /*打開*/
ssize_t(*read)(struct file *, char __user*, size_t, loff_t*);
/*用來從設備中讀取數據,成功時函數返回讀取的字節數,出錯時返回一個負值*/
1 ssize_t(*write)(struct file *, const char__user *, size_t, loff_t*);
2 /*向設備發送數據,成功時該函數返回寫入的字節數。如果此函數未被實現,
3 當用戶進行write()系統調用時,將得到-EINVAL返回值*/
2.4. close( )函數
1 int(*release)(struct inode *, struct file*);
2 /*關閉*/
原型:
int ioctl(int fd, ind cmd, …);
如果不用ioctl的話,也可以實現對設備I/O通道的控制,但那就是蠻擰了。例如,我們可以在驅動程序中實現write的時候檢查一下是否有特殊約定的數據流通過,如果有的話,那麼後面就跟著控制命令(一般在socket編程中常常這樣做)。但是如果這樣做的話,會導致代碼分工不明,程序結構混亂,程序員自己也會頭昏眼花的。
所以,我們就使用ioctl來實現控制的功能。要記住,用戶程序所作的只是通過命令碼告訴驅動程序它想做什麼,至於怎麼解釋這些命令和怎麼實現這些命令,這都是驅動程序要做的事情。
在驅動程序中實現的ioctl函數體內,實際上是有一個switch{case}結構,每一個case對應一個命令碼,做出一些相應的操作。怎麼實現這些操作,這是每一個程序員自己的事情,因為設備都是特定的,這裡也沒法說。關鍵在於怎麼樣組織命令碼,因為在ioctl中命令碼是唯一聯系用戶程序命令和驅動程序支持的途徑。
命令碼的組織是有一些講究的,因為我們一定要做到命令和設備是一一對應的,這樣才不會將正確的命令發給錯誤的設備,或者是把錯誤的命令發給正確的設備,或者是把錯誤的命令發給錯誤的設備。這些錯誤都會導致不可預料的事情發生,而當程序員發現了這些奇怪的事情的時候,再來調試程序查找錯誤,那將是非常困難的事情。
所以在Linux核心中是這樣定義一個命令碼的:
MAGIC: 幻數 8位的數 0 - 255 'L'
nr: 序數,用來區分同一類設備的不同命令
#define CMD _IO(MAGIC, nr)
hello.h
#define LED_MAGIC 'L'
#define LED_ON _IO(LED_MAGIC, 1)
#define LED_OFF _IO(LED_MAGIC, 2)
通過這種方式來定義cmd,並在ioctl程序中區分cmd。
2.5. 補充說明
1. 在Linux字符設備驅動程序設計中,有3種非常重要的數據結構:struct file、struct inode、struct file_operations。
struct file 代表一個打開的文件。系統中每個打開的文件在內核空間都有一個關聯的struct file。它由內核在打開文件時創建, 在文件關閉後釋放。其成員loff_t f_pos 表示文件讀寫位置。
struct inode 用來記錄文件的物理上的信息。因此,它和代表打開文件的file結構是不同的。一個文件可以對應多個file結構,但只有一個inode結構。其成員dev_t i_rdev表示設備號。
struct file_operations 一個函數指針的集合,定義能在設備上進行的操作。結構中的成員指向驅動中的函數,這些函數實現一個特別的操作, 對於不支持的操作保留為NULL。
2. 在read( )和write( )中的buff 參數是用戶空間指針。因此,它不能被內核代碼直接引用,因為用戶空間指針在內核空間時可能根本是無效的——沒有那個地址的映射。因此,內核提供了專門的函數用於訪問用戶空間的指針:
1 unsigned long copy_from_user(void *to, const void __user *from, unsigned long count);
2 unsigned long copy_to_user(void __user *to, const void *from, unsigned long count);
/*原型:*/
void cdev_del(struct cdev *);
/*例:*/
cdev_del(&btn_cdev);
/*原型:*/
void unregister_chrdev_region(dev_t from, unsigned count);
/*例:*/
unregister_chrdev_region(MKDEV(major, 0), 1);
前面寫到如何向系統申請一個設備號,設備號就像我們的身份證號一樣,號本身並沒有什麼特殊的意義,只有把這個號和人對應才有意義,通用設備號也需要和一個特殊的東西對於,這就是cdev, cdev是linux下抽象出來的一個用來描述一個字符設備的結構體,在linux下定義如下:
struct cdev {
                struct kobject kobj;
                struct module *owner;
                const struct file_operations *ops;
                struct list_head list;
                dev_t dev;
                unsigned int count;
        };
cdev 結構體的dev_t 成員定義了設備號,為32位,其中12位是主設備號,20位是次設備號,我們只需使用二個簡單的宏就可以從dev_t 中獲取主設備號和次設備號:
MAJOR(dev_t dev)
MINOR(dev_t dev)
相反地,可以通過主次設備號來生成dev_t:
MKDEV(int major,int minor)
4.2 Linux 2.6內核提供一組函數用於操作cdev 結構體
1:void cdev_init(struct cdev*,struct file_operations *);
2:struct cdev *cdev_alloc(void);
3:int cdev_add(struct cdev *,dev_t,unsigned);
4:void cdev_del(struct cdev *);
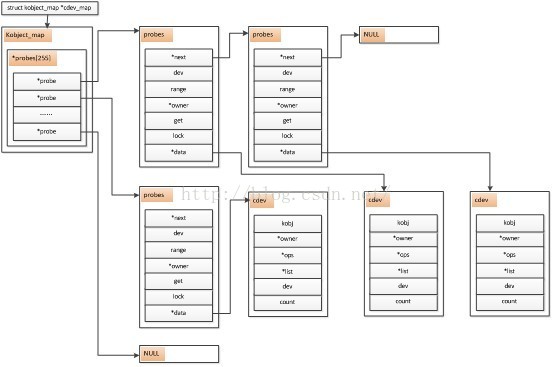
cdev_add實現cdev的注冊,linux內核裡維護了一個cdev_map的表,所謂cdev的注冊就是把我們的cdev注冊到cdev_map表上,cdev_map表結構如圖:
4.3 Linux 2.6內核分配和釋放設備號
在調用cdev_add()函數向系統注冊字符設備之前,首先應向系統申請設備號,有二種方法申請設備號,一種是靜態申請設備號:
5:int register_chrdev_region(dev_t from,unsigned count,const char *name)
另一種是動態申請設備號:
6:int alloc_chrdev_region(dev_t *dev,unsigned baseminor,unsigned count,const char *name);
其中,靜態申請是已知起始設備號的情況,如先使用cat /proc/devices 命令查得哪個設備號未事先使用(不推薦使用靜態申請);動態申請是由系統自動分配,只需設置major = 0即可。
相反地,在調用cdev_del()函數從系統中注銷字符設備之後,應該向系統申請釋放原先申請的設備號,使用:
7:void unregister_chrdev_region(dev_t from,unsigned count);
4.4 cdev結構的file_operations結構體
這個結構體是字符設備當中最重要的結構體之一,file_operations 結構體中的成員函數指針是字符設備驅動程序設計的主體內容,這些函數實際上在應用程序進行Linux 的 open()、read()、write()、close()、seek()、ioctl()等系統調用時最終被調用。
1 struct file_operations {
 2
 3 /*擁有該結構的模塊計數,一般為THIS_MODULE*/
 4 struct module *owner;
 5
 6 /*用於修改文件當前的讀寫位置*/
 7 loff_t (*llseek) (struct file *, loff_t, int);
 8
 9 /*從設備中同步讀取數據*/
10 ssize_t (*read) (struct file *, char __user *, size_t, loff_t *);
11
12 /*向設備中寫數據*/
13 ssize_t (*write) (struct file *, const char __user *, size_t, loff_t *);
14
15
16 ssize_t (*aio_read) (struct kiocb *, const struct iovec *, unsigned long, loff_t);
17 ssize_t (*aio_write) (struct kiocb *, const struct iovec *, unsigned long, loff_t);
18 int (*readdir) (struct file *, void *, filldir_t);
19
20 /*輪詢函數,判斷目前是否可以進行非阻塞的讀取或寫入*/
21 unsigned int (*poll) (struct file *, struct poll_table_struct *);
22
23 /*執行設備的I/O命令*/
24 int (*ioctl) (struct inode *, struct file *, unsigned int, unsigned long);
25
26
27 long (*unlocked_ioctl) (struct file *, unsigned int, unsigned long);
28 long (*compat_ioctl) (struct file *, unsigned int, unsigned long);
29
30 /*用於請求將設備內存映射到進程地址空間*/
31 int (*mmap) (struct file *, struct vm_area_struct *);
32
33 /*打開設備文件*/
34 int (*open) (struct inode *, struct file *);
35 int (*flush) (struct file *, fl_owner_t id);
36
37 /*關閉設備文件*/
38 int (*release) (struct inode *, struct file *);
39
40
41 int (*fsync) (struct file *, struct dentry *, int datasync);
42 int (*aio_fsync) (struct kiocb *, int datasync);
43 int (*fasync) (int, struct file *, int);
44 int (*lock) (struct file *, int, struct file_lock *);
45 ssize_t (*sendpage) (struct file *, struct page *, int, size_t, loff_t *, int);
46 unsigned long (*get_unmapped_area)(struct file *, unsigned long, unsigned long, unsigned long, unsigned long);
47 int (*check_flags)(int);
48 int (*flock) (struct file *, int, struct file_lock *);
49 ssize_t (*splice_write)(struct pipe_inode_info *, struct file *, loff_t *, size_t, unsigned int);
50 ssize_t (*splice_read)(struct file *, loff_t *, struct pipe_inode_info *, size_t, unsigned int);
51 int (*setlease)(struct file *, long, struct file_lock **);
52 };
1 struct file{
 2
 3 mode_t fmode; /*文件模式,如FMODE_READ,FMODE_WRITE*/
 4
 5 ......
 6
 7 loff_t f_pos; /*loff_t 是一個64位的數,需要時,須強制轉換為32位*/
 8
 9 unsigned int f_flags; /*文件標志,如:O_NONBLOCK*/
10
11 struct file_operations *f_op;
12
13 void *private_data; /*非常重要,用於存放轉換後的設備描述結構指針*/
14
15 .......
16
17 };
1 struct inode{
 2
 3 dev_t i_rdev; /*設備編號*/
 4
 5 struct cdev *i_cdev; /*cdev 是表示字符設備的內核的內部結構*/
 6
 7 };
 8
 9 可以從inode中獲取主次設備號,使用下面二個宏:
10
11 /*驅動工程師一般不關心這二個宏*/
12
13 unsigned int imajor(struct inode *inode);
14
15 unsigned int iminor(struct inode *inode);
1/*設備結構體*/
 2
 3 struct xxx_dev{
 4
 5 struct cdev cdev;
 6
 7 char *data;
 8
 9 struct semaphore sem;
10
11 ......
12
13 };
14
15
16
17 /*模塊加載函數*/
18
19 static int __init xxx_init(void)
20
21 {
22
23 .......
24
25 初始化cdev結構;
26
27 申請設備號;
28
29 注冊設備號;
30
31
32
33 申請分配設備結構體的內存; /*非必須*/
34
35 }
36
37
38
39 /*模塊卸載函數*/
40
41 static void __exit xxx_exit(void)
42
43 {
44
45 .......
46
47 釋放原先申請的設備號;
48
49 釋放原先申請的內存;
50
51 注銷cdev設備;
52
53 }
54
55
1 /*讀設備*/
 2
 3 ssize_t xxx_read(struct file *filp, char __user *buf, size_t count, loff_t *f_pos)
 4
 5 {
 6
 7 ......
 8
 9 使用filp->private_data獲取設備結構體指針;
10
11 分析和獲取有效的長度;
12
13 /*內核空間到用戶空間的數據傳遞*/
14
15 copy_to_user(void __user *to, const void *from, unsigned long count);
16
17 ......
18
19 }
20
21 /*寫設備*/
22
23 ssize_t xxx_write(struct file *filp, const char __user *buf, size_t count, loff_t *f_pos)
24
25 {
26
27 ......
28
29 使用filp->private_data獲取設備結構體指針;
30
31 分析和獲取有效的長度;
32
33 /*用戶空間到內核空間的數據傳遞*/
34
35 copy_from_user(void *to, const void __user *from, unsigned long count);
36
37 ......
38
39 }
40
41 /*ioctl函數*/
42
43 static int xxx_ioctl(struct inode *inode,struct file *filp,unsigned int cmd,unsigned long arg)
44
45 {
46
47 ......
48
49 switch(cmd){
50
51 case xxx_CMD1:
52
53 ......
54
55 break;
56
57 case xxx_CMD2:
58
59 .......
60
61 break;
62
63 default:
64
65 return -ENOTTY; /*不能支持的命令*/
66
67 }
68
69 return 0;
70
71 }
1 struct file_operations xxx_fops = {
 2
 3 .owner = THIS_MODULE,
 4
 5 .open = xxx_open,
 6
 7 .read = xxx_read,
 8
 9 .write = xxx_write,
10
11 .close = xxx_release,
12
13 .ioctl = xxx_ioctl,
14
15 .lseek = xxx_llseek,
16
17 };
18
19 上面的寫法需要注意二點,一:結構體成員之間是以逗號分開的而不是分號,結構體字段結束時最後應加上分號。
在剛開始寫Linux設備驅動程序的時候,很多時候都是利用mknod命令手動創建設備節點,實際上Linux內核為我們提供了一組函數,可以用來在模塊加載的時候自動在/dev目錄下創建相應設備節點,並在卸載模塊時刪除該節點。
在2.6.17以前,在/dev目錄下生成設備文件很容易,
devfs_mk_bdev
devfs_mk_cdev
devfs_mk_symlink
devfs_mk_dir
devfs_remove
這幾個是純devfs的api,2.6.17以前可用,但後來devfs被sysfs+udev的形式取代,同時期sysfs文件系統可以用的api:
class_device_create_file,在2.6.26以後也不行了,現在,使用的是device_create ,從2.6.18開始可用
struct device *device_create(struct class *class, struct device *parent,dev_t devt, const char *fmt, ...)
從2.6.26起又多了一個參數drvdata: the data to be added to the device for callbacks
不會用可以給此參數賦NULL
struct device *device_create(struct class *class, struct device *parent,dev_t devt, void *drvdata, const char *fmt, ...)
在驅動用加入對udev的支持主要做的就是:在驅動初始化的代碼裡調用class_create(...)為該設備創建一個class,再為每個設備調用device_create(...)( 在2.6較早的內核中用class_device_create)創建對應的設備。
內核中定義的struct class結構體,顧名思義,一個struct class結構體類型變量對應一個類,內核同時提供了class_create(…)函數,可以用它來創建一個類,這個類存放於sysfs下面,一旦創建好了這個類,再調用 device_create(…)函數來在/dev目錄下創建相應的設備節點。這樣,加載模塊的時候,用戶空間中的udev會自動響應 device_create(…)函數,去/sysfs下尋找對應的類從而創建設備節點。
struct class和class_create(…) 以及device_create(…)都包含在在/include/linux/device.h中,使用的時候一定要包含這個頭文件,否則編譯器會報錯。
struct class定義在頭文件include/linux/device.h中
//device classes

struct class {
      const char       *name;
      struct module     *owner;
                         nbsp;
      struct kset        subsys;
      struct list_head        devices;
      struct list_head        interfaces;
      struct kset             class_dirs;
      struct semaphore sem;    //lockschildren, devices, interfaces
      struct class_attribute   *class_attrs;
      struct device_attribute     *dev_attrs;

      int (*dev_uevent)(structdevice *dev, struct kobj_uevent_env *env);
      void (*class_release)(structclass *class);
      void (*dev_release)(struct device *dev);
      int (*suspend)(struct device*dev, pm_message_t state);
      int (*resume)(struct device *dev);
};
class_create(…)在/drivers/base/class.c中實現
// class_create - create a struct class structure
// @owner: pointer to the module that is to "own"this struct class
// @name: pointer to a string for the name of this class.

// This is used to create a struct class pointer that canthen be used
// in calls to device_create().

//Note, the pointer created here is to be destroyed whenfinished by
// making a call to class_destroy().

struct class *class_create(struct module *owner, const char *name)
{
      struct class *cls;
      int retval;

      cls = kzalloc(sizeof(*cls), GFP_KERNEL);
      if (!cls) {
           retval = -ENOMEM;
           goto error;
      }

      cls->name = name;
      cls->owner = owner;
      cls->class_release =class_create_release;

      retval =class_register(cls);
      if (retval)
           goto error;

      return cls;
error:
      kfree(cls);
      return ERR_PTR(retval);
}
class_destroy(...)函數
// class_destroy - destroys a struct class structure
//@cs: pointer to the struct class that is to be destroyed

//Note, the pointer to be destroyed must have been created with a call
//to class_create().

void class_destroy(struct class *cls)
{
    if((cls == NULL) || (IS_ERR(cls)))
        return;

    class_unregister(cls);
}
device_create(…)函數在/drivers/base/core.c中實現
// device_create - creates a device and registersit with sysfs
// @class: pointer to the struct class that thisdevice should be registered to
// @parent: pointer to the parent struct device ofthis new device, if any
// @devt: the dev_t for the char device to beadded
// @fmt: string for the device's name

// This function can be used by char deviceclasses. A struct device
// will be created in sysfs, registered to thespecified class.

// A "dev" file will be created, showingthe dev_t for the device, if
// the dev_t is not 0,0.
// If a pointer to a parent struct device ispassed in, the newly created
// struct device will be a child of that device insysfs.
// The pointer to the struct device will bereturned from the call.
// Any further sysfs files that might be requiredcan be created using this
// pointer.

// Note: the struct class passed to this functionmust have previously
// been created with a call to class_create().

struct device *device_create(struct class *class,struct device *parent,
                        dev_tdevt, const char *fmt, ...)
{
         va_list vargs;
         struct device *dev;

         va_start(vargs,fmt);
         dev =device_create_vargs(class, parent, devt, NULL, fmt, vargs);
         va_end(vargs);

         return dev;
}
第一個參數指定所要創建的設備所從屬的類,
class_destroy(...),device_destroy(...)也在/drivers/base/core.c中實現
// device_destroy - removes a device that was created with device_create()
// @class: pointer to the struct class that this device was registered with
// @devt: the dev_t of the device that was previously registered

// This call unregisters and cleans up a device that was created with a
// call to device_create().

void device_destroy(struct class *class,dev_t devt)
{
    structdevice *dev = NULL;
    structdevice *dev_tmp;

    down(&class->sem);
    list_for_each_entry(dev_tmp,&class->devices, node) {
        if(dev_tmp->devt == devt) {
            dev= dev_tmp;
            break;
        }
    }
    up(&class->sem);

    if(dev)
        device_unregister(dev);
}
相比devfs,udev有很多優勢,在此就不羅嗦了,提醒一點,udev是應用層的東東,不要試圖在內核的配置選項裡找到它;加入對udev的支持很簡單,以字符設備驅動為例,在驅動初始化的代碼裡調用class_create為該設備創建一個class,再為每個設備調用 class_device_create創建對應的設備。大致用法如下:
struct class *myclass = class_create(THIS_MODULE, “my_device_driver”);
class_device_create(myclass, NULL, MKDEV(major_num, 0), NULL, “my_device”);
這樣的module被加載時,udev daemon就會自動在/dev下創建my_device設備文件。
下面以一個簡單字符設備驅動來展示如何使用這幾個函數:
#include#include #include #include #include #include int HELLO_MAJOR = 0; int HELLO_MINOR = 0; int NUMBER_OF_DEVICES = 2; struct class *my_class; //struct cdev cdev; //dev_t devno; struct hello_dev { struct device *dev; dev_t chrdev; struct cdev cdev; }; static struct hello_dev *my_hello_dev = NULL; struct file_operations hello_fops = { .owner = THIS_MODULE }; static int __init hello_init (void) { int err = 0; struct device *dev; my_hello_dev = kzalloc(sizeof(struct hello_dev), GFP_KERNEL); if (NULL == my_hello_dev) { printk("%s kzalloc failed!\n",__func__); return -ENOMEM; } devno = MKDEV(HELLO_MAJOR, HELLO_MINOR); if (HELLO_MAJOR) err= register_chrdev_region(my_hello_dev->chrdev, 2, "memdev"); else { err = alloc_chrdev_region(&my_hello_dev->chrdev, 0, 2, "memdev"); HELLO_MAJOR = MAJOR(devno); } if (err) { printk("%s alloc_chrdev_region failed!\n",__func__); goto alloc_chrdev_err; } printk("MAJOR IS %d\n",HELLO_MAJOR); cdev_init(&(my_hello_dev->cdev), &hello_fops); my_hello_dev->cdev.owner = THIS_MODULE; err = cdev_add(&(my_hello_dev->cdev), my_hello_dev->chrdev, 1); if (err) { printk("%s cdev_add failed!\n",__func__); goto cdev_add_err; } printk (KERN_INFO "Character driver Registered\n"); my_class =class_create(THIS_MODULE,"hello_char_class"); //類名為hello_char_class if(IS_ERR(my_class)) { err = PTR_ERR(my_class); printk("%s class_create failed!\n",__func__); goto class_err; } dev = device_create(my_class,NULL,my_hello_dev->chrdev,NULL,"memdev%d",0); //設備名為memdev if (IS_ERR(dev)) { err = PTR_ERR(dev); gyro_err("%s device_create failed!\n",__func__); goto device_err; } printk("hello module initialization\n"); return 0; device_err: device_destroy(my_class, my_hello_dev->chrdev); class_err: cdev_del(my_hello_dev->chrdev); cdev_add_err: unregister_chrdev_region(my_hello_dev->chrdev, 1); alloc_chrdev_err: kfree(my_hello_dev); return err; } static void __exit hello_exit (void) { cdev_del (&(my_hello_dev->cdev)); unregister_chrdev_region (my_hello_dev->chrdev,1); device_destroy(my_class, devno); //delete device node under /dev//必須先刪除設備,再刪除class類 class_destroy(my_class); //delete class created by us printk (KERN_INFO "char driver cleaned up\n"); } module_init (hello_init); module_exit (hello_exit); MODULE_LICENSE ("GPL");
[root@localhost node]# insmod node.ko
[root@localhost node]# dmesg | tail -3
[23503.365316] create node success:
[23503.365319]   ls -l /dev/noddev*
[23503.365321]   ls -l /sys/class/noddev
[root@localhost node]# ls -l /dev/noddev*
crw------- 1 root root 66,  0 11月 26 15:02 /dev/noddev0
crw------- 1 root root 66, 20 11月 26 15:02 /dev/noddev20
[root@localhost node]# ls -l /sys/class/noddev
總用量 0
lrwxrwxrwx 1 root root 0 11月 26 15:02 noddev0 -> ../../devices/virtual/noddev/noddev0
lrwxrwxrwx 1 root root 0 11月 26 15:02 noddev20 -> ../../devices/virtual/noddev/noddev20