


ansible server : 192.168.8.40
node2.chinasoft.com: 192.168.8.39
node3.chinasoft.com: 192.168.8.41
node4.chinasoft.com: 192.168.8.42
iscsi設備:192.168.8.43
192.168.8.39 node2.chinasoft.com node2
192.168.8.41 node3.chinasoft.com node3
192.168.8.42 node4.chinasoft.com node4
[rhcs]
node2.chinasoft.com
node3.chinasoft.com
node4.chinasoft.com
# ansible rhcs -m shell -a "ntpdate -u 192.168.8.102"
node2.chinasoft.com | success | rc=0 >>
 3 May 09:13:11 ntpdate[1791]: step time server 192.168.8.102 offset 393253.345476 sec


node4.chinasoft.com | success | rc=0 >>
 3 May 09:13:11 ntpdate[1775]: step time server 192.168.8.102 offset 393211.983109 sec


node3.chinasoft.com | success | rc=0 >>
 3 May 09:13:12 ntpdate[1803]: step time server 192.168.8.102 offset 339279.739826 sec
# ansible rhcs -m yum -a"name=corosync state=present"


# ansible rhcs -m yum -a "name=cman state=present"


# ansible rhcs -m yum -a "name=rgmanager state=present"
<!--?xml version="1.0"?-->
<cluster config_version="1" name="mycluster">


  <clusternodes>
  </clusternodes>


  <fencedevices>
  </fencedevices>


  <rm>
    <failoverdomains>
    <resources>
  </resources></failoverdomains></rm>
</cluster>
# ccs_tool addnode Usage: ccs_tool addnode [options][ = ]... -n --nodeid Nodeid (required) -v --votes Number of votes for this node (default 1) -a --altname Alternative name/interface for multihomed hosts -f --fence_type Name reference of fencing to use -c --configfile Name of configuration file (/etc/cluster/cluster.conf) -o --outputfile Name of output file (defaults to same as --configfile) -h --help Display this help text Examples: Add a new node to default configuration file: ccs_tool addnode newnode1 -n 1 -f wti7 port=1 Add a new node and dump config file to stdout rather than save it ccs_tool addnode -o- newnode2 -n 2 -f apc port=1
# ccs_tool addnode node2.chinasoft.com -n 1 -v 1
# ccs_tool addnode node3.chinasoft.com -n 2 -v 1
# ccs_tool addnode node4.chinasoft.com -n 3 -v 1
<cluster config_version="4" name="mycluster">


  <clusternodes>
  <clusternode name="node2.chinasoft.com" nodeid="1" votes="1"><clusternode name="node3.chinasoft.com" nodeid="2" votes="1"><clusternode name="node4.chinasoft.com" nodeid="3" votes="1"></clusternode></clusternode></clusternode></clusternodes>


  <fencedevices>
  </fencedevices>


  <rm>
    <failoverdomains>
    <resources>
  </resources></failoverdomains></rm>
</cluster>
# service cman start
Starting cluster:
   Checking if cluster has been disabled at boot...        [  OK  ]
   Checking Network Manager...                             [  OK  ]
   Global setup...                                         [  OK  ]
   Loading kernel modules...                               [  OK  ]
   Mounting configfs...                                    [  OK  ]
   Starting cman...                                        [  OK  ]
   Waiting for quorum...                                   [  OK  ]
   Starting fenced...                                      [  OK  ]
   Starting dlm_controld...                                [  OK  ]
   Tuning DLM kernel config...                             [  OK  ]
   Starting gfs_controld...                                [  OK  ]
   Unfencing self...                                       [  OK  ]
   Joining fence domain...                                 [  OK  ]
# ccs_tool lsnode


Cluster name: mycluster, config_version: 4


Nodename                        Votes Nodeid Fencetype
node2.chinasoft.com                1    1
node3.chinasoft.com                1    2
node4.chinasoft.com                1    3
# fdisk /dev/sdb
Device contains neither a valid DOS partition table, nor Sun, SGI or OSF disklabel
Building a new DOS disklabel with disk identifier 0x21c2120e.
Changes will remain in memory only, until you decide to write them.
After that, of course, the previous content won't be recoverable.


Warning: invalid flag 0x0000 of partition table 4 will be corrected by w(rite)


WARNING: DOS-compatible mode is deprecated. It's strongly recommended to
         switch off the mode (command 'c') and change display units to
         sectors (command 'u').


Command (m for help): n
Command action
   e   extended
   p   primary partition (1-4)
p
Partition number (1-4): 1
First cylinder (1-15665, default 1):
Using default value 1
Last cylinder, +cylinders or +size{K,M,G} (1-15665, default 15665): +20G


Command (m for help): n
Command action
   e   extended
   p   primary partition (1-4)
p
Partition number (1-4): 2
First cylinder (2613-15665, default 2613):
Using default value 2613
Last cylinder, +cylinders or +size{K,M,G} (2613-15665, default 15665): +20G


Command (m for help): w
The partition table has been altered!


Calling ioctl() to re-read partition table.
Syncing disks.
# partx -a /dev/sdb
BLKPG: Device or resource busy
error adding partition 1
BLKPG: Device or resource busy
error adding partition 2


# cat /proc/partitions
major minor  #blocks  name


   8       16  125829120 sdb
   8       17   20980858 sdb1
   8       18   20980890 sdb2
   8        0   83886080 sda
   8        1     512000 sda1
   8        2   83373056 sda2
 253        0   20480000 dm-0
 253        1    4096000 dm-1
 253        2   15360000 dm-2
 253        3   20480000 dm-3
 253        4   10240000 dm-4
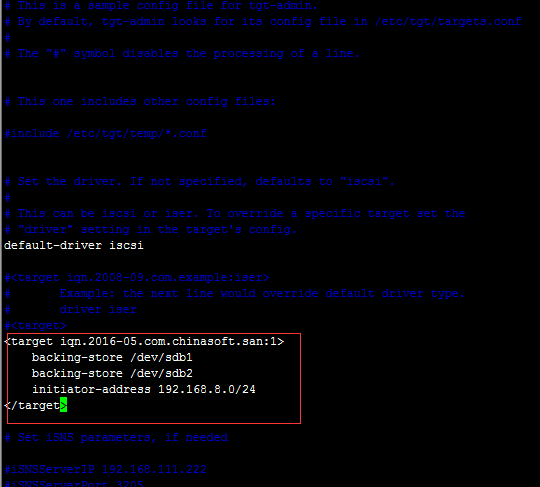
# tgtadm -L iscsi -o show -m target
Target 1: iqn.2016-05.com.chinasoft.san:1
    System information:
        Driver: iscsi
        State: ready
    I_T nexus information:
    LUN information:
        LUN: 0
            Type: controller
            SCSI ID: IET     00010000
            SCSI SN: beaf10
            Size: 0 MB, Block size: 1
            Online: Yes
            Removable media: No
            Prevent removal: No
            Readonly: No
            Backing store type: null
            Backing store path: None
            Backing store flags:
        LUN: 1
            Type: disk
            SCSI ID: IET     00010001
            SCSI SN: beaf11
            Size: 21484 MB, Block size: 512
            Online: Yes
            Removable media: No
            Prevent removal: No
            Readonly: No
            Backing store type: rdwr
            Backing store path: /dev/sdb1
            Backing store flags:
        LUN: 2
            Type: disk
            SCSI ID: IET     00010002
            SCSI SN: beaf12
            Size: 21484 MB, Block size: 512
            Online: Yes
            Removable media: No
            Prevent removal: No
            Readonly: No
            Backing store type: rdwr
            Backing store path: /dev/sdb2
            Backing store flags:
    Account information:
    ACL information:
        192.168.8.0/24
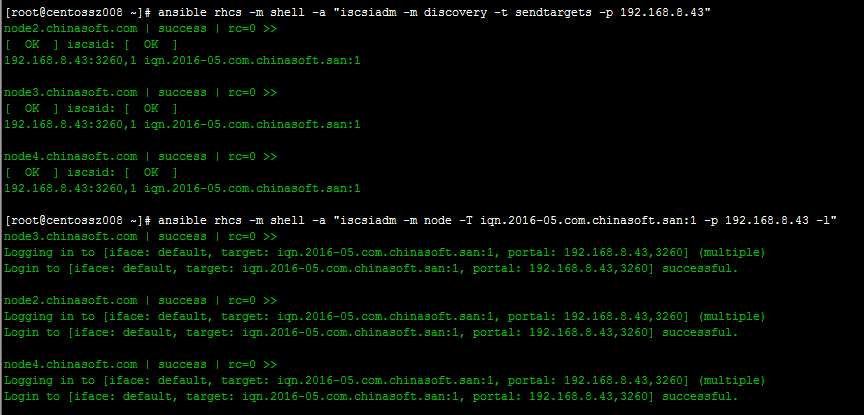
# ansible rhcs -m yum -a "name=iscsi-initiator-utils state=present"


# ansible rhcs -m shell -a 'echo "InitiatorName=`iscsi-iname -p iqn.2016-05.com.chinasoft` > /etc/iscsi/initiatorname.iscsi"'
node2.chinasoft.com | success | rc=0 >>
InitiatorName=iqn.2016-05.com.chinasoft:705b9bd97fc7 > /etc/iscsi/initiatorname.iscsi


node3.chinasoft.com | success | rc=0 >>
InitiatorName=iqn.2016-05.com.chinasoft:27b437d5e50 > /etc/iscsi/initiatorname.iscsi


node4.chinasoft.com | success | rc=0 >>
InitiatorName=iqn.2016-05.com.chinasoft:b68414f44a7f > /etc/iscsi/initiatorname.iscsi
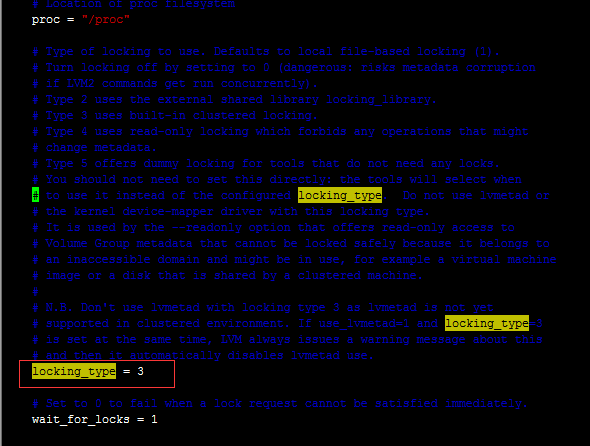
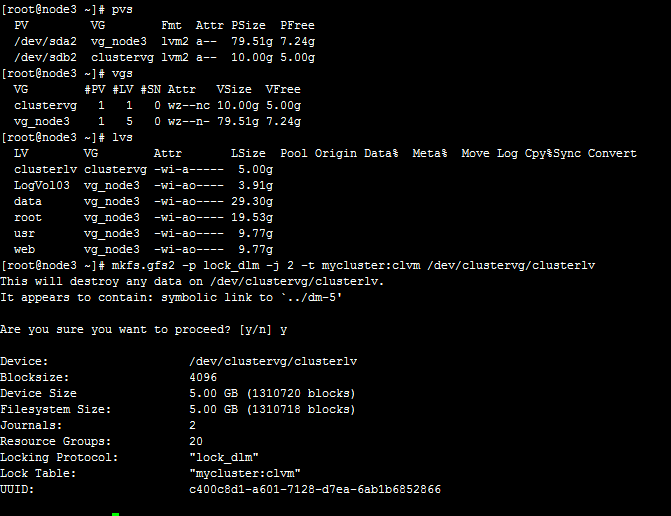
-b BlockSize:指定文件系統塊大小,最小為512,默認為4096;
-J MegaBytes:指定gfs2日志區域大小,默認為128MB,最小值為8MB;
-j Number:指定創建gfs2文件系統時所創建的日志區域個數,一般需要為每個掛載的客戶端指定一個日志區域;
-p LockProtoName:所使用的鎖協議名稱,通常為lock_dlm或lock_nolock之一;
-t LockTableName:鎖表名稱,一般來說一個集群文件系統需一個鎖表名以便讓集群節點在施加文件鎖時得悉其所關聯到的集群文件系統,鎖表名稱為clustername:fsname,其中的clustername必須跟集群配置文件中的集群名稱保持一致,因此,也僅有此集群內的節點可訪問此集群文件系統;此外,同一個集群內,每個文件系統的名稱必須惟一;
# fdisk /dev/sdb
Device contains neither a valid DOS partition table, nor Sun, SGI or OSF disklabel
Building a new DOS disklabel with disk identifier 0x0a8dee2d.
Changes will remain in memory only, until you decide to write them.
After that, of course, the previous content won't be recoverable.


Warning: invalid flag 0x0000 of partition table 4 will be corrected by w(rite)


WARNING: DOS-compatible mode is deprecated. It's strongly recommended to
         switch off the mode (command 'c') and change display units to
         sectors (command 'u').


Command (m for help): n
Command action
   e   extended
   p   primary partition (1-4)
p
Partition number (1-4): 1
First cylinder (1-20489, default 1):
Using default value 1
Last cylinder, +cylinders or +size{K,M,G} (1-20489, default 20489): +10G


Command (m for help): w
The partition table has been altered!


Calling ioctl() to re-read partition table.
Syncing disks.


查看分區是否生效
# cat /proc/partitions
major minor  #blocks  name


   8        0  125829120 sda
   8        1     512000 sda1
   8        2  125316096 sda2
 253        0   30720000 dm-0
 253        1    4096000 dm-1
 253        2   25600000 dm-2
 253        3   30720000 dm-3
 253        4   10240000 dm-4
   8       16   20980858 sdb
   8       17   10486768 sdb1
   8       32   20980890 sdc


# cman_tool status
Version: 6.2.0
Config Version: 4
Cluster Name: mycluster
Cluster Id: 65461
Cluster Member: Yes
Cluster Generation: 16
Membership state: Cluster-Member
Nodes: 3
Expected votes: 3
Total votes: 3
Node votes: 1
Quorum: 2
Active subsystems: 7
Flags:
Ports Bound: 0
Node name: node2.chinasoft.com
Node ID: 1
Multicast addresses: 239.192.255.181
Node addresses: 192.168.8.39
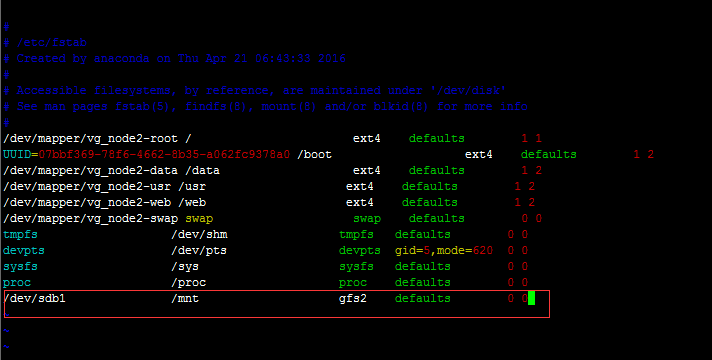
# mount /dev/sdb1 /mnt
# cd /mnt
# ls
# mount
/dev/mapper/vg_node2-root on / type ext4 (rw)
proc on /proc type proc (rw)
sysfs on /sys type sysfs (rw)
devpts on /dev/pts type devpts (rw,gid=5,mode=620)
tmpfs on /dev/shm type tmpfs (rw)
/dev/sda1 on /boot type ext4 (rw)
/dev/mapper/vg_node2-data on /data type ext4 (rw)
/dev/mapper/vg_node2-usr on /usr type ext4 (rw)
/dev/mapper/vg_node2-web on /web type ext4 (rw)
none on /proc/sys/fs/binfmt_misc type binfmt_misc (rw)
none on /sys/kernel/config type configfs (rw)
/dev/sdb1 on /mnt type gfs2 (rw,relatime,hostdata=jid=0)

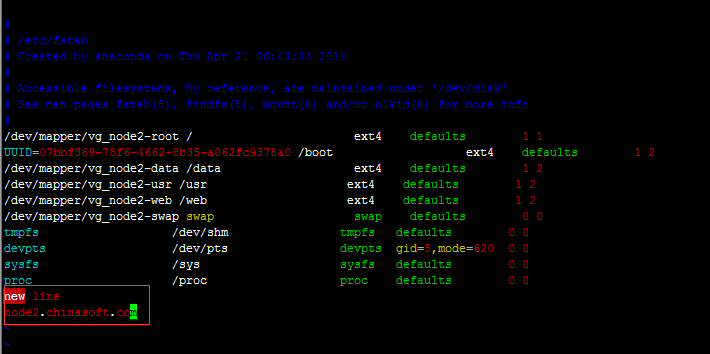
# tail -f /mnt/fstab
/dev/mapper/vg_node2-data /data                   ext4    defaults        1 2
/dev/mapper/vg_node2-usr /usr                    ext4    defaults        1 2
/dev/mapper/vg_node2-web /web                    ext4    defaults        1 2
/dev/mapper/vg_node2-swap swap                    swap    defaults        0 0
tmpfs                   /dev/shm                tmpfs   defaults        0 0
devpts                  /dev/pts                devpts  gid=5,mode=620  0 0
sysfs                   /sys                    sysfs   defaults        0 0
proc                    /proc                   proc    defaults        0 0
new line
node2.chinasoft.com
hello world
hello world2
# fdisk /dev/sdb


WARNING: DOS-compatible mode is deprecated. It's strongly recommended to
         switch off the mode (command 'c') and change display units to
         sectors (command 'u').


Command (m for help): n
Command action
   e   extended
   p   primary partition (1-4)
p
Partition number (1-4): 2
First cylinder (10242-20489, default 10242):
Using default value 10242
Last cylinder, +cylinders or +size{K,M,G} (10242-20489, default 20489): +10G


Command (m for help): t
Partition number (1-4): 2
Hex code (type L to list codes): 8e
Changed system type of partition 2 to 8e (Linux LVM)


Command (m for help): w
The partition table has been altered!


Calling ioctl() to re-read partition table.


WARNING: Re-reading the partition table failed with error 16: Device or resource busy.
The kernel still uses the old table. The new table will be used at
the next reboot or after you run partprobe(8) or kpartx(8)
Syncing disks.


# partx -a /dev/sdb
BLKPG: Device or resource busy
error adding partition 1
# partx -a /dev/sdb
BLKPG: Device or resource busy
error adding partition 1
BLKPG: Device or resource busy
error adding partition 2
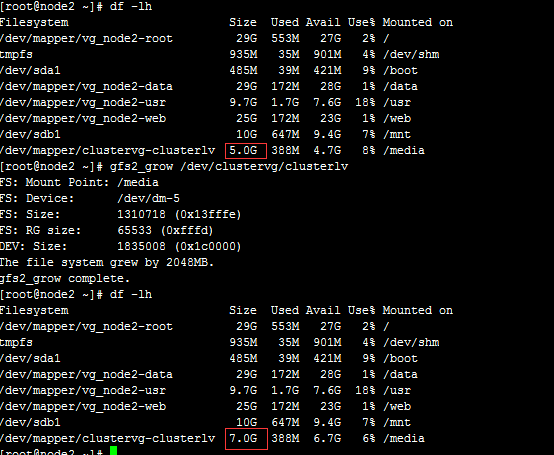
至此,基於corosync+cman實現iscsi設備的分布式文件系統配置已完成