


網絡時間協議NTP(Network Time Protocol)是用於互聯網中時間同步的標准互聯網協議。NTP的用途是把計算機的時間同步到某些時間標准。目前采用的時間標准是世界協調時UTC(Universal Time Coordinated)。NTP的主要開發者是美國特拉華大學的David L. Mills教授。
對於企業來說,當你有成百上千的計算機,都不能直接連接互聯網,時間不統一影響業務,如果一台一台的修改,工作量太大。這時搭建一個自己的NTP服務器就顯出它的優勢了。
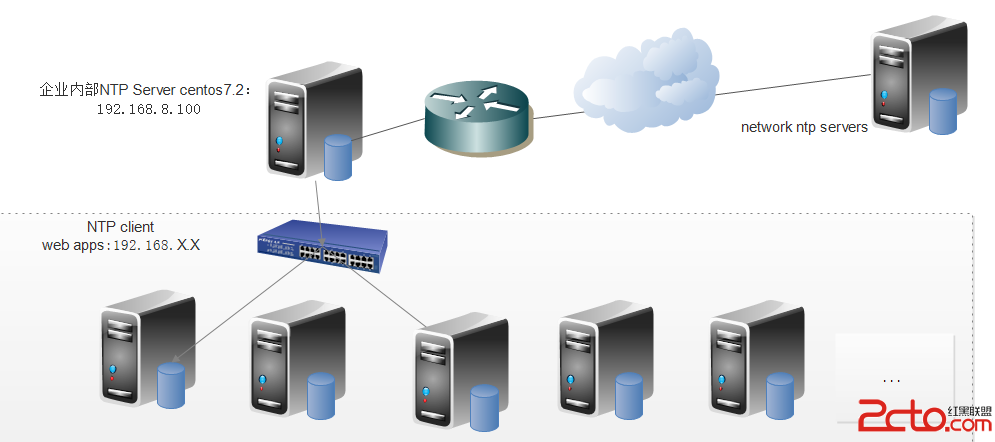
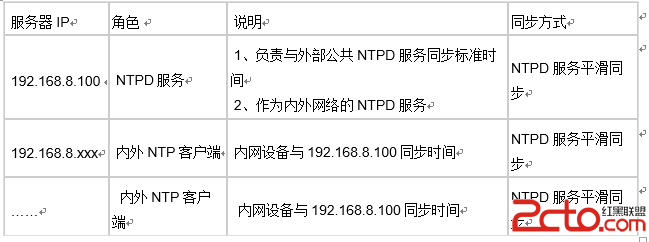
企業內部架設NTP服務器的大概拓撲如下:
# vim /etc/ntp.conf 添加如下內容就可以了
# 允許內網網段 192.168.0.0 其他機器同步時間
restrict 192.168.0.0 mask 255.255.0.0 nomodify

# 中國這邊最活躍的時間服務器 : http://www.pool.ntp.org/zone/cn
server ntp.api.bz perfer
server 210.72.145.44		 # 中國國家受時中心
server 202.112.10.36             # 1.cn.pool.ntp.org
server 59.124.196.83             # 0.asia.pool.ntp.org
# 允許上層時間服務器主動修改本機時間
restrict ntp.api.bz nomodify notrap noquery
restrict 210.72.145.44 nomodify notrap noquery
restrict 202.112.10.36 nomodify notrap noquery
restrict 59.124.196.83 nomodify notrap noquery


# 外部時間服務器不可用時,以本地時間作為時間服務
server  127.127.1.0     # local clock
fudge   127.127.1.0 stratum 10
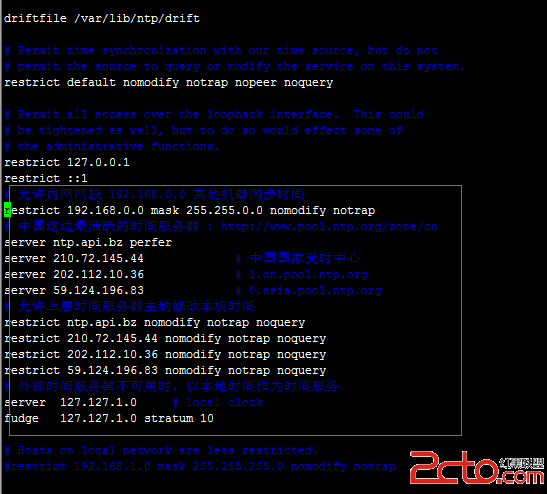
driftfile /var/lib/ntp/drift
restrict default kod nomodify notrap nopeer noquery
restrict -6 default kod nomodify notrap nopeer noquery
restrict 127.0.0.1
restrict -6 ::1
restrict 192.168.0.0 mask 255.255.0.0 nomodify
server ntp.api.bz perfer
server 210.72.145.44             # 中國國家受時中心
server 202.112.10.36             # 1.cn.pool.ntp.org
server 59.124.196.83             # 0.asia.pool.ntp.org
server  127.127.1.0     # local clock
fudge   127.127.1.0 stratum 10
server 0.centos.pool.ntp.org iburst
server 1.centos.pool.ntp.org iburst
server 2.centos.pool.ntp.org iburst
server 3.centos.pool.ntp.org iburst
includefile /etc/ntp/crypto/pw
keys /etc/ntp/keys
210.72.145.44  (國家授時中心服務器IP地址)
ntp.sjtu.edu.cn 202.120.2.101 (上海交通大學網絡中心NTP服務器地址)
s1a.time.edu.cn	北京郵電大學
s1b.time.edu.cn	清華大學
s1c.time.edu.cn	北京大學
s1d.time.edu.cn	東南大學
s1e.time.edu.cn	清華大學
s2a.time.edu.cn	清華大學
s2b.time.edu.cn	清華大學
s2c.time.edu.cn	北京郵電大學
s2d.time.edu.cn	西南地區網絡中心
s2e.time.edu.cn	西北地區網絡中心
s2f.time.edu.cn	東北地區網絡中心
s2g.time.edu.cn	華東南地區網絡中心
s2h.time.edu.cn	四川大學網絡管理中心
s2j.time.edu.cn	大連理工大學網絡中心
s2k.time.edu.cn CERNET桂林主節點
s2m.time.edu.cn 北京大學
在配置前,先使用ntpdate手動同步下時間,免得本機與外部時間服務器時間差距太大,讓ntpd不能正常同步
1)、權限的設定主要以 restrict 這個參數來設定,主要的語法為:
restrict IP地址 mask 子網掩碼 參數
其中 IP 可以是IP地址,也可以是 default ,default 就是指所有的IP
參數有以下幾個:
ignore :關閉所有的 NTP 聯機服務
nomodify:客戶端不能更改服務端的時間參數,但是客戶端可以通過服務端進行網絡校時。
notrust :客戶端除非通過認證,否則該客戶端來源將被視為不信任子網
noquery :不提供客戶端的時間查詢
2)、用server這個參數設定上級時間服務器,語法為:
server  IP地址或域名 [prefer]
IP地址或域名就是我們指定的上級時間服務器,如果 Server 參數最後加上 prefer,表示我們的 NTP 服務器主要以該部主機時間進行校准。
3)、解決NTP服務器校准時間時的傳送延遲
使用driftfile參數設置:
driftfile 文件名
在與上級時間服務器聯系時所花費的時間,記錄在driftfile參數後面的文件內。
注意:  driftfile 後面接的文件需要使用完整的路徑文件名,不能是鏈接文件,並且文件的權限需要設定成 ntpd守護進程可以寫入。
# service ntpd start
解決ntp的錯誤 no server suitable for synchronization found
當用ntpdate -d 來查詢時會發現導致 no server suitable for synchronization found 的錯誤的信息有以下2個:
錯誤1.Server dropped: Strata too high
在ntp客戶端運行ntpdate serverIP,出現no server suitable for synchronization found的錯誤。
在ntp客戶端用ntpdate –d serverIP查看,發現有“Server dropped: strata too high”的錯誤,並且顯示“stratum 16”。而正常情況下stratum這個值得范圍是“0~15”。
這是因為NTP server還沒有和其自身或者它的server同步上。
以下的定義是讓NTP Server和其自身保持同步,如果在/ntp.conf中定義的server都不可用時,將使用local時間作為ntp服務提供給ntp客戶端。
server 127.127.1.0 fudge
127.127.1.0 stratum 8
在ntp server上重新啟動ntp服務後,ntp server自身或者與其server的同步的需要一個時間段,這個過程可能是5分鐘,在這個時間之內在客戶端運行ntpdate命令時會產生no server suitable for synchronization found的錯誤。
那麼如何知道何時ntp server完成了和自身同步的過程呢?
在ntp server上使用命令:
# watch ntpq -p
出現畫面:
Every 2.0s: ntpq -p Thu Jul 10 02:28:32 2008
remote refid st t when poll reach delay offset jitter
==============================================================================
192.168.30.22 LOCAL(0) 8 u 22 64 1 2.113 179133. 0.001
LOCAL(0) LOCAL(0) 10 l 21 64 1 0.000 0.000 0.001
注意LOCAL的這個就是與自身同步的ntp server。
注意reach這個值,在啟動ntp server服務後,這個值就從0開始不斷增加,當增加到17的時候,從0到17是5次的變更,每一次是poll的值的秒數,是64秒*5=320秒的時間。
如果之後從ntp客戶端同步ntp server還失敗的話,用ntpdate –d來查詢詳細錯誤信息,再做判斷。
錯誤2.Server dropped: no data
從客戶端執行netdate –d時有錯誤信息如下:
transmit(192.168.30.22)
transmit(192.168.30.22)
transmit(192.168.30.22)
transmit(192.168.30.22)
transmit(192.168.30.22)
192.168.30.22: Server dropped: no data
server 192.168.30.22, port 123
.....
28 Jul 17:42:24 ntpdate[14148]: no server suitable for synchronization found
出現這個問題的原因可能有2:
1。檢查ntp的版本,如果你使用的是ntp4.2(包括4.2)之後的版本,在restrict的定義中使用了notrust的話,會導致以上錯誤。
使用以下命令檢查ntp的版本:
# ntpq -c version
下面是來自ntp官方網站的說明:
The behavior of notrust changed between versions 4.1 and 4.2.
In 4.1 (and earlier) notrust meant "Don't trust this host/subnet for time".
In 4.2 (and later) notrust means "Ignore all NTP packets that are not cryptographically authenticated." This forces remote time servers to authenticate themselves to your (client) ntpd
解決:
把notrust去掉。
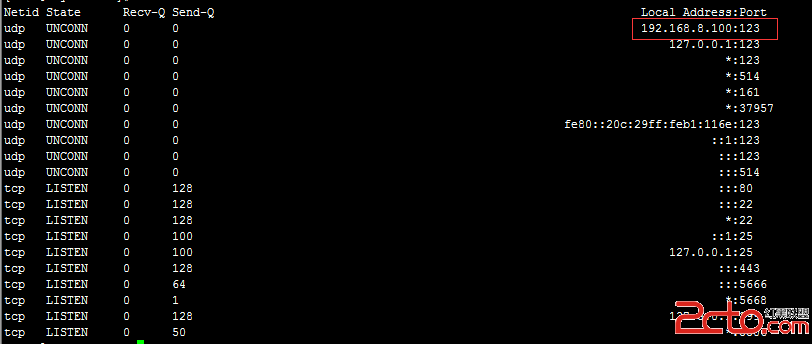
2。檢查ntp server的防火牆。可能是server的防火牆屏蔽了upd 123端口。
可以用命令
#service iptables stop
來關掉iptables服務後再嘗試從ntp客戶端的同步,如果成功,證明是防火牆的問題,需要更改iptables的設置。
centos7關閉防火牆方法;
# systemctl stop firewalld.service
禁止隨機啟動
# systemctl disable firewalld.service