


Linux內核版本:linux-3.0.35
開發板:i.MX6S MY-IMX6-EK200
系統:Ubuntu12
前言:之前寫過一篇關於如何通過應用層程序讀取系統時間的blog,今天再寫一篇如何寫入並保存RTC時鐘的blog吧。
一、寫入時間
1、預備知識:
a、mktime
頭文件:#include
函數:time_t mktime(struct tm *timeptr)
函數說明:mktime()用來將timeptr所指的tm結構體數據換成從公元1970年1月1日0時0分0 秒算起至今的本地時間所經過的秒數。
返回值:返回經過的秒數。當發生錯誤的時候,返回-1。
b、settimeofday
頭文件:#include
#include
函數:int settimeofday(const struct timeval *tv,const struct timezone *tz)
函數說明:settimeofday()會把目前時間設成由tv所指的結構體信息,當地時區信息則設成tz所指的結構體。
返回值:只有root權限才能使用此函數修改時間。成功則返回0,失敗返回-1,錯誤代碼存於errno。
2、實踐:
通過mktime和settimeofday配合使用,即可完成時間的寫入。
3、代碼如下:
#include
#include
#include
#include
#include
#include
#include

struct my_timeval
{
    __time_t tv_sec;
    __suseconds_t tv_usec;
};

/*************************************************
*函數名       :    System_SetTime
*功能         :    寫入系統時間
*使用方法      :    char* dt = "2016-04-15 21:00:00";
                   System_SetTime(dt);
**************************************************/
int System_SetTime(char* dt)
{
    struct rtc_time tm;
    struct tm _tm;
    struct my_timeval tv;
    time_t timep;

    sscanf(dt,"%d-%d-%d %d:%d:%d",&tm.tm_year,&tm.tm_mon,&tm.tm_mday,&tm.tm_hour,&tm.tm_min,&tm.tm_sec);
    _tm.tm_sec = tm.tm_sec;
    _tm.tm_min = tm.tm_min;
    _tm.tm_hour = tm.tm_hour;
    _tm.tm_mday = tm.tm_mday;
    _tm.tm_mon = tm.tm_mon - 1;
    _tm.tm_year = tm.tm_year - 1900;

    timep = mktime(&_tm);
    tv.tv_sec = timep;
    tv.tv_usec = 0;
    if(settimeofday(&tv, (struct timezone *) 0) < 0)
    {
        printf("Set system datetime error!\n");
        return -1;
    }
    return 0;
}

void main(void)
{
    char *dt = "2016-4-15 21:00:00";
    System_SetTime(dt);
}
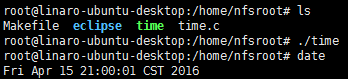
4、測試結果:
 vcWxvsDvtcTWuMHuvs3Kx2h3Y2xvY2sgJm5kYXNoO3N5c3RvaGOho9Xi0fm+zc3qs8nBy82ssr2ho7WxyLvI57n709C4/LzytaW6zbj8us/KyrXEt723qKOsu7bTrda4tbyhor27wfeho8u1wcvV4sO0tuCjrNHUuenV/bSroaM8L3N0cm9uZz48YnIgLz4NCjxzdHJvbmc+MaGi1KSxuNaqyrajujwvc3Ryb25nPjxiciAvPg0KYaGiZm9ya7S0vajX0734s8yjrLT6wuvI58/Co7o8L2NvZGU+PC9wPg0KPHByZSBjbGFzcz0="brush:sql;">
/**************************
*功能:創建子進程fork()測試
*時間:2016-4-15
*作者:Jack Cui
***************************/
#include b、fork測試程序結果顯示:

c、execve()應用層調用腳本文件:
頭文件:#include
函數:int execve(const char * filename, char * const argv[], char * const envp[]);
函數說明: execve()用來執行參數filename 字符串所代表的文件路徑, 第二個參數系利用數組指針來傳遞給執行文件, 最後一個參數則為傳遞給執行文件的新環境變量數組。
返回值:如果執行成功則函數不會返回, 執行失敗則直接返回-1, 失敗原因存於errno 中。
d、execve()測試代碼:
/**************************
*功能:測試execve
*時間:2016-4-15
*作者:Jack Cui
***************************/
#include e、腳本內容:

f、execve測試結果:

可以看出execve使用正常,我們將腳本內容改為hwclock –systohc就可以實現將系統時間同步到硬件時間了。
三、整體代碼如下:
/******************************************
*功能:Linux應用層系統時間寫入RTC時鐘的方法
*時間:2016-4-15
*作者:Jack Cui
*******************************************/
#include 四、最終結果顯示:
1、腳本內容:

2、測試結果:
這樣我們重新啟動開發板,系統時間不會變,設置成功~!