OpenVPN簡介:
OpenVPN能夠運行於大多常見的系統平台,是一個基於SSL/TLS的VPN解決方案。OpenVPN能夠基於TAP/TUN虛擬設備驅動實現2層及3層的鏈接,提供基於SSL/TLS的工業級別加密功能,並且實現了大多數常見VPN解決方案的全部特性。但目前提供整合了OpenVPN的VPN硬件廠商還不太多。

一、 下載軟件包
# wget http://www.oberhumer.com/opensource/lzo/download/lzo-2.04.tar.gz
# wget http://openvpn.net/release/openvpn-2.1_rc22.tar.gz
# yum install openssl-devel
二、解壓及安裝
# tar xvf lzo-2.04.tar.gz
# cd lzo-2.04
# ./configure
# make && make install
# cd ../
# tar xvf openvpn-2.1_rc22.tar.gz
# cd openvpn-2.1_rc22
# ./configure
# make && make install
# cd ../
三、服務器端設置:
1. 用easy-rsa生成服務器證書客戶端證書
# cp openvpn-2.1_rc22/easy-rsa/2.0 -r /etc/openvpn/
# cd /etc/openvpn/2.0/
編輯所需的參數再調用之
# vim vars
export D="`pwd`"
export KEY_CONFIG="$D/openssl.cnf"
export KEY_DIR="$D/keys"
export KEY_COUNTRY="CN"
export KEY_PROVINCE="SH"
export KEY_CITY="PD"
export KEY_ORG="zyfmaster"
export KEY_EMAIL="905407204@qq.com"
# source vars
#也可以不用設置,直接執行下面的命令
下面這個命令在第一次安裝時可以運行,以後在添加客戶端時千萬別運行,這個命令會清除所有已經生成的證書密鑰。
# ./clean-all
生成服務器端ca證書
# ./build-ca
Generating a 1024 bit RSA private key
............++++++
..................++++++
writing new private key to '
ca.key'
-----
You are about to be asked to enter information that will be incorporated
into your certificate request.
What you are about to enter is what is called a Distinguished Name or a DN.
There are quite a few fields but you can leave some blank
For some fields there will be a default value,
If you enter '.', the field will be left blank.
-----
Country Name (2 letter code) [CN]:
State or Province Name (full name) [SH]:
Locality Name (eg, city) [PD]:
Organization Name (eg, company) [zyfmaster]:
Organizational Unit Name (eg, section) []:
zyfmaster
Common Name (eg, your name or your server's hostname) [zyfmaster CA]:
server
Name []:
Email Address [905407204@qq.com]:
生成服務器端密鑰key, 後面這個server-name就是服務器名,可以自定義。
# ./build-key-server server
Generating a 1024 bit RSA private key
.......................................++++++
.......++++++
writing new private key to '
server.key'
-----
You are about to be asked to enter information that will be incorporated
into your certificate request.
What you are about to enter is what is called a Distinguished Name or a DN.
There are quite a few fields but you can leave some blank
For some fields there will be a default value,
If you enter '.', the field will be left blank.
-----
Country Name (2 letter code) [CN]:
State or Province Name (full name) [SH]:
Locality Name (eg, city) [PD]:
Organization Name (eg, company) [zyfmaster]:
Organizational Unit Name (eg, section) []:
zyfmaster
Common Name (eg, your name or your server's hostname) [server]:
server
Name []:
Email Address [905407204@qq.com]:
Please enter the following 'extra' attributes
to be sent with your certificate request
A challenge password []:abcd1234
An optional company name []:zyfmaster
Using configuration from /etc/openvpn/2.0/openssl.cnf
Check that the request matches the signature
Signature ok
The Subject's Distinguished Name is as follows
countryName :PRINTABLE:
'CN'
stateOrProvinceName :PRINTABLE:
'SH'
localityName :PRINTABLE:
'PD'
organizationName :PRINTABLE:
'zyfmaster'
organizationalUnitName:PRINTABLE:
'zyfmaster'
commonName :PRINTABLE:
'server'
emailAddress :IA5STRING:
'905407204@qq.com'
Certificate is to be certified until Dec 2 04:14:34 2022 GMT (3650 days)
Sign the certificate? [y/n]:y
1 out of 1 certificate requests certified, commit? [y/n]y
Write out database with 1 new entries
Data Base Updated
生成客戶端 key
# ./build-key client1
Generating a 1024 bit RSA private key
............++++++
........................................................++++++
writing new private key to '
client1.key'
-----
You are about to be asked to enter information that will be incorporated
into your certificate request.
What you are about to enter is what is called a Distinguished Name or a DN.
There are quite a few fields but you can leave some blank
For some fields there will be a default value,
If you enter '.', the field will be left blank.
-----
Country Name (2 letter code) [CN]:
State or Province Name (full name) [SH]:
Locality Name (eg, city) [PD]:
Organization Name (eg, company) [zyfmaster]:
Organizational Unit Name (eg, section) []:
zyfmaster
Common Name (eg, your name or your server's hostname) [client1]:
client1 #重要: 每個不同的client 生成的證書, 名字必須不同.
Name []:
Email Address [905407204@qq.com]:
Please enter the following 'extra' attributes
to be sent with your certificate request
A challenge password []:abcd1234
An optional company name []:zyfmaster
Using configuration from /etc/openvpn/2.0/openssl.cnf
Check that the request matches the signature
Signature ok
The Subject's Distinguished Name is as follows
countryName :PRINTABLE:
'CN'
stateOrProvinceName :PRINTABLE:
'SH'
localityName :PRINTABLE:
'PD'
organizationName :PRINTABLE:
'zyfmaster'
organizationalUnitName:PRINTABLE:
'zyfmaster'
commonName :PRINTABLE:
'client1'
emailAddress :IA5STRING:
'905407204@qq.com'
Certificate is to be certified until Dec 2 04:15:50 2022 GMT (3650 days)
Sign the certificate? [y/n]:y
1 out of 1 certificate requests certified, commit? [y/n]y
Write out database with 1 new entries
Data Base Updated
以此類推建立其他客戶端 key
# ./build-key client2
# ./build-key client3
注意在進入 Common Name (eg, your name or your server’s hostname) []: 的輸入時, 每個證書輸入的名字必須不同.
5.生成Diffie Hellman參數
# ./build-dh
6.將 keys 下的所有文件打包下載到本地(可以通過winscp,http,ftp等等……)
# tar zcvf yskeys.tar.gz keys/*
7.創建服務端配置文件
# mkdir /etc/openvpn/2.0/conf
# cp /root/openvpn/openvpn-2.1_rc22/sample-config-files/server.conf /etc/openvpn/2.0/conf/
# vim /etc/openvpn/2.0/conf/server.conf
port 1194
proto udp
dev tun
ca /etc/openvpn/2.0/keys/ca.crt
cert /etc/openvpn/2.0/keys/server.crt
key /etc/openvpn/2.0/keys/server.key # This file should be kept secret
dh /etc/openvpn/2.0/keys/dh1024.pem
server 10.8.0.0 255.255.255.0
push "route 10.8.0.0 255.255.255.0"
push "route 0.0.0.0 0.0.0.0"
ifconfig-pool-persist ipp.txt
push "redirect-gateway def1 bypass-dhcp"
push "dhcp-option DNS 8.8.8.8"
push "dhcp-option DNS 8.8.4.4"
client-to-client
keepalive 10 120
comp-lzo
user nobody
group nobody
persist-key
persist-tun
status openvpn-status.log
log openvpn.log
verb 3
四、打開服務器的路由功能
1.開啟CentOS 5 的路由轉發功能
# vim /etc/sysctl.conf
修改以下內容:
net.ipv4.ip_forward = 1
五、使sysctl.conf配置文件生效並添加iptables轉發規則:
# sysctl –p
# iptables -t nat -A POSTROUTING -o eth0 -s 10.8.0.0/24 -j MASQUERADE
# /etc/init.d/iptables save
六、啟動openvpn,並加入隨機啟動
vi /etc/rc.local
然後在最後面加入此行:
/usr/local/sbin/openvpn --config /etc/openvpn/2.0/conf/server.conf &
七、OpenVPN GUI For Windows 客戶端安裝過程
1.下載 openvpn-2.1_rc15-install.exe(此版本集成 OpenVPN GUI)官方下載地址:http://openvpn.net/release/openvpn-2.1_rc15-install.exe
2.依屏幕指示安裝OpenVPN GUI
3.配置 openvpn gui將上面第6步打包的yskeys.tar.gz中的下列證書文件解壓到 你的OpenVPN GUI安裝路徑OpenVPNconfig文件夾下
ca.crt
ca.key
client1.crt
client1.csr
client1.key
4.修改client.ovpn把你的OpenVPN GUI安裝路徑OpenVPNsample-config下的client.ovpn文件復制到你的OpenVPN GUI安裝路徑OpenVPNconfig文件夾下,用記事本打開client.ovpn
#找到remote my-server-1 1194,把my-server-1改成你的ip地址
remote a.b.c.d (自己的VPN地址)
5.雙擊 client.ovpn 即可啟動 openvpn, 或者通過 OpenVPN GUI 的控制啟動 VPN.
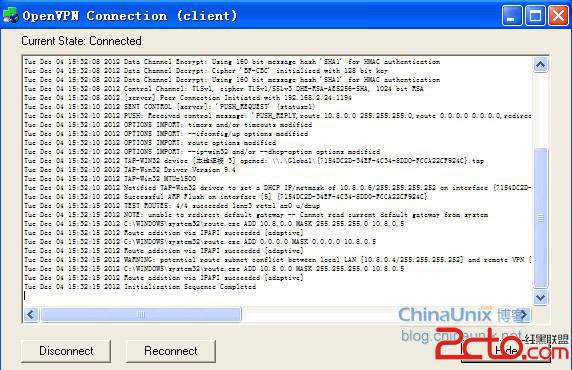
查看客戶端所獲得的IP:
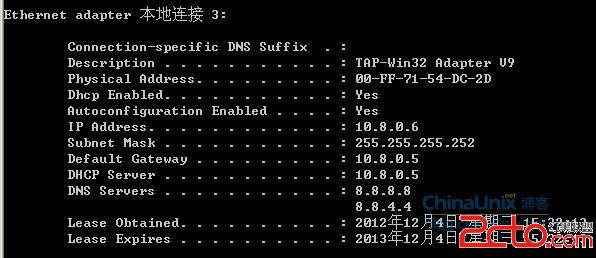
連接成功之後,去www.ip138.com上看看外網ip是多少,如果是CentOS系統的外網ip那說明測試成功了~


