


SELinux(Security-EnhancedLinux)是美國國家安全局(NAS)對於強制訪問控制的實現,字面上的意思就是安全強化的linux之意。
1.開啟selinux 後要重新啟動系統才能生效
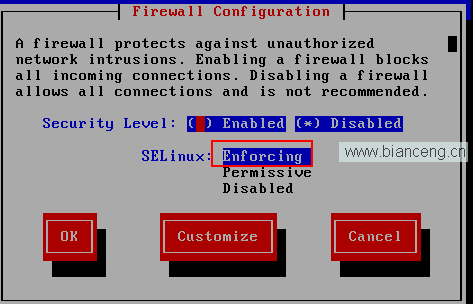
2.也可以在修改
[root@localhost ~]# vim /etc/sysconfig/selinux
6 SELINUX=enforcing #設置為強制
[root@localhost ~]# vim /etc/sysconfig/i18n
LANG="zh_CN.UTF-8" #中文界面
沒有圖像界面解決
2.安裝apache 測試selinux 及排錯
[root@localhost ~]# mount /dev/cdrom /mnt/cdrom/
[root@localhost Server]# rpm -ivh httpd-2.2.3-31.el5.i386.rpm
設置默認主目錄為/abc
[root@localhost ~]# mkdir /abc
[root@localhost ~]# vim index.html
[root@localhost ~]# cd /etc/httpd/conf/
[root@localhost conf]# vim httpd.conf
281 DocumentRoot "/abc"
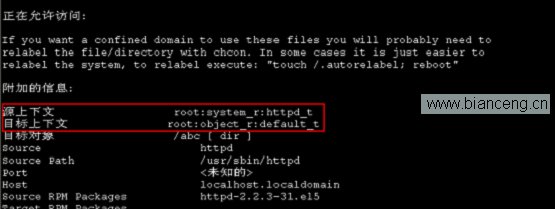
開啟selinux以後,再次啟動httpd的時候發現已經不能啟動了。
而且selinux也會出現如下界面
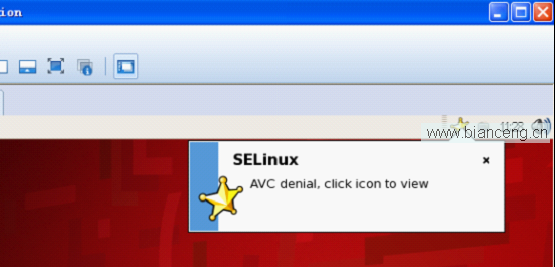
點擊一下就會出現如下界面:
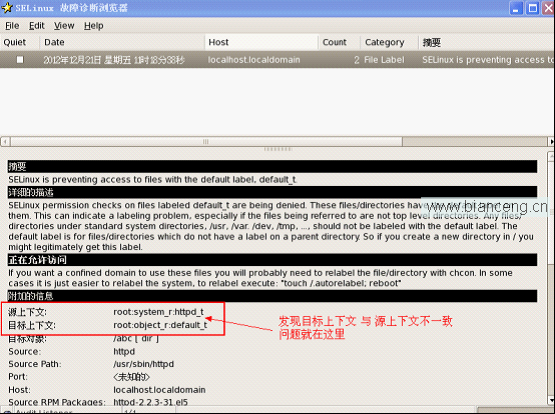
如果沒有安裝圖形界面可以通過查看日志:
[root@localhost ~]# tail -f /var/log/messages
最後一行提示
run sealert -l 6d4b54ef-9617-48f0-9613-b7cc1e18f21b
咱們試著運行一下:效果是一樣的
先把selinux的參數修改一下試試
[root@localhost ~]# setenforce 0 /1 #0代表警告 但是可以運行,1代表強制
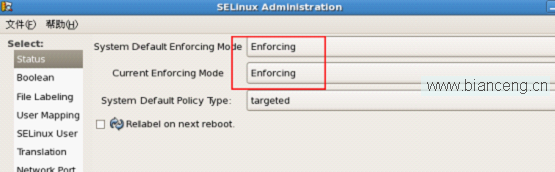
[root@localhost ~]# getenforce #得到selinux的狀態。
Enforcing
這樣就不用重啟系統,比較方便。把參數值改為0的時候是可起來的。1就不能起來
只要把目標和源的上下文修改為一致就可以了
命令如下:
[root@localhost ~]# chcon -R -t httpd_sys_content_t /abc
設置完就可以正常啟動和訪問了。
下面修改一下監聽端口,發現又啟動不了了
[root@localhost ~]# cd /etc/httpd/conf
[root@localhost conf]# vim httpd.conf
134 Listen 800
查看selinux支持的http端口
[root@localhost ~]# semanage port -l |grep http
http_cache_port_t tcp 3128, 8080, 8118, 11211, 10001-10010
http_cache_port_t udp 3130, 11211
http_port_t tcp 80, 443, 488, 8008, 8009, 8443
pegasus_http_port_t tcp 5988
pegasus_https_port_t tcp 59
修改方法,把800加入到selinux支持http的端口
[root@localhost ~]# semanage port -a -t http_port_t -p tcp 800
重啟一下,就可以基於端口訪問
例如:http://192.168.10.100:800/
二.基於ftp的selinux配置
[root@localhost ~]# yum install vsftpd -y
添加用戶如下
[root@localhost Server]# useradd u1
[root@localhost Server]# passwd u1
[root@localhost ~]# cd /home/u1
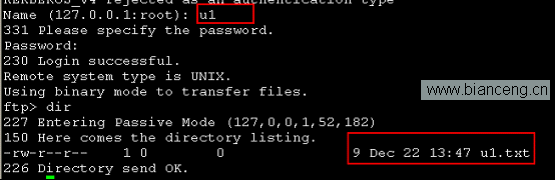
[root@localhost u1]# vim u1.txt #創建文件用於測試
U1登錄
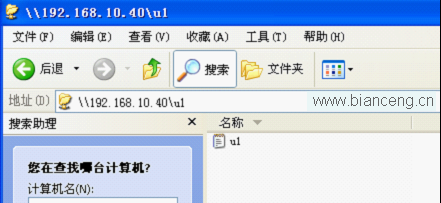
[root@localhost Server]# ftp 127.0.0.1
ftp> dir
227 Entering Passive Mode (127,0,0,1,49,10)
150 Here comes the directory listing.
226 Directory send OK.
ftp> pwd
257 "/home/u1"
並沒有發現u1.txt這個文件
查看日志:
Dec 22 21:52:18 localhost setroubleshoot: SELinux is preventing the ftp daemon from reading users home directories (/home/u1/u1.txt). For complete SELinux messages. run sealert -l f4d80bc3-3352-46c7-8aed-882c00493214 #selinux拒絕訪問自己的家目錄文件
圖形化解決
[root@localhost ~]# system-config-selinux
可以設置如下:把標准的選項勾選上就ok了

也可以通過命令設置
[root@localhost ~]# getsebool -a
ftp_home_dir --> off
ftpd_connect_db --> off
ftpd_disable_trans --> off
ftpd_is_daemon --> on
將有關選項設置為ON
[root@localhost ~]# setsebool -P ftp_home_dir=ON
設置完以後就可以進行訪問了
查看如下:
[root@localhost ~]# getsebool -a |grep ftp
allow_ftpd_anon_write --> off
allow_ftpd_full_access --> off
allow_ftpd_use_cifs --> off
allow_ftpd_use_nfs --> off
allow_tftp_anon_write --> off
ftp_home_dir --> on
Samba服務器selinux的配置部分
安裝
[root@localhost Server]# rpm -ivh perl-Convert-ASN1-0.20-1.1.noarch.rpm
[root@localhost Server]# rpm -ivh samba-3.0.33-3.14.el5.i386.rpm
[root@localhost Server]# mkdir /aa
[root@localhost Server]# cd /aa
[root@localhost aa]# touch aa.txt
[root@localhost aa]# vim /etc/samba/smb.conf
282 [public]
284 path = /aa
285 public = yes
添加smb用戶,重啟
[root@localhost aa]# smbpasswd -a u1
[root@localhost aa]# service smb start
訪問如下:

輸入用戶和密碼點擊 u1和public都無法訪問
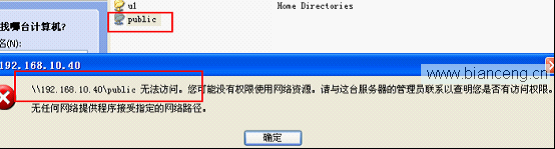
查看日志顯示權限不夠。
Dec 22 22:30:56 localhost smbd[4866]: '/home/u1' does not exist or permission denied when connecting to [u1] Error was 權限不夠
命令修改如下
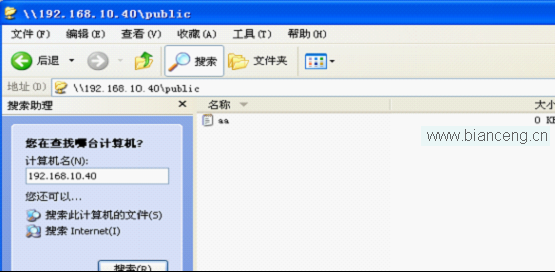
[root@localhost ~]# chcon -R -t samba_share_t /aa
[root@localhost ~]# getsebool -a |grep samba
samba_domain_controller --> off
samba_enable_home_dirs --> off
samba_export_all_ro --> off
samba_export_all_rw --> off
samba_share_nfs --> off
use_samba_home_dirs --> off
virt_use_samba --> off
[root@localhost ~]# setsebool -P samba_enable_home_dirs=ON
測試可以發現可以訪問
操作命令:
Vim /etc/sysconfig/selinux
System-config-selinux
System-config-securitylevel
使用上述兩個命令的話要重啟。
Getenforce
Setenforce 1 | 0 1表示強制 0 表示警告 不需要重啟
改變策略庫的方法:
semanage
semanage {login|user|port|interface|fcontext|translation} -l [-n]
semanage login -{a|d|m} [-sr] login_name
semanage user -{a|d|m} [-LrRP] selinux_name
semanage port -{a|d|m} [-tr] [-p protocol] port | port_range
semanage interface -{a|d|m} [-tr] interface_spec
semanage fcontext -{a|d|m} [-frst] file_spec
semanage translation -{a|d|m} [-T] level
本文出自 “Running” 博客,請務必保留此出處http://dg123.blog.51cto.com/4750342/1098197