


參考的是官方文檔,由於官方文檔有些文件及步驟沒有列出來,現已經補齊。經過測試沒問題。備忘一下。
You need at leastthree machines, virtual or physical, with Fedora 18 installed.
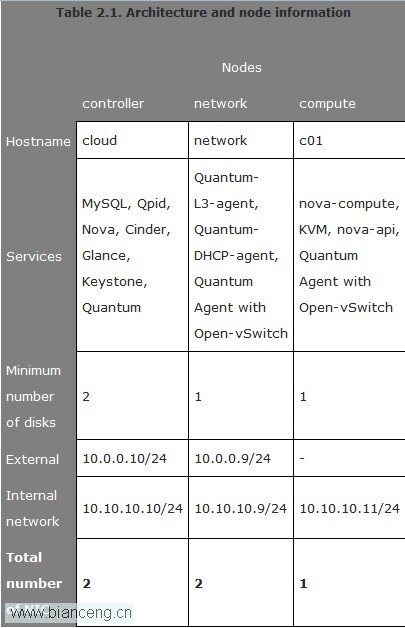
Introduction
The Controllernode will provide :
Databases (with MySQL)
Queues (with Qpid)
Keystone
Glance
Nova (without nova-compute)
Cinder
Quantum Server (with Open-vSwitch plugin)
Dashboard (with Horizon)
Common services
Operating System
MySQL DatabaseService
Qpid MessagingService
Operating System
Install Fedora 18 . The exact installation procedure is outside the scope of this document, but please note the following configurations:
Time zone: UTC
Hostname: cloud
Packages: OpenSSH-Server, wget
Once installation has finished, the server will reboot.
Use the Fedora repositories for Grizzly:
3. wgethttp://repos.fedorapeople.org/repos/openstack/openstack-grizzly/fedora-openstack-grizzly.repo
mv fedora-openstack-grizzly.repo/etc/yum.repos.d/
spacer.gif
Note
ForCentOS, use http://repos.fedorapeople.org/repos/openstack/openstack-grizzly/epel-openstack-grizzly.repo.
Configure the network:
Set up old ethernet nic device names:
sed -i 's/GOTO="netdevicename_end"/GOTO="netdevicename_end"/g'/lib/udev/rules.d/71-biosdevname.rules
Disable NetworkManager and enable the network service
· service NetworkManager stop
· service network start
· chkconfig NetworkManager off
chkconfig network on
Edit /etc/sysconfig/network-scripts/ifcfg-eth0:
· Internal Network
·DEVICE=eth0
·TYPE=Ethernet
·BOOTPROTO=static
·IPADDR=10.10.10.10
·NETMASK=255.255.255.0
·DEFROUTE=yes
·ONBOOT=yes
Edit /etc/sysconf/network-scripts/ifcfg-eth1:
· External Network
·DEVICE=eth1
·TYPE=Ethernet
·BOOTPROTO=static
·IPADDR=10.0.0.10
·NETMASK=255.255.255.0
·GATEWAY=10.0.0.1
·DNS=8.8.8.8
·DEFROUTE=yes
·ONBOOT=yes
Reboot
Edit the /etc/hosts file and add cloud, network, and c01 hostnames with correct IP.
·127.0.0.1 localhost
·10.10.10.10 cloud
·10.10.10.9 network
10.10.10.11 c01
spacer.gif
Note
While manually specifying host entries is acceptable for a simple or testing environment, it is highly recommended to use proper DNS entries, or at a minimum a configuration management system such as Puppet, to maintain your IP to host mappings.
Install NTP. NTP will ensure that the server has the correct time. This is important because if an OpenStack server's time is not correct, it will be removed from the rest of the cloud.
· yum install -y ntp
MySQL Database Service
The variousOpenStack components store persistent data in a relational database. MySQL isthe most popular choice.
Install the packages:
yum install mysql mysql-server MySQL-python
By default, MySQL will only accept connections from localhost. This needs changed so that the compute nodes can access the OpenStack Networking service. Database requests for the OpenStack Compute service are proxied through the nova-conductor service.
sed -i 's/127.0.0.1/0.0.0.0/g' /etc/my.cnf
Restart the service:
systemctl start mysqld.service
service mysqld restart
chkconfig mysqld on
The various databases that the OpenStack services require need created. Additionally, MySQL accounts to access those databases need created, too:
5. mysql -u root -p <<EOF
6.CREATE DATABASE nova;
7.GRANT ALL PRIVILEGES ON nova.* TO'nova'@'localhost' \
8.IDENTIFIED BY 'password';
9.CREATE DATABASE cinder;
10.GRANT ALL PRIVILEGES ON cinder.* TO'cinder'@'localhost' \
11.IDENTIFIED BY 'password';
12.CREATE DATABASE glance;
13.GRANT ALL PRIVILEGES ON glance.* TO'glance'@'localhost' \
14.IDENTIFIED BY 'password';
15.CREATE DATABASE keystone;
16.GRANT ALL PRIVILEGES ON keystone.* TO'keystone'@'localhost' \
17.IDENTIFIED BY 'password';
18.CREATE DATABASE quantum;
19.GRANT ALL PRIVILEGES ON quantum.* TO'quantum'@'localhost' \
20.IDENTIFIED BY 'password';
21.GRANT ALL PRIVILEGES ON quantum.* TO'quantum'@'10.10.10.9' \
22.IDENTIFIED BY 'password';
23.GRANT ALL PRIVILEGES ON quantum.* TO'quantum'@'10.10.10.11' \
24.IDENTIFIED BY 'password';
25.FLUSH PRIVILEGES;
EOF
Qpid Messaging Service
The OpenStackcomponents also communicate through a queuing service. For example, the CloudController places a request to launch an instance on the queue. The ComputeNode then picks this request up and launches the instance. OpenStack can workwith several different queuing services.
Install the packages:
yum install qpid-cpp-server
Enable authentication:
echo auth=1 >> /etc/qpidd.conf
/etc/qpidd.conf裡的yes改成no也行
Enable the messaging service:
chkconfig qpidd on
# saslpasswd2 -f /var/lib/qpidd/qpidd.sasldb-u QPID guest
>Password: guest
>Again (for verification): guest
...wait for a moment while it updates...
...and then to validate that these usersactually exist now:
[root@os-controller ~]# sasldblistusers2 -f /var/lib/qpidd/qpidd.sasldb
guest@QPID: userPassword <--- password obscured by program
steve@QPID: userPassword <-- another I added "just to test"
There were no users listed in the SASLdbat all after my initial installation, so the QPID docs (security chapter) werequite handy:
Start the messaging service:
service qpidd start
OpenStack Identity Service
The OpenStackIdentity Service provides the cloud environment with an authentication andauthorization system. In this system, users are a part of one or more projects.In each of these projects, they hold a specific role.
Install the packages:
yum install openstack-utils openstack-keystone python-keystonepython-keystoneclient
Edit /etc/keystone/keystone.conf:
3.[DEFAULT]
4.admin_token = password
5.debug = True
6.verbose = True
7.
8.[sql]
connection =mysql://keystone:password@localhost/keystone
Create the ssl keys:
10. keystone-manage pki_setup
chown -R keystone:keystone /etc/keystone/*
Restart Keystone and create the tables in the database:
12. service openstack-keystone restart
openstack-db --init --service keystone
spacer.gif
Note
Check the /var/log/keystone/keystone.log file for errors that would prevent the Identity Service from successfully starting.
Create an openrc file:
Create a file called ~/openrc. This file contains the OpenStack admin credentials that are used when interacting with the OpenStack environment on the command line.
·export OS_TENANT_NAME=admin
·export OS_USERNAME=admin
·export OS_PASSWORD=password
·export OS_AUTH_URL="http://localhost:5000/v2.0/"
·export OS_SERVICE_ENDPOINT="http://localhost:35357/v2.0"
export OS_SERVICE_TOKEN=password
spacer.gif
Note
Best practice for bootstrapping the first administrative user is to use the OS_SERVICE_ENDPOINT and OS_SERVICE_TOKEN together as environment variables, then set up a separate RC file just for Identity administration that uses port 35357 for the OS_AUTH_URL. This example is meant to provide a quick setup, not an audit-able environment.
Source the credentials into your environment:
source ~/openrc
Configure the Bash shell to load these credentials upon each login:
echo "source ~/openrc">> ~/.bashrc
The following bash script will populate Keystone with some initial data:
Projects: admin and services
Roles: admin, Member
Users: admin, demo, nova, glance, quantum, and cinder
Services: compute, volume, image, identity, ec2, and network
15.!/bin/bash
16.
17. Modify these variables as needed
18.ADMIN_PASSWORD=${ADMIN_PASSWORD:-password}
19.SERVICE_PASSWORD=${SERVICE_PASSWORD:-$ADMIN_PASSWORD}
20.DEMO_PASSWORD=${DEMO_PASSWORD:-$ADMIN_PASSWORD}
21.exportOS_SERVICE_TOKEN="password"
22.exportOS_SERVICE_ENDPOINT="http://localhost:35357/v2.0"
23.SERVICE_TENANT_NAME=${SERVICE_TENANT_NAME:-service}
24.
25.MYSQL_USER=keystone
26.MYSQL_DATABASE=keystone
27.MYSQL_HOST=localhost
28.MYSQL_PASSWORD=password
29.
30.KEYSTONE_REGION=RegionOne
31.KEYSTONE_HOST=10.10.10.10
32.
33. Shortcut function to get a newly generated ID
34.function get_field() {
35. while read data; do
36. if [ "$1" -lt 0 ]; then
37. field="(\$(NF$1))"
38. else
39. field="\$$(($1 + 1))"
40. fi
41. echo "$data" | awk -F'[\t]*\\|[ \t]*' "{print $field}"
42. done
43.}
44.
45. Tenants
46.ADMIN_TENANT=$(keystone tenant-create--name=admin | grep " id " | get_field 2)
47.DEMO_TENANT=$(keystone tenant-create--name=demo | grep " id " | get_field 2)
48.SERVICE_TENANT=$(keystone tenant-create--name=$SERVICE_TENANT_NAME | grep " id " | get_field 2)
49.
50. Users
51.ADMIN_USER=$(keystone user-create--name=admin --pass="$ADMIN_PASSWORD" --email=admin@domain.com | grep" id " | get_field 2)
52.DEMO_USER=$(keystone user-create--name=demo --pass="$DEMO_PASSWORD" --email=demo@domain.com--tenant-id=$DEMO_TENANT | grep " id " | get_field 2)
53.NOVA_USER=$(keystone user-create--name=nova --pass="$SERVICE_PASSWORD" --tenant-id $SERVICE_TENANT--email=nova@domain.com | grep " id " | get_field 2)
54.GLANCE_USER=$(keystone user-create --name=glance--pass="$SERVICE_PASSWORD" --tenant-id $SERVICE_TENANT--email=glance@domain.com | grep " id " | get_field 2)
55.QUANTUM_USER=$(keystone user-create--name=quantum --pass="$SERVICE_PASSWORD" --tenant-id $SERVICE_TENANT--email=quantum@domain.com | grep " id " | get_field 2)
56.CINDER_USER=$(keystone user-create--name=cinder --pass="$SERVICE_PASSWORD" --tenant-id $SERVICE_TENANT--email=cinder@domain.com | grep " id " | get_field 2)
57.
58. Roles
59.ADMIN_ROLE=$(keystone role-create--name=admin | grep " id " | get_field 2)
60.MEMBER_ROLE=$(keystone role-create--name=Member | grep " id " | get_field 2)
61.
62. Add Roles to Users in Tenants
63.keystone user-role-add --user-id$ADMIN_USER --role-id $ADMIN_ROLE --tenant-id $ADMIN_TENANT
64.keystone user-role-add --tenant-id$SERVICE_TENANT --user-id $NOVA_USER --role-id $ADMIN_ROLE
65.keystone user-role-add --tenant-id$SERVICE_TENANT --user-id $GLANCE_USER --role-id $ADMIN_ROLE
66.keystone user-role-add --tenant-id$SERVICE_TENANT --user-id $QUANTUM_USER --role-id $ADMIN_ROLE
67.keystone user-role-add --tenant-id$SERVICE_TENANT --user-id $CINDER_USER --role-id $ADMIN_ROLE
68.keystone user-role-add --tenant-id$DEMO_TENANT --user-id $DEMO_USER --role-id $MEMBER_ROLE
69.
70. Create services
71.COMPUTE_SERVICE=$(keystoneservice-create --name nova --type compute --description 'OpenStack ComputeService' | grep " id " | get_field 2)
72.VOLUME_SERVICE=$(keystone service-create--name cinder --type volume --description 'OpenStack Volume Service' | grep" id " | get_field 2)
73.IMAGE_SERVICE=$(keystone service-create--name glance --type image --description 'OpenStack Image Service' | grep" id " | get_field 2)
74.IDENTITY_SERVICE=$(keystoneservice-create --name keystone --type identity --description 'OpenStackIdentity' | grep " id " | get_field 2)
75.EC2_SERVICE=$(keystone service-create--name ec2 --type ec2 --description 'OpenStack EC2 service' | grep " id" | get_field 2)
76.NETWORK_SERVICE=$(keystoneservice-create --name quantum --type network --description 'OpenStackNetworking service' | grep " id " | get_field 2)
77.
78. Create endpoints
79.keystone endpoint-create --region$KEYSTONE_REGION --service-id $COMPUTE_SERVICE --publicurl 'http://'"$KEYSTONE_HOST"':8774/v2/$(tenant_id)s'--adminurl 'http://'"$KEYSTONE_HOST"':8774/v2/$(tenant_id)s'--internalurl 'http://'"$KEYSTONE_HOST"':8774/v2/$(tenant_id)s'
80.keystone endpoint-create --region$KEYSTONE_REGION --service-id $VOLUME_SERVICE --publicurl'http://'"$KEYSTONE_HOST"':8776/v1/$(tenant_id)s' --adminurl'http://'"$KEYSTONE_HOST"':8776/v1/$(tenant_id)s' --internalurl'http://'"$KEYSTONE_HOST"':8776/v1/$(tenant_id)s'
81.keystone endpoint-create --region$KEYSTONE_REGION --service-id $IMAGE_SERVICE --publicurl'http://'"$KEYSTONE_HOST"':9292' --adminurl'http://'"$KEYSTONE_HOST"':9292' --internalurl'http://'"$KEYSTONE_HOST"':9292'
82.keystone endpoint-create --region$KEYSTONE_REGION --service-id $IDENTITY_SERVICE --publicurl'http://'"$KEYSTONE_HOST"':5000/v2.0' --adminurl'http://'"$KEYSTONE_HOST"':35357/v2.0' --internalurl'http://'"$KEYSTONE_HOST"':5000/v2.0'
83.keystone endpoint-create --region$KEYSTONE_REGION --service-id $EC2_SERVICE --publicurl'http://'"$KEYSTONE_HOST"':8773/services/Cloud' --adminurl'http://'"$KEYSTONE_HOST"':8773/services/Admin' --internalurl'http://'"$KEYSTONE_HOST"':8773/services/Cloud'
84.keystone endpoint-create --region$KEYSTONE_REGION --service-id $NETWORK_SERVICE --publicurl'http://'"$KEYSTONE_HOST"':9696/' --adminurl'http://'"$KEYSTONE_HOST"':9696/' --internalurl'http://'"$KEYSTONE_HOST"':9696/'
spacer.gif
Note
If you make a mistake during this guide, you can reset the Keystone database by performing the following steps:
mysql -u root -p -e "drop database keystone"
mysql -u root -p -e "create database keystone"
mysql -u root -p -e "grant all privileges on keystone.* TO 'keystone'@'localhost' identified by 'password'"
keystone-manage db_sync
And finally, re-run the above bash script.
OpenStack Image Service
The Image Serviceprovides a catalog of virtual machine images from which you can launchinstances.
For example, ifa Fedora 19 image exists, you can use it to launch a Fedora19 instance.
Procedure 2.1. Toinstall and configure the OpenStack Image Service
Install the OpenStack Image packages, as follows:
yum install openstack-glance
Configure the OpenStack Image Service, as follows:
The OpenStack Image Service provides the glance-api and glance-registry services. You configure these services identically. However, be aware that each provides a distinct service.
Edit /etc/glance/glance-api.conf and /etc/glance/glance-registry.conf,as follows:
[DEFAULT]
sql_connection =mysql://glance:password@localhost/glance
[keystone_authtoken]
admin_tenant_name = service
admin_user = glance
admin_password = password
[paste_deploy]
flavor=keystone
Restart both services, as follows:
service openstack-glance-api restart&& service openstack-glance-registry restart
spacer.gif
Note
Check the /var/log/glance/*.log files for errors that cause the Image Service to fail to start.
Create the OpenStack Image tables in the database, as follows:
glance-manage db_sync
Download and import the latest Fedora cloud image:
e.$ wgethttp://cloud.fedoraproject.org/fedora-latest.x86_64.qcow2
glance image-create --is-public true--disk-format qcow2 --container-format bare --name "Fedora" <fedora-latest.x86_64.qcow2
Download and import the CirrOS QCOW2 Image:
$ wgethttp://download.cirros-cloud.net/0.3.1/cirros-0.3.1-x86_64-disk.img
$ glance image-create --is-public true--disk-format qcow2 --container-format bare --name "CirrOS 0.3.1"< cirros-0.3.1-x86_64-disk.img
Check if the images have been introduced in the index:
$ glance image-list
+--------------------------------------+--------------+-------------+------------------+-----------+--------+
| ID | Name | Disk Format | Container Format |Size | Status |
+--------------------------------------+--------------+-------------+------------------+-----------+--------+
| acafc7c0-40aa-4026-9673-b879898e1fc2 |CirrOS 0.3.1 | qcow2 | bare | 13147648 | active |
| 62f9278e-a26e-4fa0-9537-1eb503aa2f01 |Fedora | qcow2 | bare | 237371392 | active |
+--------------------------------------+--------------+-------------+------------------+-----------+--------+
OpenStack Compute (Cloud Controller services)
The OpenStackCompute Service provides the cloud environment with the ability to manage thescheduling, creation and deletion of virtual machines (instances).
Install the Nova packages:
2. yum install -y openstack-nova-apiopenstack-nova-scheduler openstack-nova-cert \
3. openstack-nova-consoleopenstack-nova-doc genisoimage openstack-dashboard \
openstack-nova-novncproxy openstack-nova-conductor novnc
Configure Nova:
/etc/nova/nova.confis missing an essential "auth_strategy=keystone" line in the[DEFAULT] section
Edit /etc/nova/api-paste.ini:
·[filter:authtoken]
·paste.filter_factory = keystoneclient.middleware.auth_token:filter_factory
·service_protocol = http
·service_host = 127.0.0.1
·service_port = 5000
·admin_tenant_name = service
·admin_user = nova
·admin_password = password
· Workaround forhttps://bugs.launchpad.net/nova/+bug/1154809
auth_version = v2.0
Add the following to the /etc/nova/nova.conf file. This file is the main configuration file of Nova. There is a large amount of configuration options that can go in this file. This guide illustrates the minimum needed for a simple environment. Note that the nova.conf file supplied by your distribution will have some options already set. Leave them as-is.
· General
·verbose = True
·qpid_username=guest
·qpid_password=guest
·rpc_backend = nova.openstack.common.rpc.impl_qpid
·
· Networking
·network_api_class=nova.network.quantumv2.api.API
·quantum_url=http://10.10.10.10:9696
·quantum_auth_strategy=keystone
·quantum_admin_tenant_name=service
·quantum_admin_username=quantum
·quantum_admin_password=password
·quantum_admin_auth_url=http://10.10.10.10:35357/v2.0
·libvirt_vif_driver=nova.virt.libvirt.vif.LibvirtHybridOVSBridgeDriver
·linuxnet_interface_driver=nova.network.linux_net.LinuxOVSInterfaceDriver
·
· Security Groups
·firewall_driver=nova.virt.firewall.NoopFirewallDriver
·security_group_api=quantum
·
· Metadata
·quantum_metadata_proxy_shared_secret=password
·service_quantum_metadata_proxy=true
·metadata_listen = 10.10.10.10
·metadata_listen_port = 8775
·
· Cinder
·volume_api_class=nova.volume.cinder.API
·
· Glance
·glance_api_servers=10.10.10.10:9292
·image_service=nova.image.glance.GlanceImageService
·
· novnc
·novnc_enable=true
·novncproxy_port=6080
·novncproxy_host=10.0.0.10
·vncserver_listen=0.0.0.0
Create Nova tables into the database:
nova-manage db sync
Restart Nova services:
· service openstack-nova-api restart
· service openstack-nova-cert restart
· service openstack-nova-consoleauthrestart
· service openstack-nova-schedulerrestart
· service openstack-nova-conductorrestart
· service openstack-nova-novncproxyrestart
· chkconfig openstack-nova-api on
· chkconfig openstack-nova-cert on
· chkconfigopenstack-nova-consoleauth on
· chkconfig openstack-nova-scheduleron
· chkconfig openstack-nova-conductoron
chkconfig openstack-nova-novncproxy on
spacer.gif
Note
Check the /var/log/nova/nova-* files for any errors that would prevent the Compute Service from successfully starting.
OpenStack Block Storage
While Cindercontains many different storage drivers, the most common and basicconfiguration uses LVM and iSCSI. This guide illustrates how to use one disk (/dev/sdb) in an LVM VolumeGroup called cinder-volumes. When a user requests a block storage volume, a Logical Volume is createdfrom this Volume Group and then mounted on the user's instance by way of iSCSI.
Install the Cinder packages:
2. yum install -y openstack-cinderopenstack-cinder-doc \
iscsi-initiator-utils scsi-target-utils
Configure & start the iSCSI services:
4. service tgtd start
5. service iscsi start
6. chkconfig tgtd on
chkconfig iscsi on
Configure Cinder:
Edit /etc/cinder/cinder.conf:
·[DEFAULT]
·rpc_backend = cinder.openstack.common.rpc.impl_qpid
·sql_connection = mysql://cinder:password@localhost/cinder
·qpid_user = guest
qpid_password = guest
important:/etc/cinder/cinder.conf is ALSO missing an essential "auth_strategy =keystone" in the [DEFAULT] section
Edit /etc/cinder/api-paste.ini:
·admin_tenant_name = service
·admin_user = cinder
admin_password = password
admin_tenant_name= service
admin_user = cinder
admin_password = password
Create the LVM Physical Volume and Logical Volume:
· pvcreate /dev/sdb
vgcreatecinder-volumes /dev/sdb
Create Cinder tables into the database:
cinder-manage db sync
Restart the services:
· service openstack-cinder-apirestart
· service openstack-cinder-schedulerrestart
· service openstack-cinder-volumerestart
· chkconfig openstack-cinder-api on
· chkconfigopenstack-cinder-scheduler on
chkconfig openstack-cinder-volume on
If all cinder volumes you create result inan "error" state, and if you see entries like this in your volume.logfile:
# cat volume.log2013-08-20 20:17:31 ERROR [cinder.volume.iscsi] Failed tocreate iscsi target for volume id:volume-6f57d2da-3cde-479f-9f51-b37deeab6970.Please ensure your tgtd config file contains 'include /etc/cinder/volumes/*'
2013-08-20 20:17:31 ERROR [cinder.volume.manager] volume volume-6f57d2da-3cde-479f-9f51-b37deeab6970:create failed
The fix is clearly answered by the log filein this case.
Edityour /etc/tgt/targets.conf file, and add this line near the top:
include /etc/cinder/volumes/*
?
OpenStack Network Service (Cloud Controller)
The OpenStackNetwork Service provides a comprehensive and extendible networking service tothe cloud. Some features include, but are not limited to, the ability forinstances to reach an external network outside of the cloud as well as theability for each user of the cloud to create multiple internal subnets of theirown.
Install the Quantum Server:
yum install openstack-quantumopenstack-quantum-openvswitch
Configure the Quantum service:
Edit /etc/quantum/quantum.conf:
·[DEFAULT]
·core_plugin = \
· quantum.plugins.openvswitch.ovs_quantum_plugin.OVSQuantumPluginV2
·auth_strategy = keystone
·fake_rabbit = False
·rpc_backend=quantum.openstack.common.rpc.impl_qpid
·qpid_username = guest
qpid_password = guest
Edit /etc/quantum/plugins/openvswitch/ovs_quantum_plugin.ini:
·[DATABASE]
·sql_connection = mysql://quantum:password@localhost/quantum
·[OVS]
·tenant_network_type = gre
·tunnel_id_ranges = 1:1000
·enable_tunneling = True
·local_ip = 10.10.10.10
·[SECURITYGROUP]
firewall_driver = quantum.agent.linux.iptables_firewall.OVSHybridIptablesFirewallDriver
[DATABASE]
sql_connection =mysql://quantum:password@localhost/quantum
[OVS]
enable_tunneling = False
[SECURITYGROUP]
firewall_driver =quantum.agent.linux.iptables_firewall.OVSHybridIptablesFirewallDriver
spacer.gif
Note
The Fedora kernel module for OpenVSwitch has been compiles with out support for tunnels. To use gre tunnels the module will have to be recompiled.
Edit /etc/quantum/api-paste.ini:
·[filter:authtoken]
·paste.filter_factory = keystoneclient.middleware.auth_token:filter_factory
·auth_host = 127.0.0.1
·auth_port = 35357
·auth_protocol = http
·admin_tenant_name = service
·admin_user = quantum
·admin_password = password
Enable the OVS plugin:
ln -s /etc/quantum/plugins/openvswitch/ovs_quantum_plugin.ini/etc/quantum/plugin.ini
Set SELinux to permissive mode:
Start the services:
6. service quantum-server restart
chkconfig quantum-server on
OpenStack Dashboard
The OpenStackDashboard service provides users of the cloud environment with a web-accessibleGUI as an alternative to using the command-line tools.
To enable it,install the Horizon package and its dependencies:
yum install httpd memcached
(cat | sudo tee -a /etc/openstack-dashboard/local_settings ) <<EOF
DATABASES = {
'default': {
'ENGINE': 'django.db.backends.mysql',
'NAME': 'horizon',
'USER': 'horizon',
'PASSWORD': 'password',
'HOST': '$MY_IP',
'PORT': '',
}
}
EOF
OpenStackDashboard is now available at http://10.10.10.10/horizon. We canlogin with the admin / password credentialsor demo /password.
spacer.gif
Note
Check the /var/log/httpd/error_log file for errors that wold prevent either the Apache service or the Dashboard service from successfully starting.
補上這段是針對memcache的配置
vim /etc/openstack-dashboard/local_settings.py
DEBUG = True
CACHE_BACKEND ='memcached://172.16.0.254:11211/'
OPENSTACK_HOST = "172.16.0.254"
# sed -i 's/127.0.0.1/172.16.0.254/g'/etc/memcached.conf
本文出自 “單身貴族” 博客,請務必保留此出處http://liuxin1982.blog.51cto.com/4338970/1309212