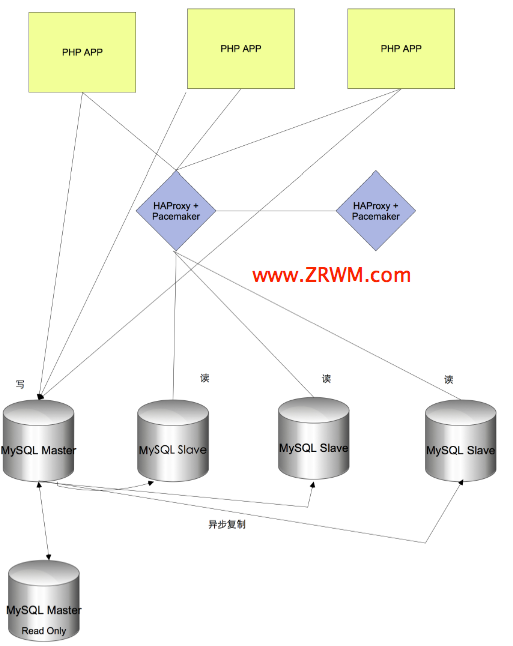
當前環境說明
A: 192.168.1.191 (MySQL Slave)
B: 192.168.1.192 (MySQL Slave)
C: 192.168.1.216 (Pacemaker + CoroSync + HAProxy)
D: 192.168.1.217 (Pacemaker + CoroSync + HAProxy)
虛擬VIP: 192.168.1.210.
這裡配置的HAProxy負載均衡器為雙機Active/Passive模式.
安裝與配置HAProxy
調整內核參數,允許綁定VIP:
# vi /etc/sysctl.conf
net.ipv4.ip_nonlocal_bind=1

# sysctl -p
添加用戶haproxy:
# groupadd haproxy
# useradd haproxy -g haproxy
在負載均衡器後端的MySQL上分別添加健康檢測MySQL用戶:
mysql> create user 'haproxy'@'192.168.1.%';
mysql> flush privileges;
安裝HAProxy:
# wget -c http://haproxy.1wt.eu/download/1.4/src/haproxy-1.4.23.tar.gz
# tar zxvf haproxy-1.4.23.tar.gz
# cd haproxy-1.4.23
# make TARGET=linux26 #如果是32位機器,則make TARGET=linux26 ARCH=i386
# make install
# mkdir -p /etc/haproxy
# cp examples/haproxy.cfg /etc/haproxy/haproxy.cfg
配置HAProxy:
# cat /etc/haproxy/haproxy.cfg
global
    maxconn 40000
    user haproxy
    group haproxy
    stats socket /tmp/haproxy  user haproxy group haproxy mode 600 level admin
    node lb1
    nbproc 1
    daemon
    spread-checks 3
    quiet

defaults
    log global
    mode tcp
    option tcplog
    option dontlognull
    option tcp-smart-accept
    option tcp-smart-connect
    #option dontlog-normal
    retries 3
    option redispatch
    timeout connect 500
    timeout client  2000
    timeout server  2000
    maxconn 40000
    option redispatch

listen slave_clusters *:3306
    mode tcp
    balance roundrobin
    #balance leastconn
    option tcpka       # enable the keepalive
    option mysql-check user haproxy

    server MySQL191 192.168.1.191:3306 check weight 1 maxconn 2000
    server MySQL192 192.168.1.192:3306 check weight 1 maxconn 2000


# HAProxy管理用戶(admin/stats)
userlist STATSUSERS
    group admin users admin
    user admin insecure-password 1234567
    user stats insecure-password 123456

# HAProxy的管理界面
listen stats *:8081
    mode http
    stats enable
    stats refresh 60s
    stats uri /
    stats hide-version
    acl AuthOkay_ReadOnly http_auth(STATSUSERS)
    acl AuthOkay_Admin http_auth_group(STATSUSERS) admin
    stats http-request auth realm Haproxy_Admin_Page unless AuthOkay_ReadOnly
    stats admin if AuthOkay_Admin
HAProxy的啟動管理腳本:
# cat /etc/init.d/haproxy
#!/bin/bash
#
# chkconfig: 2345 85 15
# description: HA-Proxy is a TCP/HTTP reverse proxy which is particularly suited \
#              for high availability environments.
# processname: haproxy
# config: /etc/haproxy.cfg
# pidfile: /var/run/haproxy.pid

# Source function library.
if [ -f /etc/init.d/functions ]; then
  . /etc/init.d/functions
elif [ -f /etc/rc.d/init.d/functions ] ; then
  . /etc/rc.d/init.d/functions
else
  exit 0
fi

CONF_FILE="/etc/haproxy/haproxy.cfg"
HAPROXY_BINARY="/usr/local/sbin/haproxy"
PID_FILE="/var/run/haproxy.pid"

# Source networking configuration.
. /etc/sysconfig/network

# Check that networking is up.
[ ${NETWORKING} = "no" ] && exit 0

[ -f ${CONF_FILE} ] || exit 1

RETVAL=0

start() {
  $HAPROXY_BINARY -c -q -f $CONF_FILE
  if [ $? -ne 0 ]; then
    echo "Errors found in configuration file."
    return 1
  fi

  echo -n "Starting HAproxy: "
  daemon $HAPROXY_BINARY -D -f $CONF_FILE -p $PID_FILE
  RETVAL=$?
  echo
  [ $RETVAL -eq 0 ] && touch /var/lock/subsys/haproxy
  return $RETVAL
}

stop() {
  echo -n "Shutting down HAproxy: "
  killproc haproxy -USR1
  RETVAL=$?
  echo
  [ $RETVAL -eq 0 ] && rm -f /var/lock/subsys/haproxy
  [ $RETVAL -eq 0 ] && rm -f $PID_FILE
  return $RETVAL
}

restart() {
  $HAPROXY_BINARY -c -q -f $CONF_FILE
  if [ $? -ne 0 ]; then
    echo "Errors found in configuration file, check it with 'haproxy check'."
    return 1
  fi
  stop
  start
}

check() {
  $HAPROXY_BINARY -c -q -V -f $CONF_FILE
}

rhstatus() {
  pid=$(pidof haproxy)
  if [ -z "$pid" ]; then
    echo "HAProxy is stopped."
    exit 3
  fi
  status haproxy
}

condrestart() {
  [ -e /var/lock/subsys/haproxy ] && restart || :
}

# See how we were called.
case "$1" in
  start)
    start
    ;;
  stop)
    stop
    ;;
  restart)
    restart
    ;;
  reload)
    restart
    ;;
  condrestart)
    condrestart
    ;;
  status)
    rhstatus
    ;;
  check)
    check
    ;;
  *)
    echo $"Usage: haproxy {start|stop|restart|reload|condrestart|status|check}"
    RETVAL=1
esac

exit $RETVAL
檢查HAProxy的配置是否正確:
# /etc/init.d/haproxy check
Configuration file is valid
注:在這裡HAProxy不需要單獨啟動.我們在後面讓Pacemaker來管理HAProxy的啟動.
Pacemaker + CoroSync安裝和配置
Pacemaker + CoroSync安裝和配置過程參考《
CentOS 6 安裝和配置Pacemaker》
安裝配置好之後:
兩台均衡機器分別啟動CoroSync:
# /etc/init.d/corosync start
Starting Corosync Cluster Engine (corosync):               [  OK  ]
查看兩台機的CoroSync之間是否成功通信:
[root@centos216 ~]# corosync-objctl | grep members | grep ip
runtime.totem.pg.mrp.srp.members.-670979904.ip=r(0) ip(192.168.1.216)
runtime.totem.pg.mrp.srp.members.-654202688.ip=r(0) ip(192.168.1.217)
然後再分別啟動Pacemaker:
# /etc/init.d/pacemaker start
Starting Pacemaker Cluster Manager:                        [  OK  ]
資源約束配置
先定義一些資源屬性約束(包括禁止STONITH錯誤,忽略Quorum,防止資源在恢復之後移動等):
# crm configure
crm(live)configure# property stonith-enabled=false
crm(live)configure# property no-quorum-policy=ignore
crm(live)configure# rsc_defaults resource-stickiness=100
crm(live)configure# rsc_defaults failure-timeout=0
crm(live)configure# rsc_defaults migration-threshold=10
配置VIP資源:
crm(live)configure# primitive failover-ip ocf:heartbeat:IPaddr2 params ip=192.168.1.210 cidr_netmask=24 op monitor interval=5s
配置HAProxy資源:
crm(live)configure# primitive haproxy lsb:haproxy op monitor interval="5s"
定義運行的HAProxy和VIP必須在同一節點上:
crm(live)configure# colocation haproxy-with-public-IPs INFINITY: haproxy failover-ip
定義先接管VIP之後才啟動HAProxy:
crm(live)configure# order haproxy-after-IP mandatory: failover-ip haproxy
驗證並提交配置:
crm(live)configure# verify
crm(live)configure# commit
crm(live)configure# quit
資源狀態查看
查看資源狀態:
[root@centos216 ~]# crm_mon -1
Last updated: Mon May 20 01:55:31 2013
Last change: Mon May 20 01:27:39 2013 via cibadmin on centos216
Stack: classic openais (with plugin)
Current DC: centos216 - partition with quorum
Version: 1.1.8-7.el6-394e906
2 Nodes configured, 2 expected votes
2 Resources configured.


Online: [ centos216 centos217 ]

 failover-ip	(ocf::heartbeat:IPaddr2):	Started centos216
 haproxy	(lsb:haproxy):	Started centos216
216機器上查看:
[root@centos216 ~]# /etc/init.d/haproxy status
haproxy (pid  1629) is running...

[root@centos216 ~]# ip addr show eth0
2: eth0:  mtu 1500 qdisc pfifo_fast state UP qlen 1000
    link/ether 08:00:27:67:ab:7e brd ff:ff:ff:ff:ff:ff
    inet 192.168.1.216/24 brd 192.168.1.255 scope global eth0
    inet 192.168.1.210/24 brd 192.168.1.255 scope global secondary eth0
    inet6 fe80::a00:27ff:fe67:ab7e/64 scope link
       valid_lft forever preferred_lft forever
217機器上查看:
[root@centos217 ~]# /etc/init.d/haproxy status
HAProxy is stopped.
[root@centos217 ~]# ip addr show eth0
2: eth0:  mtu 1500 qdisc pfifo_fast state UP qlen 1000
    link/ether 08:00:27:67:ab:7e brd ff:ff:ff:ff:ff:ff
    inet 192.168.1.217/24 brd 192.168.1.255 scope global eth0
    inet6 fe80::a00:27ff:fe67:ab7e/64 scope link tentative dadfailed
       valid_lft forever preferred_lft forever
從上面的這些信息,可以知道VIP綁定在216機器,同時只有216機器上的HAProxy已經啟動.
Failover測試
[root@centos216 ~]# crm node standby
[root@centos216 ~]# crm_mon -1
Last updated: Mon May 20 02:13:30 2013
Last change: Mon May 20 02:13:17 2013 via crm_attribute on centos216
Stack: classic openais (with plugin)
Current DC: centos216 - partition with quorum
Version: 1.1.8-7.el6-394e906
2 Nodes configured, 2 expected votes
2 Resources configured.


Node centos216: standby
Online: [ centos217 ]

 failover-ip	(ocf::heartbeat:IPaddr2):	Started centos217
 haproxy	(lsb:haproxy):	Started centos217
[root@centos216 ~]# crm node online
可以看到216機器standby之後,217機器成功接管VIP和啟動HAProxy.
MySQL連接測試
PHP腳本通過VIP連接負載均衡器後端的MySQL:
[root@centos192 test]# cat test.php
<?php
// mysql -uroot -p123456 -h192.168.1.210 -P3306 -D test
$mysqli = new mysqli('192.168.1.210', 'root', '123456', 'test', 3306);

if ($mysqli->connect_errno) {
    die('Connect Error (' . $mysqli->connect_errno . ') ' . $mysqli->connect_error);
}

echo 'Success... ' . $mysqli->host_info . "\n";

$query = $mysqli->query("select * from mtest");

if ($mysqli->errno) {
   echo "Query Error:" . $mysqli->error, PHP_EOL;
   exit;
}

$res = $query->fetch_assoc();

var_dump($res);

$mysqli->close();
[root@centos192 test]# php test.php
Success... 192.168.1.210 via TCP/IP
array(1) {
  ["a"]=>
  string(1) "0"
}
原文:http://www.zrwm.com/?p=6983


