因為最近開始在Ubuntu上學習Nginx,在網上看到別人介紹了一款強大的內核探測工具Systemtap,於是便准備學習下這款探測工具為以後代碼分析做准備。
第一步便是安裝。在自己電腦上安裝的時候,也是費了一番勁兒。因此,為防止以後需要重新安裝,也希望可以幫助後來學習的人,在這裡准備寫一篇博客做一個記錄。
以下便是安裝步驟:
(0)、安裝elfutils,提供分析調試信息的庫函數,及libcap-dev。
借助於Ubuntu方便強大的包管理器,可以很方便進行安裝,如下:
sudo apt-get install elfutils
sudo apt-get install libcap-dev
(1)、安裝systemtap。
借助於Ubuntu方便強大的包管理器,可以很方便進行安裝,如下:
sudo apt-get install systemtap
後續如果需要卸載,可執行如下命令:
sudo apt-get remove systemtap
也可以通過源碼進行安裝,下載地址:https://sourceware.org/systemtap/ftp/releases/ 。解壓然後進入根目錄,執行如下命令:
./configure
make
sudo make instal
如果後續需要卸載,可進入根目錄,執行如下命令:
sudo make uninstall
(2)、安裝debug symbols。
1)、配置ddeb repository。
sudo cat > /etc/apt/sources.list.d/ddebs.list << EOF
deb http://ddebs.ubuntu.com/ precise main restricted universe multiverse
EOF
sudo apt-key adv --keyserver keyserver.ubuntu.com --recv-keys ECDCAD72428D7C01
sudo apt-get update
上面添加倉庫地址也可以直接在ddebs.list文件後面添加相應地址。
2)、添加完repository之後,便是下載和你當前內核版本相對應的debug symbols。在這裡推薦一位外國朋友寫的腳本,寫的非常好,博文鏈接(http://www.domaigne.com/blog/random/getting-debug-kernel-on-ubuntu/),感興趣的可以去學習學習。因此為了減少錯誤發生,這裡采用這裡的腳本進行下載和安裝:
wget http://www.domaigne.com/download/tools/get-dbgsym
chmod +x get-dbgsym
sudo ./get-dbgsy
執行腳本後,可以去做些其他事情,因為這裡可能需要等待較長的時間。
3)、生成systemtap/libelf所需的模塊信息。將如下命令放入debug_ko.sh:
for file in `find /usr/lib/debug -name '*.ko' -print`
do
buildid=`eu-readelf -n $file| grep Build.ID: | awk '{print $3}'`
dir=`echo $buildid | cut -c1-2`
fn=`echo $buildid | cut -c3-`
mkdir -p /usr/lib/debug/.build-id/$dir
ln -s $file /usr/lib/debug/.build-id/$dir/$fn
ln -s $file /usr/lib/debug/.build-id/$dir/${fn}.debug
done
然後執行該文件:
sudo ./debug_ko.sh
(4)、測試安裝是否成功。執行如下命令:
stap -e 'probe kernel.function("sys_open") {log("hello world") exit()}'
如果在終端打印出“hello world”說明安裝成功。如果沒有,繼續往下看。
(5)、如果按照上述步驟安裝完之後,仍然不能使用,那麼請參考下面的場景分別進行補充。
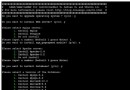
1)、如果執行(4)中的命令後,終端打印如下信息:
stap: Symbol `SSL_ImplementedCiphers' has different size in shared object, consider re-linking
In file included from include/linux/mutex.h:15:0,
from /tmp/staphH2yQD/stap_6e022ad97cbe9c6f46b582f7a0eac81d_1242_src.c:25:
include/linux/spinlock_types.h:55:14: error: ‘__ARCH_SPIN_LOCK_UNLOCKED’ undeclared here (not in a function)
.raw_lock = __ARCH_SPIN_LOCK_UNLOCKED, \
^
include/linux/spinlock_types.h:79:15: note: in expansion of macro ‘__RAW_SPIN_LOCK_INITIALIZER’
{ { .rlock = __RAW_SPIN_LOCK_INITIALIZER(lockname) } }
^
include/linux/spinlock_types.h:82:16: note: in expansion of macro ‘__SPIN_LOCK_INITIALIZER’
(spinlock_t ) __SPIN_LOCK_INITIALIZER(lockname)
^
include/linux/mutex.h:111:18: note: in expansion of macro ‘__SPIN_LOCK_UNLOCKED’
, .wait_lock = __SPIN_LOCK_UNLOCKED(lockname.wait_lock) \
^
include/linux/mutex.h:117:27: note: in expansion of macro ‘__MUTEX_INITIALIZER’
struct mutex mutexname = __MUTEX_INITIALIZER(mutexname)
^
/tmp/staphH2yQD/stap_6e022ad97cbe9c6f46b582f7a0eac81d_1242_src.c:26:8: note: in expansion of macro ‘DEFINE_MUTEX’
static DEFINE_MUTEX(module_refresh_mutex);
^
scripts/Makefile.build:258: recipe for target '/tmp/staphH2yQD/stap_6e022ad97cbe9c6f46b582f7a0eac81d_1242_src.o' failed
make[1]: *** [/tmp/staphH2yQD/stap_6e022ad97cbe9c6f46b582f7a0eac81d_1242_src.o] Error 1
Makefile:1398: recipe for target '_module_/tmp/staphH2yQD' failed
make: *** [_module_/tmp/staphH2yQD] Error 2
WARNING: kbuild exited with status: 2
Pass 4: compilation failed. [man error::pass4]
說明有些共享庫需要重新readlink,執行如下命令:
readlink /lib/modules/`uname -r`/build/
更多Ubuntu相關信息見Ubuntu 專題頁面 http://www.linuxidc.com/topicnews.aspx?tid=2