


Nagios內置了很多腳本來監控服務。本篇會使用其中一些來檢查通用服務如MySql、Apache、DNS等等。
為了保證本篇集中在系統監控,我們不會在這裡配置主機組或者模板,它們已經在前面的教程中覆蓋了,它們可以滿足需要了。

通常建議在添加到Nagios前,先在命令行中運行Nagios服務檢測腳本。它會給出執行是否成功以及腳本的輸出將會看上去的樣子。
這些腳本存儲在 /etc/nagios-plugins/config/ ,可執行文件在 /usr/lib/nagios/plugins/。
下面就是該怎麼做
root@nagios:~# cd /etc/nagios-plugins/config/
提供的腳本包含了語法幫助。示例包含了部分輸出。
root@nagios:~# cat /etc/nagios-plugins/config/tcp_udp.cfg
# 'check_tcp' command definition
define command{
command_name check_tcp
command_line /usr/lib/nagios/plugins/check_tcp -H '$HOSTADDRESS$' -p '$ARG1$'
了解了語法,TCP 80端口可以用下面的方法檢查。
root@nagios:~# /usr/lib/nagios/plugins/check_tcp -H 10.10.10.1 -p 80
TCP OK - 0.000 second response time on port 80|time=0.000222s;;;0.000000;10.000000
本片中使用下面三台服務器。每台服務器運行多個通用服務。Nagios服務器現在運行的是Ubuntu。
首先,這些服務器被定義在了Nagios中。
root@nagios:~# vim /etc/nagios3/conf.d/example.cfg
define host{
use generic-host
host_name test-server-1
alias test-server-1
address 10.10.10.1
}

define host{
use generic-host
host_name test-server-2
alias test-server-2
address 10.10.10.2
}

define host{
use generic-host
host_name test-server-3
alias test-server-3
address 10.10.10.3
}
開始檢測MySQL時,需要記住MySQL默認只監聽回環接口127.0.0.1。這增加了數據庫的安全。手動調節需要告訴MySQL該監聽什麼其他接口。下面是該怎麼做。
這個設置要在所有的MySQL服務器上完成。
root@nagios:~# vim /etc/mysql/my.cnf
下面這行被注釋掉以監聽所有網絡接口。
#bind-address = 127.0.0.1
同樣,MySQL也不會讓任意主機來連接它。需要為localhost和“任意”主機創建MySQL用戶‘nagios’,接著在所有的數據庫中為這個用戶授予ALL權限,會這將在會用在監控中。
下面的設置對所有的MySQL服務器都已經設置。
root@nagios:~# mysql -u root –p
## MySQL root 密碼 ##
在MySQL服務器中創建'nagios@localhost'用戶。
mysql> CREATE USER 'nagios'@'localhost' IDENTIFIED BY 'nagios-pass';
mysql> GRANT ALL PRIVILEGES ON *.* TO 'nagios'@'localhost';
創建'nagios@任意主機'用戶。(LCTT 譯注:實際上這兩個是同一個用戶,只是分別授權給localhost和任意主機的訪問;因為它們所用的密碼的同一個,修改任何一個,另外一個也相應變化。)
mysql> CREATE USER 'nagios'@'%' IDENTIFIED BY 'nagios-pass';
mysql> GRANT ALL PRIVILEGES ON *.* TO 'nagios'@'%';

mysql> FLUSH PRIVILEGES;
這使MySQL監聽所有的網絡接口,同樣接受來自用戶'nagios'的進入連接。
請注意,這種修改可能有安全隱患,所以需要提示幾點:
按如下配置來做一些調整。
root@nagios:~# vim /etc/nagios3/conf.d/services_nagios2.cfg
define service{
use generic-service
host_name test-server-1
;hostgroup can be used instead as well

service_description Check MYSQL via TCP port
check_command check_tcp!3306
}

define service{
use generic-service
host_name test-server-1
;hostgroup can be used instead as well

service_description Check availability of database 'testDB'
check_command check_mysql_database!nagios!nagios-pass!testDB
;check_mysql!userName!userPassword!databaseName
}
這樣,Nagios就可以同時監控MySQL服務器及其數據庫的可用性。
Nagios同樣也可以監控Apache服務。
這個任務非常簡單因為Nagios有一個內置命令。
root@nagios:~# vim /etc/nagios3/conf.d/services_nagios2.cfg
define service{
use generic-service
host_name test-server-1, test-server-2
service_description Check Apache Web Server
check_command check_http
}
現在就非常簡單了。
Nagios通過向DNS服務器查詢一個完全限定域名(FQDN),或者使用dig工具來查詢。默認用於查詢的FQDN的是www.google.com,但是這個可以按需改變。按照下面的文件修改來完成這個任務。
root@nagios:~# vim /etc/nagios-plugins/config/dns.cfg
## The -H portion can be modified to replace Google ##
define command{
command_name check_dns
command_line /usr/lib/nagios/plugins/check_dns -H www.google.com -s '$HOSTADDRESS$'
}
編輯下面的行。
root@nagios:~# vim /etc/nagios3/conf.d/services_nagios2.cfg
## Nagios asks server-3 to resolve the IP for google.com ##
define service{
use generic-service
host_name test-server-3
service_description Check DNS
check_command check_dns
}

## Nagios asks server-3 to dig google.com ##
define service{
use generic-service
host_name test-server-3
service_description Check DNS via dig
check_command check_dig!www.google.com
}
Nagios可以監控不同的郵件服務組件如SMTP、POP、IMAP和mailq。之前提過,server-2設置了Postfix郵件服務。Nagios將被配置來監控SMTP和郵件隊列。
root@nagios:~# vim /etc/nagios3/conf.d/services_nagios2.cfg
define service{
use generic-service
host_name test-server-2
service_description Check SMTP
check_command check_smtp
}

define service{
use generic-service
host_name test-server-2
service_description Check Mail Queue
check_command check_mailq_postfix!50!100
;warning at 50, critical at 100
}
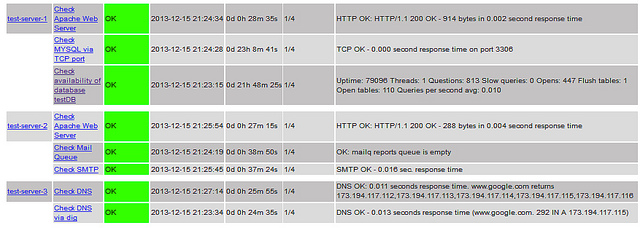
下面的截屏顯示了目前配置監控服務的概覽。
讓我們假設如下定制程序同樣運行在網絡中,監聽著一個特定的端口。
做一些小的調整,Nagios也可以幫助我們監控這個程序。
root@nagios:~# vim /etc/nagios3/conf.d/services_nagios2.cfg
define service{
use generic-service
host_name test-server-1
service_description Check server 1 custom application
check_command check_tcp!12345
}
在結束之前的提示,Nagios可以監控網絡很多其他的方面。存儲在/etc/nagios-plugins/config/中的腳本為Nagios提供了很棒的能力。
一些Nagios提供的腳本被僅限於本地服務器,比如,服務器負載、進程並發數量、登錄用戶數量等。這些檢查可以提供Nagios服務器內有用的信息。
譯文:https://linux.cn/article-5741-1.html