VirtualBox基礎 VirtualBox磁盤Disk介紹 VirtualBox的磁盤格式 磁盤的操作Linux篇 追加一個新的磁盤用以擴充操作系統的磁盤容量 1 創建新的虛擬盤 2 Virtualbox的Linux掛載分區 21 查看現在系統的磁盤空間 22 創建新分區 23 格式化和掛載新磁盤 24 修改啟動加載文件使每次開機時都能自動掛載磁盤 25 把u02的訪問權限賦予給Oracle用戶 追加一個共享磁盤用以方便主機和虛擬機數據文件共享 1 關閉虛擬機添加共享文件夾 1 啟動虛擬機設定權限 虛擬機系統快照 生成系統快照的方法 恢復為初始狀態 查看和操作備份的系統快照
筆者作為數據庫/IT從業者,在學習和工作的測試過程中,越來越頻繁的使用虛擬機,針對Oracle虛擬機軟件VirtualBox在使用過程中常常遇到的問題和操作,在此進行簡單的梳理和總結。
以下為Oracle VirtualBox的官方網站:
https://www.virtualbox.org/
1.下載
可以通過以下的鏈接進行下載virtualbox的最新版本和歷史版本。
https://www.virtualbox.org/wiki/Downloads
因為Extension Pack提供很多增強功能,所以建議一並下載和安轉 Oracle VM VirtualBox Extension Pack。
2.安裝
圖形化界面,不做介紹
3.使用方法
如果有時間建議閱讀官方操作手冊。
http://www.virtualbox.org/manual/
如果沒有那麼大的精力,可以查看本篇以後的更新。
VirtualBox上,創建新的磁盤時,有很多的選項,這些選項都代表什麼意思?
作為使用者我們該選擇哪種格式呢?
參考:
Chapter 5. Virtual storage
https://www.virtualbox.org/manual/ch05.html
創建新的磁盤時,主要有以下的選項:
VID (VirtualBox Disk Image) –VirtualBox磁盤映像 VMDK (Virtual Machine Disk) –虛擬機磁盤 VHD (Virtual Hard Disk) –虛擬硬盤 HDD (Parallels Hard Disk) –並口硬盤 QED (QEMU enhanced disk) –QEMU增強型磁盤 QCOW (QEMU Copy-On-Write) –QEMU寫入時復制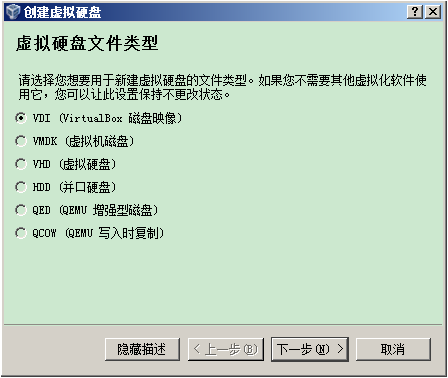
VDI形式 (VirtualBox),vmdk形式 (VMware)、vhd形式 (MicrZ喎?http://www.2cto.com/kf/ware/vc/" target="_blank" class="keylink">vc29mdCBWaXJ0dWFsIFBDKaGiaGRk0M7KvSAoUGFyYWxsZWxzKbXIIMbkyrW+zcrHtrzKx9DpxOK7r761z/G48cq9o6y497j2srvNrLXEs6e80rXEsrvNrLL6xre1xLK7zazOxLz+uPHKvbb40tGhozwvcD4NCjxwPlZESaO6PGJyIC8+DQpWaXJ0dWFsQm94tcS2wNfUuPHKvaOs0ruw49TaVmlydHVhbEJveNbQtcS0psDty9m2yLj8usOhozwvcD4NCjxwPmh0dHBzOi8vd3d3LnZpcnR1YWxib3gub3JnLzwvcD4NCjxwPlZNREujujxiciAvPg0KVk13YXJl0OnE4rv6tcS48cq9o6y85sjd0NS4/LrDo6zGxM6qwffQ0KOs1eLW1s7EvP7U2rrctuDQ6cTiu/rW0La8v8nS1Mq508OhozwvcD4NCjxwPmh0dHA6Ly93d3cudm13YXJlLmNvbS9jbjwvcD4NCjxwPlZIRKO6IM6iyO1WaXJ0dWFsUEPQ6cTiu/q1xLjxyr08L3A+DQo8cD5odHRwOi8vd3d3Lm1pY3Jvc29mdC5jb20vd2luZG93cy92aXJ0dWFsLXBjLzwvcD4NCjxwPkhERKO6IE1hYyBQYXJhbGxlbHPQ6cTiu/q1xLjxyr08L3A+DQo8cD5odHRwOi8vd3d3LnBhcmFsbGVsc2Rlc2t0b3AuY24vPC9wPg0KPHA+UUVEL1FDT1ejujxiciAvPg0KaHR0cDovL3dpa2kucWVtdS5vcmcvTWFpbl9QYWdlPC9wPg0KPHA+1NpWaXJ0dWFsQm94tcTKudPDuf2zzNbQo6zTptPD1+6547e6tcTQzsq9ysdWREm6zVZNREujrNLyzqpWREm1xLSmwO3L2bbIuPy6w6OsvajS6cq508NWREmhozwvcD4NCjxoMyBpZD0="磁盤的操作linux篇">磁盤的操作(Linux篇)
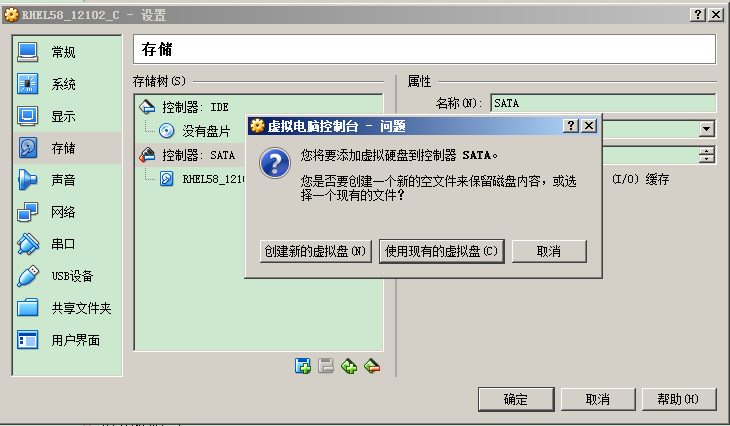
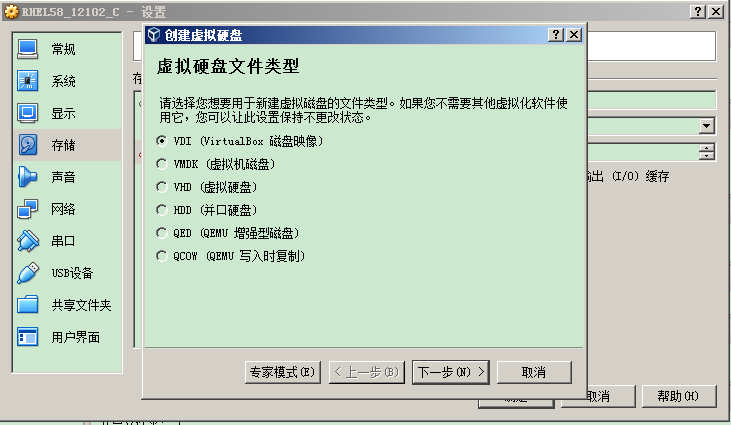
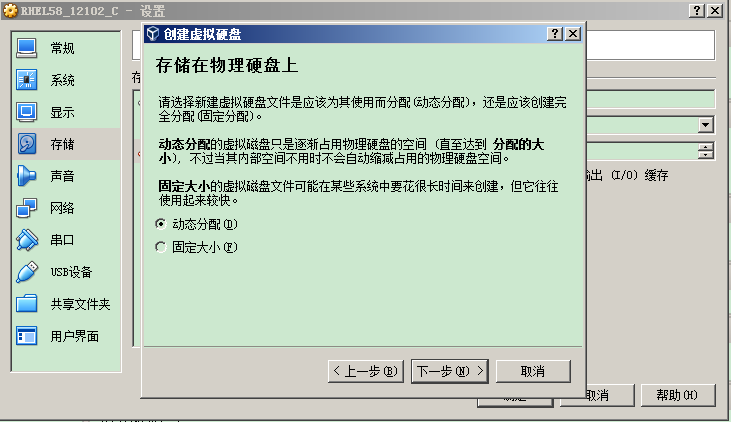
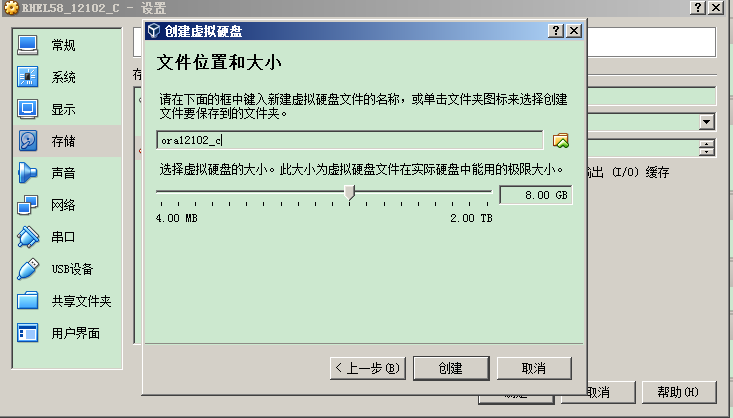
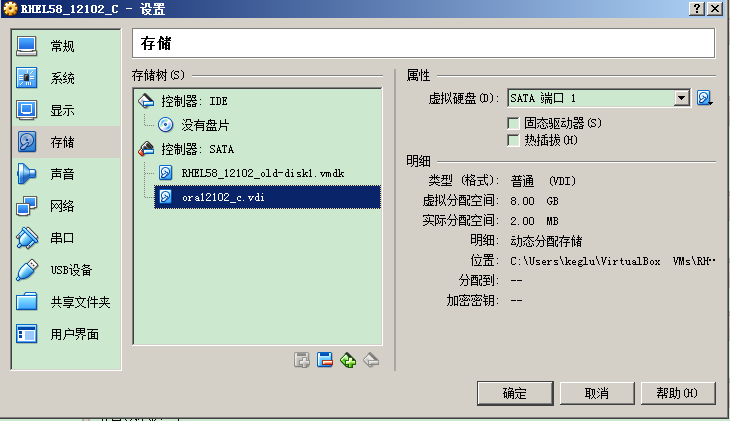
啟動系統後,進行如下操作進行掛載分區。
fdisk -l
fdisk /dev/sdb
m
n
p
1
1
w

fdisk -l
mkfs -t ext3 /dev/sdb1
df -h
mkdir /u02
mount /dev/sdb1 /u02
df -h
[root@db12102 ~]# fdisk -l
Disk /dev/sda: 32.2 GB, 32212254720 bytes
255 heads, 63 sectors/track, 3916 cylinders
Units = cylinders of 16065 * 512 = 8225280 bytes

   Device Boot      Start         End      Blocks   Id  System
/dev/sda1   *           1          13      104391   83  Linux
/dev/sda2              14        3916    31350847+  8e  Linux LVM

Disk /dev/sdb: 8589 MB, 8589934592 bytes
255 heads, 63 sectors/track, 1044 cylinders
Units = cylinders of 16065 * 512 = 8225280 bytes

Disk /dev/sdb doesn't contain a valid partition table
1.2.2 創建新分區
[root@db12102 ~]# fdisk /dev/sdb
Device contains neither a valid DOS partition table, nor Sun, SGI or OSF disklabel
Building a new DOS disklabel. Changes will remain in memory only,
until you decide to write them. After that, of course, the previous
content won't be recoverable.


The number of cylinders for this disk is set to 1044.
There is nothing wrong with that, but this is larger than 1024,
and could in certain setups cause problems with:
1) software that runs at boot time (e.g., old versions of LILO)
2) booting and partitioning software from other OSs
   (e.g., DOS FDISK, OS/2 FDISK)
Warning: invalid flag 0x0000 of partition table 4 will be corrected by w(rite)

Command (m for help): m
Command action
   a   toggle a bootable flag
   b   edit bsd disklabel
   c   toggle the dos compatibility flag
   d   delete a partition
   l   list known partition types
   m   print this menu
   n   add a new partition
   o   create a new empty DOS partition table
   p   print the partition table
   q   quit without saving changes
   s   create a new empty Sun disklabel
   t   change a partition's system id
   u   change display/entry units
   v   verify the partition table
   w   write table to disk and exit
   x   extra functionality (experts only)

Command (m for help): n
Command action
   e   extended
   p   primary partition (1-4)
p
Partition number (1-4): 1
First cylinder (1-1044, default 1): 1
Last cylinder or +size or +sizeM or +sizeK (1-1044, default 1044):
Using default value 1044

Command (m for help): w
The partition table has been altered!

Calling ioctl() to re-read partition table.
Syncing disks.
[root@db12102 ~]# fdisk -l

Disk /dev/sda: 32.2 GB, 32212254720 bytes
255 heads, 63 sectors/track, 3916 cylinders
Units = cylinders of 16065 * 512 = 8225280 bytes

   Device Boot      Start         End      Blocks   Id  System
/dev/sda1   *           1          13      104391   83  Linux
/dev/sda2              14        3916    31350847+  8e  Linux LVM

Disk /dev/sdb: 8589 MB, 8589934592 bytes
255 heads, 63 sectors/track, 1044 cylinders
Units = cylinders of 16065 * 512 = 8225280 bytes

   Device Boot      Start         End      Blocks   Id  System
/dev/sdb1               1        1044     8385898+  83  Linux
1.2.3 格式化和掛載新磁盤
[root@db12102 ~]# mkfs -t ext3 /dev/sdb1
mke2fs 1.39 (29-May-2006)
Filesystem label=
OS type: Linux
Block size=4096 (log=2)
Fragment size=4096 (log=2)
1048576 inodes, 2096474 blocks
104823 blocks (5.00%) reserved for the super user
First data block=0
Maximum filesystem blocks=2147483648
64 block groups
32768 blocks per group, 32768 fragments per group
16384 inodes per group
Superblock backups stored on blocks:
        32768, 98304, 163840, 229376, 294912, 819200, 884736, 1605632

Writing inode tables: done
Creating journal (32768 blocks): done
Writing superblocks and filesystem accounting information: done

This filesystem will be automatically checked every 22 mounts or
180 days, whichever comes first.  Use tune2fs -c or -i to override.
[root@db12102 ~]# df -h
Filesystem            Size  Used Avail Use% Mounted on
/dev/mapper/VolGroup00-LogVol00
                       26G  2.6G   22G  11% /
/dev/sda1              99M   13M   82M  14% /boot
tmpfs                1006M     0 1006M   0% /dev/shm
share                  79G   40G   39G  51% /media/sf_share
[root@db12102 ~]# mkdir /u02
[root@db12102 ~]# mount /dev/sdb1 /u02
[root@db12102 ~]# df -h
Filesystem            Size  Used Avail Use% Mounted on
/dev/mapper/VolGroup00-LogVol00
                       26G  2.6G   22G  11% /
/dev/sda1              99M   13M   82M  14% /boot
tmpfs                1006M     0 1006M   0% /dev/shm
share                  79G   40G   39G  51% /media/sf_share
/dev/sdb1             7.9G  147M  7.4G   2% /u02
[root@db12102 ~]#
1.2.4 修改啟動加載文件,使每次開機時都能自動掛載磁盤在/etc/fstab文件中追加以下內容
/dev/sdb1 /u02 ext3 defaults 0 0
執行例:
[root@db12102 etc]# more /etc/fstab
/dev/VolGroup00/LogVol00 /                       ext3    defaults        1 1
LABEL=/boot             /boot                   ext3    defaults        1 2
tmpfs                   /dev/shm                tmpfs   defaults        0 0
devpts                  /dev/pts                devpts  gid=5,mode=620  0 0
sysfs                   /sys                    sysfs   defaults        0 0
proc                    /proc                   proc    defaults        0 0
/dev/VolGroup00/LogVol01 swap                    swap    defaults        0 0
[root@db12102 etc]# vi /etc/fstab
[root@db12102 etc]# more /etc/fstab
/dev/VolGroup00/LogVol00 /                       ext3    defaults        1 1
LABEL=/boot             /boot                   ext3    defaults        1 2
tmpfs                   /dev/shm                tmpfs   defaults        0 0
devpts                  /dev/pts                devpts  gid=5,mode=620  0 0
sysfs                   /sys                    sysfs   defaults        0 0
proc                    /proc                   proc    defaults        0 0
/dev/VolGroup00/LogVol01 swap                    swap    defaults        0 0

/dev/sdb1               /u02                    ext3    defaults        0 0
[root@db12102 etc]#
到此,成功把新加的磁盤掛載到/u02路徑下。
1.2.5 把/u02的訪問權限賦予給Oracle用戶。變更文件夾的所有者和所有組
[root@db12102 /]# chgrp -R dba /u02
[root@db12102 /]# chown oracle /u02
[root@db12102 /]# ls -larth
...
drwxr-xr-x   3 oracle dba  4.0K  4月  4 09:17 u02
...
2.追加一個共享磁盤,用以方便主機和虛擬機數據文件共享2.1 關閉虛擬機,添加共享文件夾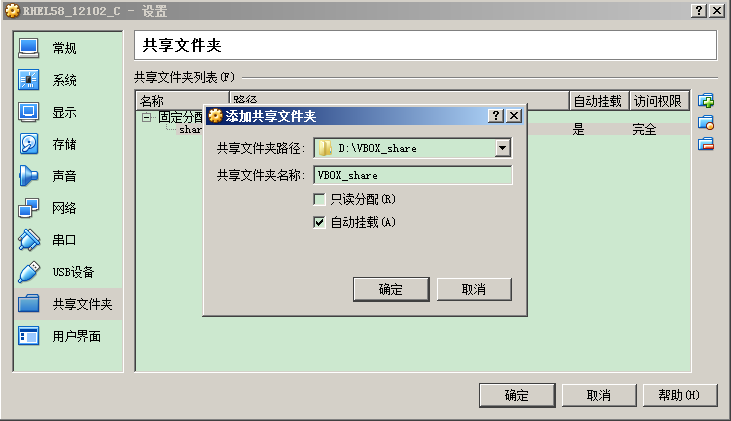
2.1 啟動虛擬機,設定權限查看新追加的共享文件夾
[root@db12102 ~]# df -h
Filesystem            Size  Used Avail Use% Mounted on
/dev/mapper/VolGroup00-LogVol00
                       26G  2.6G   22G  11% /
/dev/sda1              99M   13M   82M  14% /boot
tmpfs                1006M     0 1006M   0% /dev/shm
VBOX_share             79G   40G   39G  51% /media/sf_VBOX_share  新追加的共享文件夾
share                  79G   40G   39G  51% /media/sf_share
如何讓Oracle數據庫用戶操作追加的共享文件夾?
[root@db12102 ~]# ls -la /media/sf_VBOX_share
total 8
drwxrwx--- 1 root vboxsf    0 Jan 15 17:27 .
drwxr-xr-x 4 root root   4096 Jan 15 17:29 ..

[root@db12102 ~]# su - oracle
[oracle@db12102 ~]$ id
uid=54321(oracle) gid=1105(oinstall) groups=1101(oper),1102(backupdba),1103(dgdba),1104(kmdba),1105(oinstall),1106(dba)
[oracle@db12102 ~]$ cd /media/sf_VBOX_share
-bash: cd: /media/sf_VBOX_share: Permission denied ---Oracle數據庫用戶無法訪問共享文件夾
通過usermod命令把新追加的共享文件夾的組賦予Oracle數據庫用戶(或其他用戶)
# usermod
Usage: usermod [options] LOGIN

Options:
  -a, --append                  append the user to the supplemental GROUPS
                                (use only with -G)
  -c, --comment COMMENT         new value of the GECOS field
  -d, --home HOME_DIR           new home directory for the user account
  -e, --expiredate EXPIRE_DATE  set account expiration date to EXPIRE_DATE
  -f, --inactive INACTIVE       set password inactive after expiration
                                to INACTIVE
  -g, --gid GROUP               force use GROUP as new primary group
  -G, --groups GROUPS           new list of supplementary GROUPS
  -h, --help                    display this help message and exit
  -l, --login NEW_LOGIN         new value of the login name
  -L, --lock                    lock the user account
  -m, --move-home               move contents of the home directory to the new
                                location (use only with -d)
  -o, --non-unique              allow using duplicate (non-unique) UID
  -p, --password PASSWORD       use encrypted password for the new password
  -s, --shell SHELL             new login shell for the user account
  -u, --uid UID                 new UID for the user account
  -U, --unlock                  unlock the user account
  -Z, --selinux-user    new selinux user mapping for the user account
[root@db12102 ~]# usermod -a -G vboxsf oracle
[root@db12102 ~]# id oracle
uid=54321(oracle) gid=1105(oinstall) groups=1105(oinstall),500(vboxsf),1101(oper),1102(backupdba),1103(dgdba),1104(kmdba),1106(dba)
[root@db12102 ~]# su - oracle
[oracle@db12102 ~]$ cd /media/sf_VBOX_share
[oracle@db12102 sf_VBOX_share]$
通過以上的設定,就可以在主機和虛擬機數據文件方便的共享文件了。
虛擬機系統快照在做測試時,有可能是破壞性的測試,如果反復重做虛擬機會非常浪費時間,還好,
VirtualBox提供了快照備份和恢復功能,可以在測試前保存一個備份,然後每次做完測試後再恢復到最初的狀態去。
生成系統快照的方法可以通過左上角的【控制】–》【生成備份】來生成系統快照。
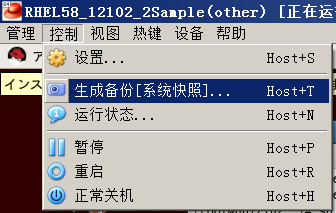
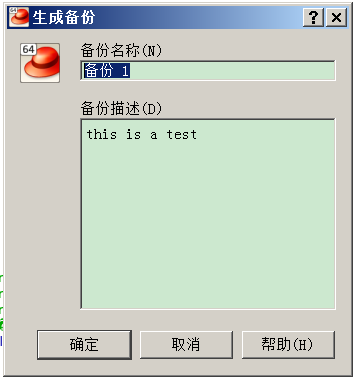
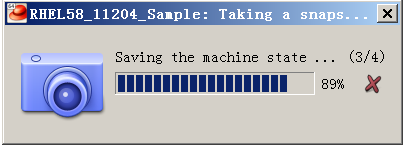
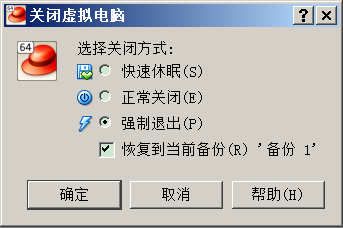
恢復為初始狀態當關閉虛擬機時,可以選擇【強制退出】-》【恢復到當前備份】‘備份名’,來恢復到初始狀態。
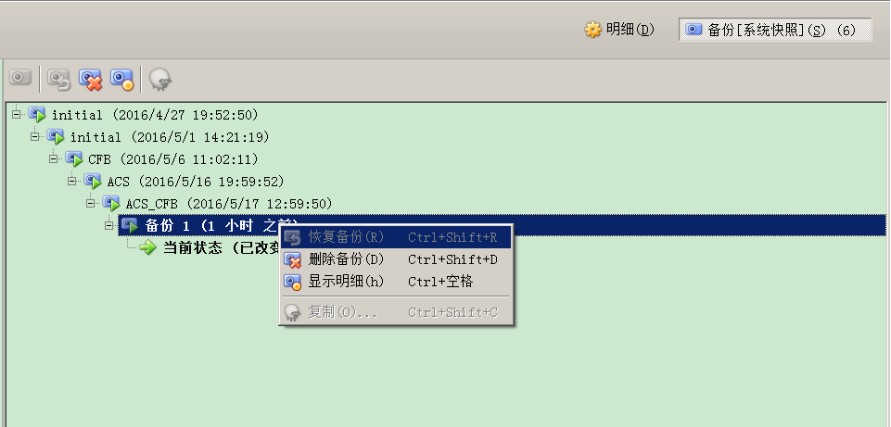
查看和操作備份的系統快照可通過VM管理器右上角的
【備份[系統快照]】來查看備份過的系統快照和進行恢復,以及刪除等管理操作。
參考官方在線文檔:
http://www.virtualbox.org/manual/