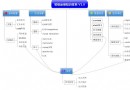
以下面的圖來安裝一個簡單的靜態內容的nginx應用:
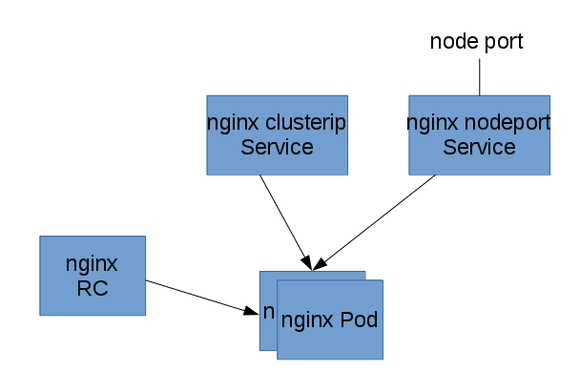
首先,我們用復制器啟動一個2個備份的nginx Pod。然後在前面掛Service,一個service只能被集群內部訪問,一個能被集群外的節點訪問。
1. 部署nginx pod 和復制器
#cat nginx-rc.yaml
apiVersion: v1
kind: ReplicationController
metadata:
  name: nginx-controller
spec:
  replicas: 2
  selector:
    name: nginx
  template:
    metadata:
      labels:
        name: nginx
    spec:
      containers:
        - name: nginx
          image: nginx
          ports:
            - containerPort: 80
我們定義了一個nginx pod復制器,復制份數為2,我們使用nginx docker鏡像。
執行下面的操作創建nginx pod復制器:
[root@master test]# kubectl create -f nginx-rc.yaml
replicationcontrollers/nginx-controller
記得先去下載gcr.io鏡像,然後改名,否則會提示失敗。由於還會下載nginx鏡像,所以所創建的Pod需要等待一些時間才能處於running狀態。
[root@master test]# kubectl get pods
NAME                     READY     STATUS    RESTARTS   AGE
nginx                    1/1       Running   0          1d
nginx-controller-dkl3v   1/1       Running   0          14s
nginx-controller-hxcq8   1/1       Running   0          14s
我們可以使用describe 命令查看pod的相關信息:
[root@master test]# kubectl describe pod nginx-controller-dkl3v
Name:               nginx-controller-dkl3v
Namespace:          default
Image(s):           nginx
Node:               192.168.32.17/192.168.32.17
Labels:             name=nginx
Status:             Running
Reason:
Message:
IP:             172.17.67.2
Replication Controllers:    nginx-controller (2/2 replicas created)
Containers:
  nginx:
    Image:      nginx
    State:      Running
      Started:      Wed, 30 Dec 2015 02:03:19 -0500
    Ready:      True
    Restart Count:  0
Conditions:
  Type      Status
  Ready     True
Events:
  FirstSeen             LastSeen            Count   From            SubobjectPath           Reason      Message
  Wed, 30 Dec 2015 02:03:14 -0500   Wed, 30 Dec 2015 02:03:14 -0500 1   {scheduler }                        scheduled   Successfully assigned nginx-controller-dkl3v to 192.168.32.17
  Wed, 30 Dec 2015 02:03:15 -0500   Wed, 30 Dec 2015 02:03:15 -0500 1   {kubelet 192.168.32.17} implicitly required container POD   pulled      Pod container image "kubernetes/pause" already present on machine
  Wed, 30 Dec 2015 02:03:16 -0500   Wed, 30 Dec 2015 02:03:16 -0500 1   {kubelet 192.168.32.17} implicitly required container POD   created     Created with docker id e88dffe46a28
  Wed, 30 Dec 2015 02:03:17 -0500   Wed, 30 Dec 2015 02:03:17 -0500 1   {kubelet 192.168.32.17} implicitly required container POD   started     Started with docker id e88dffe46a28
  Wed, 30 Dec 2015 02:03:18 -0500   Wed, 30 Dec 2015 02:03:18 -0500 1   {kubelet 192.168.32.17} spec.containers{nginx}      created     Created with docker id 25fcb6b4ce09
  Wed, 30 Dec 2015 02:03:19 -0500   Wed, 30 Dec 2015 02:03:19 -0500 1   {kubelet 192.168.32.17} spec.containers{nginx}      started     Started with docker id 25fcb6b4ce09
2. 部署節點內部可訪問的nginx service
Service的type有ClusterIP和NodePort之分,缺省是ClusterIP,這種類型的Service只能在集群內部訪問。配置文件如下:
#cat nginx-service-clusterip.yaml
apiVersion: v1
kind: Service
metadata:
  name: nginx-service-clusterip
spec:
  ports:
    - port: 8001
      targetPort: 80
      protocol: TCP
  selector:
    name: nginx
執行下面的命令創建service:
[root@master test]# kubectl create -f ./nginx-service-clusterip.yaml
services/nginx-service-clusterip
查看所創建的service:
[root@master test]# kubectl get service
NAME                      LABELS                                    SELECTOR     IP(S)            PORT(S)
kubernetes                component=apiserver,provider=kubernetes   <none>       10.254.0.1       443/TCP
nginx-service-clusterip   <none>                                    name=nginx   10.254.234.255   8001/TCP
上面的輸出告訴我們這個 Service的Cluster IP是10.254.234.255,端口是8001。下面我們驗證這個PortalNet IP的工作情況:
在192.168.32.16上執行以下命令:
[root@minion1 ~]# curl -s 10.254.234.255:8001
<!DOCTYPE html>
<html>
<head>
<title>Welcome to nginx!</title>
<style>
    body {
        width: 35em;
        margin: 0 auto;
        font-family: Tahoma, Verdana, Arial, sans-serif;
    }
</style>
</head>
<body>
<h1>Welcome to nginx!</h1>
<p>If you see this page, the nginx web server is successfully installed and
working. Further configuration is required.</p>

<p>For online documentation and support please refer to
<a href="http://nginx.org/">nginx.org</a>.<br/>
Commercial support is available at
<a href="http://nginx.com/">nginx.com</a>.</p>

<p><em>Thank you for using nginx.</em></p>
</body>
</html>
從前面部署復制器的部分我們知道nginx Pod運行在17節點上。上面我們特意從16代理節點上訪問我們的服務來體現Service Cluster IP在所有集群代理節點的可到達性。
3. 部署外部可訪問的nginx service
下面我們創建NodePort類型的Service,這種類型的Service在集群外部是可以訪問。配置文件如下:
cat nginx-service-nodeport.yaml
apiVersion: v1
kind: Service
metadata:
  name: nginx-service-nodeport
spec:
  ports:
    - port: 8000
      targetPort: 80
      protocol: TCP
  type: NodePort
  selector:
    name: nginx
執行如下命令創建service並進行查看:
[root@master test]# kubectl create -f ./nginx-service-nodeport.yaml
You have exposed your service on an external port on all nodes in your
cluster.  If you want to expose this service to the external internet, you may
need to set up firewall rules for the service port(s) (tcp:31000) to serve traffic.

See http://releases.k8s.io/HEAD/docs/user-guide/services-firewalls.md for more details.
services/nginx-service-nodeport

[root@master test]# kubectl get service
NAME                      LABELS                                    SELECTOR     IP(S)            PORT(S)
kubernetes                component=apiserver,provider=kubernetes   <none>       10.254.0.1       443/TCP
nginx-service-clusterip   <none>                                    name=nginx   10.254.234.255   8001/TCP
nginx-service-nodeport    <none>                                    name=nginx   10.254.210.68    8000/TCP
創建service時提示需要設置firewall rules,不用去管,不影響後續操作。
查看創建的service:
[root@master test]# kubectl describe service nginx-service-nodeport
Name:           nginx-service-nodeport
Namespace:      default
Labels:         <none>
Selector:       name=nginx
Type:           NodePort
IP:         10.254.210.68
Port:           <unnamed> 8000/TCP
NodePort:       <unnamed> 31000/TCP
Endpoints:      172.17.67.2:80,172.17.67.3:80
Session Affinity:   None
No events.
這個 Service的節點級別端口是31000。下面我們驗證這個 Service的工作情況:
[root@master test]# curl -s 192.168.32.16:31000
<!DOCTYPE html>
<html>
<head>
<title>Welcome to nginx!</title>
<style>
    body {
        width: 35em;
        margin: 0 auto;
        font-family: Tahoma, Verdana, Arial, sans-serif;
    }
</style>
</head>
<body>
<h1>Welcome to nginx!</h1>
<p>If you see this page, the nginx web server is successfully installed and
working. Further configuration is required.</p>

<p>For online documentation and support please refer to
<a href="http://nginx.org/">nginx.org</a>.<br/>
Commercial support is available at
<a href="http://nginx.com/">nginx.com</a>.</p>

<p><em>Thank you for using nginx.</em></p>
</body>
</html>

[root@master test]# curl -s 192.168.32.17:31000
<!DOCTYPE html>
<html>
<head>
<title>Welcome to nginx!</title>
<style>
    body {
        width: 35em;
        margin: 0 auto;
        font-family: Tahoma, Verdana, Arial, sans-serif;
    }
</style>
</head>
<body>
<h1>Welcome to nginx!</h1>
<p>If you see this page, the nginx web server is successfully installed and
working. Further configuration is required.</p>

<p>For online documentation and support please refer to
<a href="http://nginx.org/">nginx.org</a>.<br/>
Commercial support is available at
<a href="http://nginx.com/">nginx.com</a>.</p>

<p><em>Thank you for using nginx.</em></p>
</body>
</html>
不管是從16還是17,都能訪問到我們的服務。
4. 總結
本文只是一個簡單的應用,在應用部署時,了解Kubernetes的應用模型是非常重要的。還需要對Kubernetes進行更深入的研究。