之前有分享《Shadowsocks一鍵安裝腳本(CentOS6,7、Ubuntu、Debian)》,適合單用戶個人用。如果你的手上有多個牆外vps可以搭建一個Shadowsocks分享平台。前端面板(moeSS,建議使用ssl加密)和後端(shadowsocks-manyuser),教程如下:
環境:CentOS-6.6-x86_64-minimal.iso
PHP環境配置
安裝lnmp環境(必須安裝Nginx、MySQL、PHP5.4+),參考《OneinStack》或者《lnmp一鍵安裝包》
加虛擬主機ss.linuxeye.com,需要用到pathinfo,下面是我的配置文件(/usr/local/nginx/conf/vhost/ss.linuxeye.com.conf):
server {
listen 443 ssl spdy;
ssl_certificate 1_ss.linuxeye.com_bundle.crt;
ssl_certificate_key ss.linuxeye.com.key;
ssl_ciphers "CHACHA20:GCM:HIGH:!DH:!RC4:!aNULL:!eNULL:!LOW:!3DES:!MD5:!EXP:!PSK:!SRP:!DSS";
ssl_session_cache shared:SSL:10m;
ssl_session_timeout 10m;
ssl_stapling on;
ssl_stapling_verify on;
resolver 8.8.8.8 8.8.4.4 valid=300s;
resolver_timeout 5s;
server_name ss.linuxeye.com;
access_log off;
index index.html index.htm index.jsp index.php;
include moess.conf;
root /home/wwwroot/ss.linuxeye.com;

if (!-e $request_filename) {
        rewrite ^/(.*)$ /index.php/$1 last;
        break;
        }

location ~ [^/]\.php(/|$) {
        fastcgi_split_path_info ^(.+\.php)(/.+)$;
        try_files $fastcgi_script_name =404;
        set $path_info $fastcgi_path_info;
        fastcgi_param PATH_INFO $path_info;
        fastcgi_pass unix:/dev/shm/php-cgi.sock;
        fastcgi_index index.php;
        include fastcgi.conf;
        }

location ~ /\.ht {
        deny  all;
        }

location ~ .*\.(gif|jpg|jpeg|png|bmp|swf|flv|ico)$ {
        expires 30d;
        }

location ~ .*\.(js|css)?$ {
        expires 7d;
        }
}
server {
listen 80;
server_name ss.linuxeye.com;
rewrite ^(.*)$ https://$host$1 permanent;
}
下載代碼
cd ~/oneinstack/src
git clone https://github.com/monoking/moeSS.git #下載moeSS
mv moeSS/* /home/wwwroot/ss.linuxeye.com/ #將代碼上傳到知道虛擬主機(ss.linuxeye.com)網站根目錄
find /home/wwwroot/ss.linuxeye.com -type f -exec chmod 644 {} \;   #為了安全,將代碼裡面文件權限設置為644
find /home/wwwroot/ss.linuxeye.com d -exec chmod 755 {} \;   #為了安全,將代碼裡面目錄權限設置為755
chown -R www.www /home/wwwroot/ss.linuxeye.com/  #修改代碼用戶和所在組設置為www
導入sql
cd /home/wwwroot/ss.linuxeye.com/
mysql -uroot -p
mysql> create database shadowsocks;
mysql> use shadowsocks;
mysql> source shadowsocks.sql;
//注:#創建moeSS面板和多用戶後端shadowsocks-manyuser(shadowsocks-manyuser只需要連接user表,後面授權注意)連接數據庫 mysql> grant all privileges on shadowsocks.user to 'oneinstack_ss'@'%' identified by 'oneinstack_pwd';
mysql> flush privileges;
開啟mysql遠程連接端口
iptables -I INPUT 5 -p tcp -m state --state NEW -m tcp --dport 3306 -j ACCEPT  #建議只對指定服務器開放3306端口
service iptables save
修改moeSS配置文件
# cd /home/wwwroot/ss.linuxeye.com/application/config
# cp config-simple.php config.php  #直接復制模板,更改
修改如下幾個參數:
SITE_NAME:顯示在系統各處的網站名稱;
base_url:網站地址。如果你的系統放在二級目錄的話,請寫全二級目錄的地址,並且不要忘了後置的斜槓和前置的 http:// 或 https://;
encryption_key:用來加密Cookie信息的,請隨意寫一串字符串作為加密密鑰。務必修改該值,否則Cookie可以被輕易偽造!
# cp database-sample.php database.php #數據庫連接文件
保證hostname, username, password, database 四項設置完全正確,否則可能會導致程序無法連接數據庫。
登錄管理後台
訪問:https://ss.linuxeye.com/admin, 可以登錄系統進行配置了。
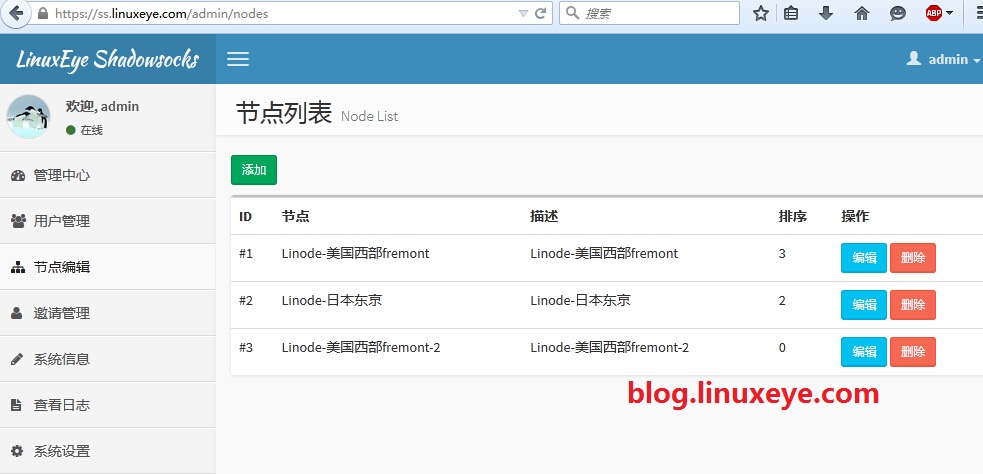
默認情況下系統自帶了用戶名和密碼為 admin/admin12345 的管理員賬戶和用戶賬戶。你可以先嘗試使用這個賬戶分別登陸用戶面板和管理面板來確認網站是否安裝成功。安裝完成之後請務必修改默認密碼,在管理面板的左 下方,你可以找到系統設置->一般設置。其中包含了很多系統的基礎設置。你可以選擇使用默認值,也可以按照需要修改。
項目地址:https://github.com/mengskysama/shadowsocks
先安裝需要的環境依賴
Debian/Ubuntu:
apt-get -y install python-pip python-m2crypto
CentOS:
yum -y install m2crypto python-setuptools
easy_install pip
安裝cymysql
pip install cymysql
安裝shadowsocks-manyuser
cd ~/oneinstack/src
git clone -b manyuser https://github.com/mengskysama/shadowsocks.git
修改配置
vi ~/shadowsocks/shadowsocks/Config.py #前端數據庫連接信息
#Config
MYSQL_HOST = 'ss.linuxeye.com'
MYSQL_PORT = 3306
MYSQL_USER = 'oneinstack_ss'
MYSQL_PASS = 'oneinstack_pwd'
MYSQL_DB = 'shadowsocks'
關閉iptables
service iptables stop   #shadowsocks多用戶需要啟用多個端口,添加iptables麻煩,關閉
chkconfig iptables off
運行shadowsocks-manyuser
nohup python server.py &原文:https://blog.linuxeye.com/426.html