


好,下面我們就介紹一下還剩下的這兩個Namespace。
User Namespace主要是用了CLONE_NEWUSER的參數。使用了這個參數後,內部看到的UID和GID已經與外部不同了,默認顯示為65534。 那是因為容器找不到其真正的UID所以,設置上了最大的UID(其設置定義在/proc/sys/kernel/overflowuid)。
要把容器中的uid和真實系統的uid給映射在一起,需要修改 /proc/<pid>/uid_map 和 /proc/<pid>/gid_map 這兩個文件。這兩個文件的格式為:
ID-inside-ns ID-outside-ns length
其中:
比如,把真實的uid=1000映射成容器內的uid=0
$ cat /proc/2465/uid_map
         0       1000          1
再比如下面的示例:表示把namespace內部從0開始的uid映射到外部從0開始的uid,其最大范圍是無符號32位整形
$ cat /proc/$$/uid_map
         0          0          4294967295
另外,需要注意的是:
這些規則看著都煩,我們來看程序吧(下面的程序有點長,但是非常簡單,如果你讀過《Unix網絡編程》上卷,你應該可以看懂):
#define _GNU_SOURCE
#include <stdio.h>
#include <stdlib.h>
#include <sys/types.h>
#include <sys/wait.h>
#include <sys/mount.h>
#include <sys/capability.h>
#include <stdio.h>
#include <sched.h>
#include <signal.h>
#include <unistd.h>

#define STACK_SIZE (1024 * 1024)

static char container_stack[STACK_SIZE];
char* const container_args[] = {
    "/bin/bash",
    NULL
};

int pipefd[2];

void set_map(char* file, int inside_id, int outside_id, int len) {
    FILE* mapfd = fopen(file, "w");
    if (NULL == mapfd) {
        perror("open file error");
        return;
    }
    fprintf(mapfd, "%d %d %d", inside_id, outside_id, len);
    fclose(mapfd);
}

void set_uid_map(pid_t pid, int inside_id, int outside_id, int len) {
    char file[256];
    sprintf(file, "/proc/%d/uid_map", pid);
    set_map(file, inside_id, outside_id, len);
}

void set_gid_map(pid_t pid, int inside_id, int outside_id, int len) {
    char file[256];
    sprintf(file, "/proc/%d/gid_map", pid);
    set_map(file, inside_id, outside_id, len);
}

int container_main(void* arg)
{

    printf("Container [%5d] - inside the container!\n", getpid());

    printf("Container: eUID = %ld;  eGID = %ld, UID=%ld, GID=%ld\n",
            (long) geteuid(), (long) getegid(), (long) getuid(), (long) getgid());

    /* 等待父進程通知後再往下執行(進程間的同步) */
    char ch;
    close(pipefd[1]);
    read(pipefd[0], &ch, 1);

    printf("Container [%5d] - setup hostname!\n", getpid());
    //set hostname
    sethostname("container",10);

    //remount "/proc" to make sure the "top" and "ps" show container's information
    mount("proc", "/proc", "proc", 0, NULL);

    execv(container_args[0], container_args);
    printf("Something's wrong!\n");
    return 1;
}

int main()
{
    const int gid=getgid(), uid=getuid();

    printf("Parent: eUID = %ld;  eGID = %ld, UID=%ld, GID=%ld\n",
            (long) geteuid(), (long) getegid(), (long) getuid(), (long) getgid());

    pipe(pipefd);

    printf("Parent [%5d] - start a container!\n", getpid());

    int container_pid = clone(container_main, container_stack+STACK_SIZE,
            CLONE_NEWUTS | CLONE_NEWPID | CLONE_NEWNS | CLONE_NEWUSER | SIGCHLD, NULL);


    printf("Parent [%5d] - Container [%5d]!\n", getpid(), container_pid);

    //To map the uid/gid,
    //   we need edit the /proc/PID/uid_map (or /proc/PID/gid_map) in parent
    //The file format is
    //   ID-inside-ns   ID-outside-ns   length
    //if no mapping,
    //   the uid will be taken from /proc/sys/kernel/overflowuid
    //   the gid will be taken from /proc/sys/kernel/overflowgid
    set_uid_map(container_pid, 0, uid, 1);
    set_gid_map(container_pid, 0, gid, 1);

    printf("Parent [%5d] - user/group mapping done!\n", getpid());

    /* 通知子進程 */
    close(pipefd[1]);

    waitpid(container_pid, NULL, 0);
    printf("Parent - container stopped!\n");
    return 0;
}
上面的程序,我們用了一個pipe來對父子進程進行同步,為什麼要這樣做?因為子進程中有一個execv的系統調用,這個系統調用會把當前子進程的 進程空間給全部覆蓋掉,我們希望在execv之前就做好user namespace的uid/gid的映射,這樣,execv運行的/bin/bash就會因為我們設置了uid為0的inside-uid而變成#號的 提示符。
整個程序的運行效果如下:
hchen@ubuntu:~$ id
uid=1000(hchen) gid=1000(hchen) groups=1000(hchen)

hchen@ubuntu:~$ ./user #<--以hchen用戶運行
Parent: eUID = 1000;  eGID = 1000, UID=1000, GID=1000
Parent [ 3262] - start a container!
Parent [ 3262] - Container [ 3263]!
Parent [ 3262] - user/group mapping done!
Container [    1] - inside the container!
Container: eUID = 0;  eGID = 0, UID=0, GID=0 #<---Container裡的UID/GID都為0了
Container [    1] - setup hostname!

root@container:~# id #<----我們可以看到容器裡的用戶和命令行提示符是root用戶了
uid=0(root) gid=0(root) groups=0(root),65534(nogroup)
雖然容器裡是root,但其實這個容器的/bin/bash進程是以一個普通用戶hchen來運行的。這樣一來,我們容器的安全性會得到提高。
我們注意到,User Namespace是以普通用戶運行,但是別的Namespace需要root權限,那麼,如果我要同時使用多個Namespace,該怎麼辦呢?一般來 說,我們先用一般用戶創建User Namespace,然後把這個一般用戶映射成root,在容器內用root來創建其它的Namesapce。
Network的Namespace比較啰嗦。在Linux下,我們一般用ip命令創建Network Namespace(Docker的源碼中,它沒有用ip命令,而是自己實現了ip命令內的一些功能——是用了Raw Socket發些“奇怪”的數據,呵呵)。這裡,我還是用ip命令講解一下。
首先,我們先看個圖,下面這個圖基本上就是Docker在宿主機上的網絡示意圖(其中的物理網卡並不准確,因為docker可能會運行在一個VM中,所以,這裡所謂的“物理網卡”其實也就是一個有可以路由的IP的網卡)
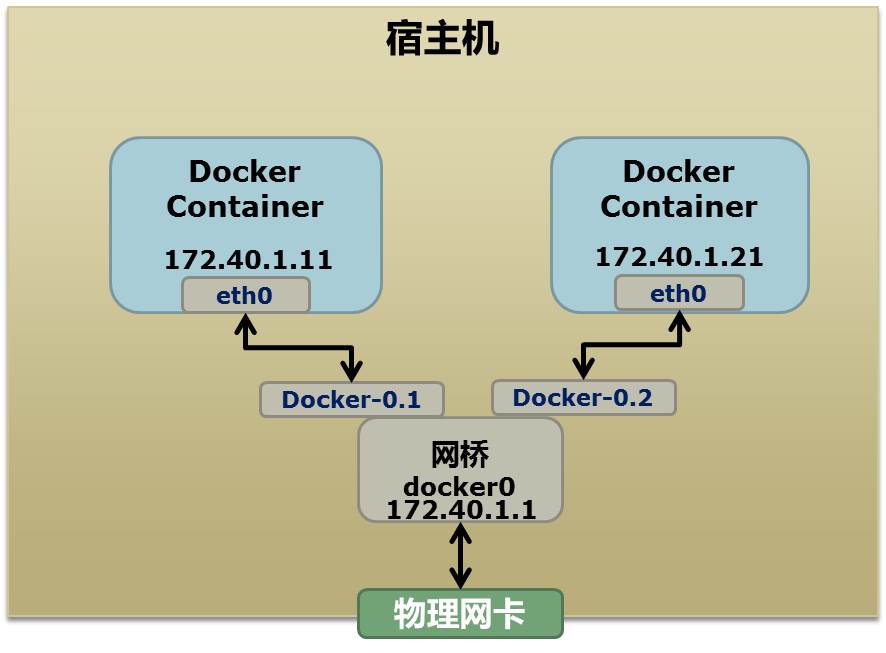
上圖中,Docker使用了一個私有網段,172.40.1.0,docker還可能會使用10.0.0.0和192.168.0.0這兩個私有網 段,關鍵看你的路由表中是否配置了,如果沒有配置,就會使用,如果你的路由表配置了所有私有網段,那麼docker啟動時就會出錯了。
當你啟動一個Docker容器後,你可以使用ip link show或ip addr show來查看當前宿主機的網絡情況(我們可以看到有一個docker0,還有一個veth22a38e6的虛擬網卡——給容器用的):
hchen@ubuntu:~$ ip link show
1: lo: <LOOPBACK,UP,LOWER_UP> mtu 65536 qdisc noqueue state ...
    link/loopback 00:00:00:00:00:00 brd 00:00:00:00:00:00
2: eth0: <BROADCAST,MULTICAST,UP,LOWER_UP> mtu 1500 qdisc ...
    link/ether 00:0c:29:b7:67:7d brd ff:ff:ff:ff:ff:ff
3: docker0: <BROADCAST,MULTICAST,UP,LOWER_UP> mtu 1500 ...
    link/ether 56:84:7a:fe:97:99 brd ff:ff:ff:ff:ff:ff
5: veth22a38e6: <BROADCAST,UP,LOWER_UP> mtu 1500 qdisc ...
    link/ether 8e:30:2a:ac:8c:d1 brd ff:ff:ff:ff:ff:ff
那麼,要做成這個樣子應該怎麼辦呢?我們來看一組命令:
## 首先,我們先增加一個網橋lxcbr0,模仿docker0
brctl addbr lxcbr0
brctl stp lxcbr0 off
ifconfig lxcbr0 192.168.10.1/24 up #為網橋設置IP地址

## 接下來,我們要創建一個network namespace - ns1

# 增加一個namesapce 命令為 ns1 (使用ip netns add命令)
ip netns add ns1

# 激活namespace中的loopback,即127.0.0.1(使用ip netns exec ns1來操作ns1中的命令)
ip netns exec ns1   ip link set dev lo up

## 然後,我們需要增加一對虛擬網卡

# 增加一個pair虛擬網卡,注意其中的veth類型,其中一個網卡要按進容器中
ip link add veth-ns1 type veth peer name lxcbr0.1

# 把 veth-ns1 按到namespace ns1中,這樣容器中就會有一個新的網卡了
ip link set veth-ns1 netns ns1

# 把容器裡的 veth-ns1改名為 eth0 (容器外會沖突,容器內就不會了)
ip netns exec ns1  ip link set dev veth-ns1 name eth0

# 為容器中的網卡分配一個IP地址,並激活它
ip netns exec ns1 ifconfig eth0 192.168.10.11/24 up


# 上面我們把veth-ns1這個網卡按到了容器中,然後我們要把lxcbr0.1添加上網橋上
brctl addif lxcbr0 lxcbr0.1

# 為容器增加一個路由規則,讓容器可以訪問外面的網絡
ip netns exec ns1     ip route add default via 192.168.10.1

# 在/etc/netns下創建network namespce名稱為ns1的目錄,
# 然後為這個namespace設置resolv.conf,這樣,容器內就可以訪問域名了
mkdir -p /etc/netns/ns1
echo "nameserver 8.8.8.8" > /etc/netns/ns1/resolv.conf
上面基本上就是docker網絡的原理了,只不過,
了解了這些後,你甚至可以為正在運行的docker容器增加一個新的網卡:
ip link add peerA type veth peer name peerB
brctl addif docker0 peerA
ip link set peerA up
ip link set peerB netns ${container-pid}
ip netns exec ${container-pid} ip link set dev peerB name eth1
ip netns exec ${container-pid} ip link set eth1 up ;
ip netns exec ${container-pid} ip addr add ${ROUTEABLE_IP} dev eth1 ;
上面的示例是我們為正在運行的docker容器,增加一個eth1的網卡,並給了一個靜態的可被外部訪問到的IP地址。
這個需要把外部的“物理網卡”配置成混雜模式,這樣這個eth1網卡就會向外通過ARP協議發送自己的Mac地址,然後外部的交換機就會把到這個 IP地址的包轉到“物理網卡”上,因為是混雜模式,所以eth1就能收到相關的數據,一看,是自己的,那麼就收到。這樣,Docker容器的網絡就和外部 通了。
當然,無論是Docker的NAT方式,還是混雜模式都會有性能上的問題,NAT不用說了,存在一個轉發的開銷,混雜模式呢,網卡上收到的負載都會完全交給所有的虛擬網卡上,於是就算一個網卡上沒有數據,但也會被其它網卡上的數據所影響。
這兩種方式都不夠完美,我們知道,真正解決這種網絡問題需要使用VLAN技術,於是Google的同學們為Linux內核實現了一個IPVLAN的驅動,這基本上就是為Docker量身定制的。
上面就是目前Linux Namespace的玩法。 現在,我來看一下其它的相關東西。
讓我們運行一下上篇中的那個pid.mnt的程序(也就是PID Namespace中那個mount proc的程序),然後不要退出。
$ sudo ./pid.mnt
[sudo] password for hchen:
Parent [ 4599] - start a container!
Container [    1] - inside the container!
我們到另一個shell中查看一下父子進程的PID:
hchen@ubuntu:~$ pstree -p 4599
pid.mnt(4599)───bash(4600)
我們可以到proc下(/proc//ns)查看進程的各個namespace的id(內核版本需要3.8以上)。
下面是父進程的:
hchen@ubuntu:~$ sudo ls -l /proc/4599/ns
total 0
lrwxrwxrwx 1 root root 0  4月  7 22:01 ipc -> ipc:[4026531839]
lrwxrwxrwx 1 root root 0  4月  7 22:01 mnt -> mnt:[4026531840]
lrwxrwxrwx 1 root root 0  4月  7 22:01 net -> net:[4026531956]
lrwxrwxrwx 1 root root 0  4月  7 22:01 pid -> pid:[4026531836]
lrwxrwxrwx 1 root root 0  4月  7 22:01 user -> user:[4026531837]
lrwxrwxrwx 1 root root 0  4月  7 22:01 uts -> uts:[4026531838]
下面是子進程的:
hchen@ubuntu:~$ sudo ls -l /proc/4600/ns
total 0
lrwxrwxrwx 1 root root 0  4月  7 22:01 ipc -> ipc:[4026531839]
lrwxrwxrwx 1 root root 0  4月  7 22:01 mnt -> mnt:[4026532520]
lrwxrwxrwx 1 root root 0  4月  7 22:01 net -> net:[4026531956]
lrwxrwxrwx 1 root root 0  4月  7 22:01 pid -> pid:[4026532522]
lrwxrwxrwx 1 root root 0  4月  7 22:01 user -> user:[4026531837]
lrwxrwxrwx 1 root root 0  4月  7 22:01 uts -> uts:[4026532521]
我們可以看到,其中的ipc,net,user是同一個ID,而mnt,pid,uts都是不一樣的。如果兩個進程指向的namespace編號相同,就說明他們在同一個namespace下,否則則在不同namespace裡面。
這些文件還有另一個作用,那就是,一旦這些文件被打開,只要其fd被占用著,那麼就算PID所屬的所有進程都已經結束,創建的namespace也 會一直存在。比如:我們可以通過:mount –bind /proc/4600/ns/uts ~/uts 來hold這個namespace。
另外,我們在上篇中講過一個setns的系統調用,其函數聲明如下:
int setns(int fd, int nstype);
其中第一個參數就是一個fd,也就是一個open()系統調用打開了上述文件後返回的fd,比如:
fd = open("/proc/4600/ns/nts", O_RDONLY);  // 獲取namespace文件描述符
setns(fd, 0); // 加入新的namespace
原文:http://coolshell.cn/articles/17029.html