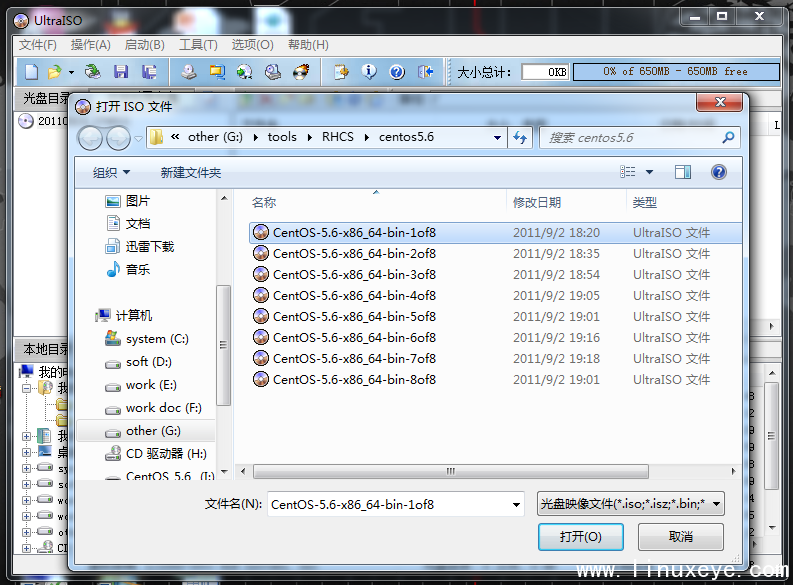
CentOS 6.2鏡像制作
用root用戶登錄(重要) sudo su
qemu-img create -f qcow2 /var/dev/disk1/centos-6.2.qcow2 20G
virt-install --virt-type kvm --name centos-6.2 --ram 1024 --cdrom=/home/cpadmin/CentOS-6.2.iso --disk /var/dev/disk1/centos-6.2.qcow2,format=qcow2 --network network=default --graphics vnc,listen=0.0.0.0 --noautoconsole --os-type=linux --os-variant=rhel6
安裝VNCviewer 連接192.168.110.9:5902 如果閃退只需修改vnc option裡面Advanced-->expert-->ColourLevel的值為“rgb222” or “full”即可。
直接skip就行。
做到磁盤分區那一步的時候centOS6.2需要保留SWAP分區,其他的版本合並成一個分區。
virsh dumpxml centos-6.2
virsh attach-disk --type cdrom --mode readonly centos-6.2 "" hdc
virsh destroy centos-6.2
virsh start centos-6.2
/etc/sysconfig/network-scrips/ifcfg-eth0 去除HWADDR一行
rm -rf /etc/udev/rules.d/70-persistent-net.rules
# echo "NOZEROCONF=yes" >> /etc/sysconfig/network
In order for nova console-log to work properly on CentOS 6.x, guests you may need to add the following lines to /boot/grub/menu.lst
serial --unit=0 --speed=115200
terminal --timeout=10 console serial
# Edit the kernel line to add the console entries
kernel ... console=tty0 console=ttyS0,115200n8
剩下的參考http://docs.openstack.org/image-guide/content/centos-image.html
根據用戶需求進行相關配置可以用guestfish進行。http://docs.openstack.org/image-guide/content/ch_modifying_images.html
# /sbin/shutdown -h now
# virt-sysprep -d centos-6.2
# virsh undefine centos-6.2
再把鏡像傳輸到keystone那個機器上
source /home/test/keystonerc
glance image-create --name="centos-6.2" --disk-format=qcow2 --container-format=bare --is-public=true < centos-6.2.qcow2
Ubuntu 11.10鏡像制作
root用戶 sudo su
# qemu-img create -f qcow2/tmp/precise.qcow2 10G
# virt-install --virt-type kvm --nameprecise --ram 1024 \
--cdrom=/data/isos/precise-64-mini.iso \
--disk /tmp/precise.qcow2,format=qcow2 \
--network network=default \
--graphics vnc,listen=0.0.0.0 --noautoconsole \
--os-type=linux --os-variant=ubuntuprecise
分區的時候只分成一個區
ssh server一定要選上
剩下的參考http://docs.openstack.org/image-guide/content/ubuntu-image.html
WindowsR2ST鏡像制作
用root用戶登錄(重要) sudo su
下載windowsR2ST的鏡像。
kvm-img create -f qcow2windowsserver.img 20G
kvm -m 1024 -cdrom /var/dev/disk0/cn_windows_server_2008_r2_standard_enterprise_datacenter_and_web_with_sp1_vl_build_x64_dvd_617396.iso--drive file=/var/dev/disk0/windowsserver.img,if=virtio --boot d --drivefile=/var/dev/disk0/virtio-win-0.1-74.iso,index=3,media=cdrom -devicevirtio-net-pci -net nic -net user -nographic -vnc :2
然後打開VNC,開始安裝,默認不識別硬盤,網卡。點擊Load Driver,選擇,選擇第二個CDROM, wlh或者win7,加載amd64的驅動
允許服務器被ping netsh firewall set icmpsetting 8
安裝cloud-init http://www.cloudbase.it/cloud-init-for-windows-instances/
安裝的時候要用Red Hat virtIOEthernet Adapter網卡驅動。
如果沒有Red Hat virtIO Ethernet Adapter網卡驅動則參考(重要)http://www.auvps.com/post_486.html#more-486
安裝結束的時候點sync那個框
刪除下載的安裝包
關機
重啟相關nova服務和compute上的neutron服務