Zenoss做為一款優秀的開源網管軟件不測試是不行的,Zenoss對自己的定義是:Commercial Open Source Application, Systems and Network Monitoring.
環境准備 & 下載
我的系統是openSUSE11,安裝在VMWare WorkStation6.5上,分配了400M內存,關掉Xwindows和大部分系統默認的Service。
注意:磁盤空間至少要留出500M,我第一次安裝出錯,發現磁盤空間滿了(當時還有300多M可用)。沒想到Open Source的東東也會這麼大。
登錄
Zenoss的網站,下載Zenoss Core 2.3.2 32bit Stack Installer for openSUSE10.3,下載安裝的包同時,進入doc,順手將《Zenoss Installation Guide》和《Getting StartedWith Zenoss》也下載了。
includes all dependencies,原來Zenoss將所有需要的東東都打好包了,現在知道為什麼需要這麼大磁盤空間了吧,這個bin包有78M。
沒有發現for openSUSE11的,不過後來從文檔和實際操作來看,Zenoss向上兼容,這個不必擔心。
安裝:
看了Installation Guide,感覺安裝異常簡單。
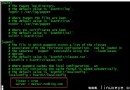
將zenoss-stack-2.3.2-linux.bin賦予執行權限:a+x,然後運行就OK了。
# ./zenoss-stack-2.3.2-linux.bin
----------------------------------------------------------------------------
Welcome to the Zenoss Setup Wizard.
Created with an evaluation version of BitRock InstallBuilder
----------------------------------------------------------------------------
Installation folder
Please, choose a folder to install Zenoss
Select a folder [/usr/local/zenoss]: /disk/zenoss//如果你的/usr空間足夠,不必修改
----------------------------------------------------------------------------
MySQL Credentials
Please enter your database root user password
MySQL Server root password : //這裡輸入zenoss新建mysql的root密碼,並不是你系統上原有的。
Re-enter password :
----------------------------------------------------------------------------
Setup is now ready to begin installing Zenoss on your computer.
Do you want to continue? [Y/n]: Y
----------------------------------------------------------------------------
Please wait while Setup installs Zenoss on your computer.
Installing
0% ______________ 50% ______________ 100%
######################################### //我的老爺機,這裡差不多花了5分鐘
----------------------------------------------------------------------------
Setup has finished installing Zenoss on your computer.
Launch Zenoss [Y/n]: Y //這裡等的時間也夠長的
Info: To access the Zenoss Application, go to [url]http://localhost:8080[/url] from your
browser.
Press [Enter] to continue :
登錄:
用浏覽器訪問8080端口即可登陸,admin/zenoss
登錄以後進入界面:安裝完成
進入系統看看,差不多裝了380M
opensuse:/disk/zenoss # du -sk *|sort -n
1 zenconsole
3 scripts
20 ctlscript.sh
170 licenses
2303 uninstall
74120 python
81472 zenoss
92623 common
127625 mysql
進他自己帶的數據庫看看,注意:zenoss將自己帶的Mysql端口改為了3307。
opensuse:/disk/zenoss/mysql/bin # ./mysql -P3307 -uroot -p
xxxxxxWelcome to the MySQL monitor. Commands end with ; or \g.
Your MySQL connection id is 19
Server version: 5.0.45 MySQL Community Server (GPL)
Type 'help;' or '\h' for help. Type '\c' to clear the buffer.
mysql> show databases;
+--------------------+
| Database |
+--------------------+
| information_schema |
| events |
| mysql |
| test |
+--------------------+
就建了個events庫?不知道在後面的使用是否還有新的庫建立
mysql> use events
Reading table information for completion of table and column names
You can turn off this feature to get a quicker startup with -A
Database changed
mysql> show tables;
+------------------+
| Tables_in_events |
+------------------+
| alert_state |
| detail |
| heartbeat |
| history |
| log |
| status |
+------------------+
總結:
什麼叫商業化的open source,大家有所體會了吧,這種傻瓜式的安裝幾乎可以等同於Windows了。
Zenoss的收費版本有Professional和Enterprise,網站裡有
三個版本的對比 ,呵呵,好東西還是要花銀子的,不知道Zenoss現在有沒有來自中國的客戶?