OS:CentOS-6.6-x86_64(Minimal)
Puppet 3.7.3
Zabbix 2.4
Puppet/Zabbix master: master/zabbix.redking.com
Puppet/Zabbix agent:  agent1~5.redking.com
Puppet安裝
1.服務端安裝puppet-server
puppet不在CentOS的基本源中,需要加入PuppetLabs提供的官方源,Puppet Master服務器端安裝puppet-server,自動匹配安裝Facter等相關依賴包
[root@master ~]# rpm -ivh http://yum.puppetlabs.com/el/6/products/x86_64/puppetlabs-release-6-7.noarch.rpm
[root@master ~]# yum install -y puppet-server
[root@master ~]# chkconfig puppetmaster on
[root@master ~]# service puppetmaster start
2.客戶端安裝puppet
[root@agent ~]# rpm -ivh http://yum.puppetlabs.com/el/6/products/x86_64/puppetlabs-release-6-7.noarch.rpm
[root@agent ~]# yum install -y puppet
[root@agent ~]# chkconfig puppet on
[root@agent ~]# service puppet start
Puppet Master服務器配置
1.配置自動認證
允許所有redking.com域的主機自動頒發證書.創建autosign.conf文件
[root@master ~]# cat > /etc/puppet/autosign.conf <<EOF
> *.redking.com
> EOF
[root@master ~]#
Puppet Agent客戶端配置
1.修改客戶端主配置文件puppet.conf來增加監聽與指定服務端域名
[root@agent ~]# vim /etc/puppet/puppet.conf
[agent]
        listen = true
        server = master.redking.com

Puppet測試
這樣我們可以使用Puppet來管理Puppet,通過配置puppet modules的方式來管理所有puppet客戶端,將配置文件應用到所有服務器。
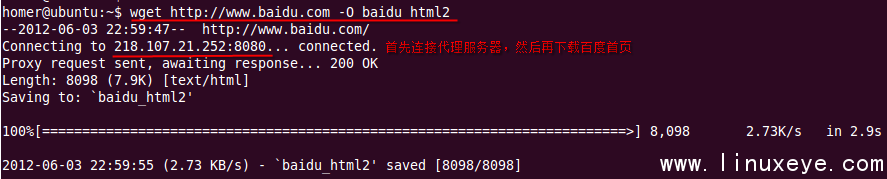
client需要向服務器端發出請求, 讓服務器對客戶端進行管理. 這其實是一個證書簽發的過程. 第一次運行 puppet 客戶端的時候會生成一個SSL證書並指定發給Puppet 服務端, 服務器端如果同意管理客戶端,就會對這個證書進行簽發,可以用這個命令來簽發證書,由於我們已經在客戶端設置了server地址,因此不需要跟服務端地址
[root@agent ~]# puppet agent --test

為了詳細了解注冊的過程和日後排錯,可以增加參數
–no-daemonize 前台輸出日志
–verbose 輸入更加詳細的日志
–debug 更加詳細的日志,排錯的時候使用
–test 表示測試,就帶一個–test參數就可以
[root@agent ~]# puppet agent --no-daemonize --onetime --verbose --debug
服務端查看證書簽發信息
[root@master ~]# puppet cert list --all

Zabbix Server安裝
1.配置軟件倉庫並安裝Zabbix
[root@master ~]# rpm -ivh http://repo.zabbix.com/zabbix/2.4/rhel/6/x86_64/zabbix-release-2.4-1.el6.noarch.rpm
[root@master ~]# yum install -y zabbix-server-mysql zabbix-web-mysql mysql-server
默認創建Zabbix運行的用戶及組,創建Web服務器Apache虛擬主機配置文件。
2.創建數據庫並導入數據表
[root@master ~]# rpm -ivh http://repo.zabbix.com/zabbix/2.4/rhel/6/x86_64/zabbix-release-2.4-1.el6.noarch.rpm
[root@master ~]# yum install -y zabbix-server-mysql zabbix-web-mysql mysql-server
[root@master ~]# service mysqld start
[root@master ~]# chkconfig mysqld on
[root@master ~]# mysqladmin -u root password '123456'
[root@master ~]# mysql -uroot -p123456
mysql> create database zabbix character set utf8;
mysql> grant all privileges on zabbix.* to zabbix@localhost identified by 'zabbix';
mysql> flush privileges;
進入Zabbix數據庫文件目錄導入數據庫信息
[root@master ~]# cd /usr/share/doc/zabbix-server-mysql-2.4.3/create/
[root@master create]# mysql -uroot -p123456 zabbix < schema.sql
[root@master create]# mysql -uroot -p123456 zabbix < images.sql
[root@master create]# mysql -uroot -p123456 zabbix < data.sql
3.修改Zabbix配置文件配置數據庫相關信息
[root@master ~]# vim /etc/zabbix/zabbix_server.conf
DBHost=localhost
DBName=zabbix
DBUser=zabbix
DBPassword=zabbix
4.設置PHP默認時區
[root@master ~]# vim /etc/php.ini
date.timezone = PRC
5.啟動Zabbix和Apache服務
[root@master ~]# service zabbix-server start
[root@master ~]# chkconfig zabbix-server on
[root@master ~]# service httpd start
[root@master ~]# chkconfig httpd on
6.設置Zabbix
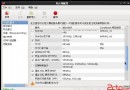
Zabbix安裝頁面:http://zabbix.redking.com/zabbix/setup.php


Zabbix後台界面

編寫Zabbix模塊
1.創建模塊目錄
[root@master ~]# mkdir -p /etc/puppet/modules/zabbix/{manifests,templates}
2.創建manifests文件
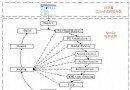
服務器端保存著所有對客戶端服務器的配置代碼,在puppet裡面叫做manifest. 客戶端下載manifest之後,可以根據manifest對服務器進行配置,例如軟件包管理,用戶管理和文件管理等等。
Zabbix Agent程序采用官方提供的軟件源,客戶端配置文件采用模板方式進行文件下載,由於客戶端需要指定Zabbix Server,因此配置文件采用變量進行傳遞,最後使用“->”指定資源之間的依賴順序關系。
[root@master ~]# vim /etc/puppet/modules/zabbix/manifests/init.pp
class zabbix {
package { 'zabbix-agent':
ensure => installed,
require => Yumrepo["zabbix"],
}
yumrepo { 'zabbix':
baseurl => "http://repo.zabbix.com/zabbix/2.4/rhel/\$releasever/\$basearch/",
descr => "Zabbix Official Repository",
enabled => 1,
gpgcheck => 0,
}
file { '/etc/zabbix/zabbix_agentd.conf':
content => template("zabbix/zabbix_agentd_conf.erb"),
ensure => file,
}
service { 'zabbix-agent':
ensure => "running",
hasstatus => true,
enable => true,
subscribe => [ File["/etc/zabbix/zabbix_agentd.conf"] ],
}
Package ["zabbix-agent"] -> File ["/etc/zabbix/zabbix_agentd.conf"] -> service ["zabbix-agent"]
}
3.創建模板文件
[root@master ~]# vim /etc/puppet/modules/zabbix/templates/zabbix_agentd_conf.erb
PidFile=/var/run/zabbix/zabbix_agentd.pid
LogFile=/var/log/zabbix/zabbix_agentd.log
EnableRemoteCommands=1
LogRemoteCommands=1
Server=<%= zabbix_server %>
Hostname=<%= fqdn %>
ListenIP=<%= ipaddress %>
Include=/etc/zabbix/zabbix_agentd.d/
4.創建節點文件
[root@master ~]# mkdir /etc/puppet/manifests/nodes
[root@master ~]# vim /etc/puppet/manifests/nodes/agentgroup.pp
node /^agent\d+\.redking\.com$/ {
$zabbix_server = "zabbix.redking.com"
include zabbix
}
5.修改site.pp將測試節點載入Puppet
[root@master ~]# vim /etc/puppet/manifests/site.pp
Package {
allow_virtual => true,
}
import "nodes/agentgroup.pp"
節點agent.redking.com測試
[root@agent ~]# puppet agent --test

客戶端已經自動安裝zabbix-agent並開啟服務。
Zabbix Web界面測試
設置Discovery規則
設置Actions


Monitoring界面