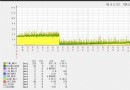
→RMVB播放截圖player RMVB
相信常在Win平台看高清的同學都不會對終極解碼&完美解碼這些播放器陌生吧,就目前來說身邊也是越來越多的字幕組開始壓制以264為編碼的MP4或者mkv的視頻了(取代RV10,基於264的480p或更高。
那麼想要在win平台上播放這些視頻卻是很容易的,通常一些播放器都會集成眾多的解碼器來進行解碼,這就是我們常說的萬能播放器了,而在這些解碼器中較受歡迎和常用的便是CoreAVC,ffdshow等。
從截圖可以看到atom1.6Ghz的CPU播放720p只占用了很少的系統資源,可見其效能優異
以下將以<安裝記錄>的方式教授大家如何在Ubuntu上安裝基於MPlayer+CoreAVC 2.0的萬能播放器(SMPlayer)
--------------------------意味不明の分割線--------------------------
注:以下所有命令操作均在root賬戶下進行:
view sourceprint?1 sudo passwd root #修改root密碼
2 su root #此時提升至root,請輸入root密碼
建立一個存放目錄,並安裝所需環境
view sourceprint?1 mkdir ~/mplayer-with-coreavc
2 cd ~/mplayer-with-coreavc
3
4 apt-get install build-essential subversion pkg-config xorg-dev libgtk2.0-dev libxv-dev libasound2-dev libpulse-dev
5
6 apt-get build-dep mplayer #build一個編譯MPlayer所需要的依賴環境
7 apt-get install gcc-4.3 # 9.10用戶需執行
8 svn checkout svn://svn.mplayerhq.hu/mplayer/trunk mplayer #取得svn下的MPlayer源碼
9 svn checkout http://coreavc-for-linux.googlecode.com/svn/trunk/ coreavc-for-linux #取得coreavc for linux源碼
下載CoreAVC安裝文件
CoreAVC 2.0 Professional Edition
安裝此文件需要wine支持
view sourceprint?1 apt-get install wine wine-dev #安裝wine&wine-dev(注意dev必須安裝,否則無法完成dshowserver編譯
運行CoreAVC 2.0 Professional Edition.exe
view sourceprint?1 wine "CoreAVC 2.0 Professional Edition.exe"
彈出程序安裝窗口,進行安裝(郵箱及序列號請查看壓縮包內SN.txt)
安裝完畢後命令行會停在{fixme:shell:DllCanUnloadNow stub},此時回車即可繼續。
建立codecs目錄,復制CoreAVCDecoder.ax到codecs
下載win32Codecs all-20100303.tar.bz2
view sourceprint?1 mkdir /usr/lib/codecs/
2
3 cp ~/.wine/drive_c/Program\ Files/CoreCodec/CoreAVC\ Professional\ Edition/CoreAVCDecoder.ax /usr/lib/codecs/
4
5 bunzip2 all-20100303.tar.bz2 && tar xvf all-20100303.tar #解壓&&解包
6
7 cp -rf all-20100303/* /usr/lib/codecs/ #復制所有到codecs文件夾
8
9 chmod -R 777 /usr/lib/codecs/ #添加權限
編譯安裝dshowserver
view sourceprint?1 cd mplayer-with-coreavc/coreavc-for-linux #進入coreavc-for-linux目錄
2
3 make -C dshowserver/ #編譯 dshowserver(文件夾)
4
5 cd dshowserver #進入dshowserver文件夾
6
7 make install #安裝dshowserver
測試dshowserver是否工作
view sourceprint?1 dshowserver -c /usr/lib/codecs/CoreAVCDecoder.ax -s 1280x720 -g 09571a4b-f1fe-4c60-9760de6d310c7c31 -b 12 -f 0x34363248 -o 0x30323449
顯示結果類似如下則正常
view sourceprint?01 Starting wine dshowserver.exe.so
02 No id specified, assuming test mode
03 Opening device (port is 0)
04 len: 992
05 ProductVersion: 2.0.0
06 fixme:thread:SetThreadIdealProcessor (0x54): stub
07 fixme:thread:SetThreadIdealProcessor (0x58): stub
08 Decoder supports the following YUV formats: YUY2 UYVY YV12 I420
09 Decoder is capable of YUV output (flags 0x2b)
10 Setting fmt
11 Starting
12 Initialization is complete
編譯MPlayer
view sourceprint?1 cd ~/mplayer-with-coreavc/mplayer #進入mplayer源碼目錄
編譯參數
view sourceprint?1 CC=gcc-4.3 ./configure --enable-gui --enable-menu --enable-freetype --enable-debug --codecsdir=/usr/lib/codecs --language=zh_CN #如果您是9.10用戶請加上CC=gcc-4.3
安裝dshowserver補丁
view sourceprint?1 patch -p0 < ../coreavc-for-linux/mplayer/dshowserver.patch #安裝dshowserver補丁
開始編譯
view sourceprint?1 make && make install #編譯時間針對配置,可能時間較長
執行一次MPlayer創建.mplayer/配置目錄
view sourceprint?1 mplayer #直接輸入即可
復制配置文件
view sourceprint?1 cp etc/codecs.conf ~/.mplayer/ #復制配置文件到用戶目錄下的.mplayer/
將下面配置信息粘貼入codecs.conf中,videocodec ffbinkvideo的前面。
view sourceprint?1 vim ~/.mplayer/codecs.conf
view sourceprint?01 videocodec coreserve
02 info "CoreAVC DShow H264 decoder 2.0 for x86 - http://corecodec.org/"
03 status working
04 format 0x10000005
05 fourcc H264,h264 H264
06 fourcc X264,x264
07 fourcc avc1,AVC1 AVC1
08 fourcc davc,DAVC
09 fourcc VSSH
10 driver dshowserver
11 dll "/usr/lib/codecs/CoreAVCDecoder.ax"
12 guid 0x09571a4b, 0xf1fe, 0x4c60, 0x97, 0x60, 0xde, 0x6d, 0x31, 0x0c, 0x7c, 0x31
13 out YV12,IYUV,I420,YUY2
下載SMPlayer
SMPlayer SF.net
view sourceprint?1 cd ~/mplayer-with-coreavc #下載smplayer-x.x.x.tar.bz2 到此目錄
2 bunzip2 smplayer-x.x.x.tar.bz2 #解壓
3 tar xvf smplayer-x.x.x.tar #解包
4 cd smplayer-x.x.x
安裝SMPlayer
view sourceprint?1 apt-get install libqt4-dev zlib1g-dev fakeroot devscripts debhelper g++ #安裝環境,會在命令行界面出現對話框,請一直確定下一步即可
制作一個deb包
view sourceprint?1 ./create_deb.sh #發生錯誤請檢查是否安裝上面的環境,或安裝更多依賴包
安裝deb包
上一條命令執行結束後會在上級目錄生成deb安裝包
view sourceprint?1 cd ../ #跳會上一級目錄
2 dpkg -i smplayer_x.x.x_i386.deb #dpkg -i 安裝軟件包
以上方法安裝的SMPlayer不會集成MPlayer等軟件包,但會產生錯誤信息、請無視。
此時SMPlayer已經安裝完畢,你可以在:
view sourceprint?1 應用程序->影音->SMPlayer 啟動它
ok,全部安裝完成、
注:如果想在普通用戶組使用,請確定所有需要調用的目錄文件是否賦予權限、復制codecs.conf到當前用戶目錄下的.mplayer/ 並且在普通用戶下重新執行
view sourceprint?1 wine "CoreAVC 2.0 Professional Edition.exe"
來安裝CoreAVC,否則dshowserver可能無法正常使用
後記:第一次寫這麼長的東東,只是因為目前網上能查到的資料似乎都已經無法勝任了、
新版的CoreAVC for linux 改變了許多,還有大概是因為我比較愛用CoreAVC這個東東吧,所以就有了這篇小記