導讀
Hadoop是一個能夠讓用戶輕松架構和使用的分布式計算平台,用戶可以輕松地在Hadoop上開發和運行處理海量數據的應用程序,本節講安裝並且優化centos 6.7 系統下的Supper Hadoop。 1、系統安裝類型選擇及自定義額外包組
進入如圖 1-1 所示界面。 上半部分是系統定制的不同的系統安裝類型選擇項,默認是“ Desktop”,這裡我們選擇“ Minimal”,即最小化安裝,下半部分是在上面系統安裝類型確定後, 額外想添加的軟件包組選擇項,我們選擇“ Customize now”即立即自定義。
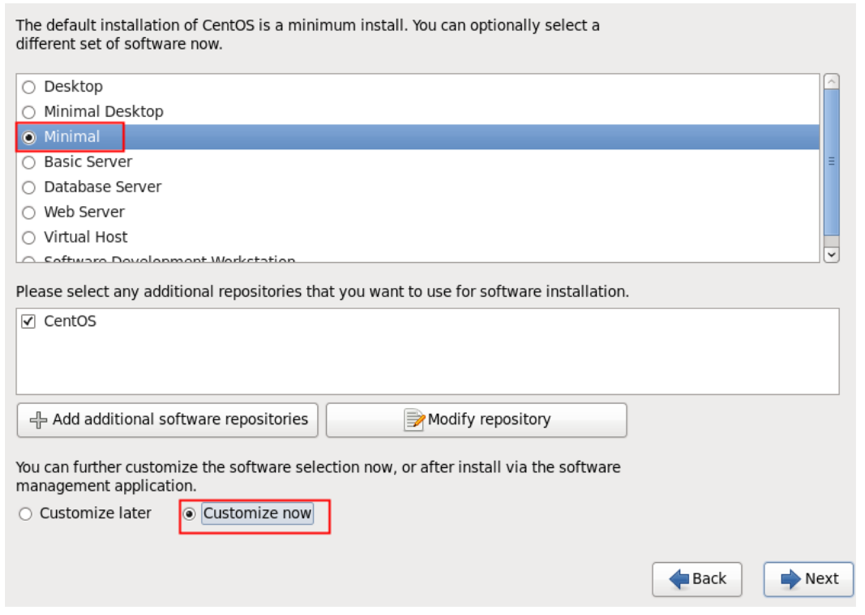
圖 1-1 系統安裝包類型選擇及自定義額外包組。
在下圖 1-2 的自定義額外的包組界面,我們首先需要選擇左邊的大的分類,然後在勾選右邊對應的小的包組。注意:右邊小包組裡的內容默認即可,選擇結果如圖(1)、圖(2)所示。
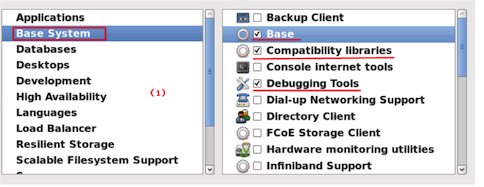
圖 1-2 自定義安裝包組選擇界面I
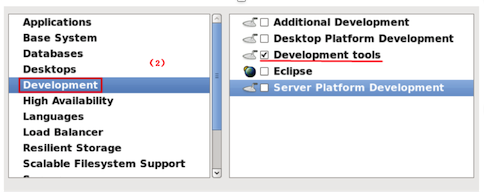 1.1 根據經驗,選擇安裝包時應該按最小化原則,即不需要的或者不確定是否需要的就不安裝,這樣可以最大程度上確保系統安全。1.2 如果安裝過程落了部分包組或者其他伙伴安裝時沒選
安裝後可以按如下方式補上安裝時未安裝的包組:
yum groupinstall "Compatibility libraries" "Base" "Development tools"
yum groupinstall "debugging Tools" "Dial-up Networking Support"
可以通過 yum groupinfo 包組查看具體安裝的組件。
1.3 下面安裝 6.7 後登陸系統的時候查看選包的情況yum grouplist:
Installed Groups:
Base
Compatibility libraries
Debugging Tools
Development tools
E-mail server
Graphical Administration Tools
Hardware monitoring utilities
Legacy UNIX compatibility
Networking Tools
Performance Tools
Perl Support
Scientific support
Security Tools
可以看到除了我們選擇的外,系統還是默認安裝了一些必須的軟件包組。
2、網絡設置[root@centos ~]# cat /etc/sysconfig/network-scripts/ifcfg-eth0
DEVICE=eth0
HWADDR=00:0C:29:6D:58:E4
TYPE=Ethernet
UUID=5236fdbb-76ee-4f98-90cf-6bed4fb62661
ONBOOT=yes
NM_CONTROLLED=yes
BOOTPROTO=static
IPADDR=192.168.2.200
GATEWAY=192.168.2.1
NETMASK=255.255.255.0
3、Linux系統優化 Supper Hadoop
3.1 環境檢查3.1.1 操作系統
# cat /etc/redhat-release
CentOS release 6.6 (Final)
3.1.2 所有主機能夠相互ping通
3.1.3 linux內核版本
# uname -r
2.6.32-504.el6.x86_64
3.2 添加安裝集群用戶&&關閉selinux&&修改Linux啟動級別為3useradd hadoop
echo "hadoop123"|passwd --stdin hadoop
yum grouplist
sed -i 's#SELINUX=enforcing#SELINUX=disabled#g' /etc/selinux/config
setenforce 0
grep SELINUX=disabled /etc/selinux/config
grep id:3:initdefault: /etc/inittab
 3.3 優化開機自動啟動服務&&增大文件描述符(Hadoop並行讀取數據文件)&&sudo權限管理
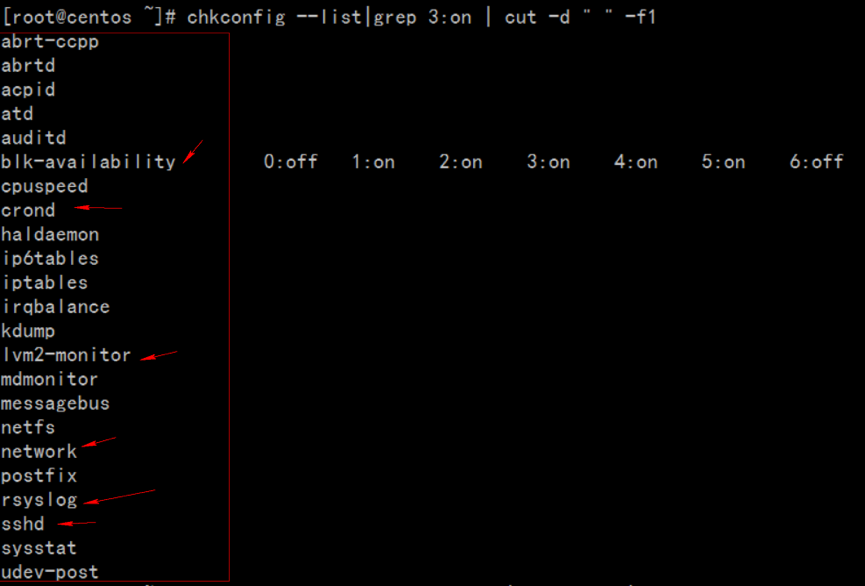
chkconfig --list|grep 3:on |wc –l
chkconfig --list|grep 3:on | cut -d " " -f1
for name in `chkconfig --list|grep 3:on | cut -d " " -f1` ;do chkconfig $name off;done
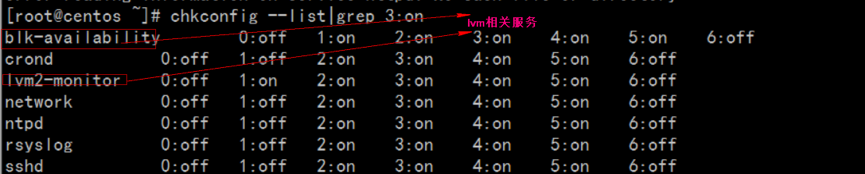
chkconfig --list|grep 3:on
#如果系統基於lvm邏輯卷管理需要開啟lvm2-monitor blk-availability兩個服務
for name in crond ntpd lvm2-monitor blk-availability network rsyslog sshd;do chkconfig $name on;done
iptables -L -n
/etc/init.d/iptables stop
iptables -L -n
chkconfig --list|grep iptables
echo 'hadoop ALL=(ALL) NOPASSWD: ALL' >> /etc/sudoers
echo '* - nofile 65535' >> /etc/security/limits.conf
tail -1 /etc/security/limits.conf
 3.4 配置ntp服務器,讓所有服務器時間保持一致,如果是非內網服務器可以直接安裝啟動ntp
yum install htpd -y
/etc/init.d/ntpd start
chkconfig ntpd on

$ ntpq –p  #公網自動時間同步
如果是內網服務器,需要配置一台ntp服務器,所有服務器到ntp服務器定期同步時間,內網ntp服務器配置:
vim /etc/ntp.conf
restrict default ignore   //默認不允許修改或者查詢ntp,並且不接收特殊封包
restrict 127.0.0.1        //給於本機所有權限
restrict 192.168.2.0 mask 255.255.255.0 notrap nomodify  //給於局域網機的機器有同步時間的權限
server  192.168.2.124   # local clock
driftfile /var/lib/ntp/drift
fudge   127.127.1.0 stratum 10
ntpq -p 查詢網絡中的NTP服務器:
$ ntpq –p
所有機器服務器需要和ntp服務時間保持一致:
$ ntpdate 192.168.1.124 #剛剛配置好ntp服務器,大概需要5min後才能正常提供服務;報錯"no server suitable for synchronization found"
所有大數據服務器設置cron同步ntp服務器時間:
$ crontab -l
00 1 * * * root /usr/sbin/ntpdate 192.168.1.124 >> /root/ntpdate.log 2>&1
3.5 關閉防火牆/etc/init.d/iptables status
/etc/init.d/iptables stop
chkconfig iptables off
3.6 關閉Swapswapoff -a
3.7 Linux overcommit-memoryecho 0 > /proc/sys/vm/overcommit_memory
3.8 所有主機做好hosts ip映射&&repo文件# tail -6 /etc/hosts
192.168.1.124 apache-server archive.cloudera.com archive-primary.cloudera.com
192.168.1.201 server1
192.168.1.202 server2
192.168.1.203 server3
192.168.1.204 server4
所有主機同步hosts文件一致
# scp -r /etc/hosts hostname:/etc/
所有主機repo文件同步
# scp -r CentOS-httpd.repo cloudera-cdh5.repo hostname:/etc/yum.repos.d/
3.9 swappiness && transparent_hugepage#sudo echo '0' > /proc/sys/vm/swappiness
#sudo sysctl vm.swappiness=0
#sudo echo '#by whoami 2015-10-30'>> /etc/sysctl.conf
#sudo echo 'vm.swappiness=0'>> /etc/sysctl.conf
# cat /sys/kernel/mm/redhat_transparent_hugepage/defrag
[always] never
# echo never > /sys/kernel/mm/redhat_transparent_hugepage/defrag
# cat /sys/kernel/mm/redhat_transparent_hugepage/defrag
always [never]
# echo '#by whoami 2015-10-30'>> /etc/rc.local
# echo 'echo never > /sys/kernel/mm/redhat_transparent_hugepage/defrag ' >> /etc/rc.local
4、克隆虛擬機虛擬機eth0無法啟動解決,其實是因為克隆後Mac地址一致,導致沖突,而無法啟動,報錯信息如下:
Bring up interface eth0: Device eth0 does not seem to be present,delaying initialization.
刪除兩項ifcfg-eth0的配置,重啟系統即可:
rm -f /etc/udev/rules.d/70-persistent-net.rules
刪除/etc/sysconfig/network-scripts/ifcfg-eth0中,HWADDR、UUID兩項內容,重啟網卡即可解決。
/etc/init.d/network restart
本文轉載自:http://www.linuxprobe.com/centos-reduce-hadoop.html
免費提供最新Linux技術教程書籍,為開源技術愛好者努力做得更多更好:http://www.linuxprobe.com/


