FastDFS分布式文件系統的安裝及配置-單服務器版
安裝環境及其配置目錄
一台服務器集成一個Tracker Server + 兩個Storage Server
1
環境IP:192.168.127.6
2
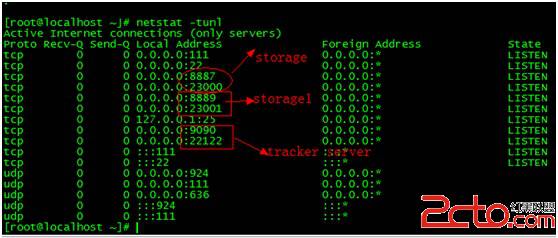
Tracker Server base_path:/home/fastdfs/tracker 端口:22122 http端口:9090
3
storage Server base_path:/home/fastdfs/fdfs_storage 端口:23000 http端口:8887 group:group2
4
storage Server base_path:/home/fastdfs/fdfs_storage1 端口:23001 http端口:8889 group:group3
01
#軟件安裝包存儲:
02
/usr/local/src
03
/etc/fdfs/* #tracker,storage ·· 配置文件
04
05
#基本目錄列表:
06
/home/fastdfs/tracker #創建tracker目錄保存運行日志
07
/home/fastdfs/fdfs_storage #創建Storage目錄保存運行日志及其data數據
08
/home/fastdfs/fdfs_storage1 #創建Storage1目錄保存運行日志及其data數據
09
10
命令匯總:mkdir -p /home/fastdfs/tracker;mkdir -p /home/fastdfs/fdfs_storage;mkdir -p /home/fastdfs/fdfs_storage1;
11
12
為方便查找目錄,設置變量
13
# vi .bashrc
14
alias worksrc='cd /usr/local/src'
15
配置生效
16
# source .bashrc
安裝FastDFS
首先安裝libevent,FastDFS 內部綁定了 libevent 作為 http 服務器
01
##卸載系統自帶libevent,自帶版本過低,安裝fastdfs會出錯
02
rpm -qa|grep libevent;yum remove libevent*
03
04
worksrc;
05
wget http://cloud.github.com/downloads/libevent/libevent/libevent-2.0.19-stable.tar.gz;
06
tar -zxvf libevent-2.0.19-stable.tar.gz;
07
cd libevent-2.0.19-stable;
08
make clean;
09
./configure --prefix=/usr/local/libevent
10
make && make install;
11
12
##為libevent創建軟鏈接到/lib庫下,64位系統對應/lib64
13
ln -s /usr/local/libevent/lib/libevent-2.0.so.5 /usr/lib/libevent-2.0.so.5
14
ln -s /usr/local/libevent/lib/libevent-2.0.so.5 /usr/lib64/libevent-2.0.so.5
15
16
命令匯總:worksrc;wget http://cloud.github.com/downloads/libevent/libevent/libevent-2.0.19-stable.tar.gz;tar -zxvf libevent-2.0.19-stable.tar.gz;cd libevent-2.0.19-stable;make clean;./configure --prefix=/usr/local/libevent;make && make install;cd ../
安裝FastDFS的步驟
1
wget http://fastdfs.googlecode.com/files/FastDFS_v3.08.tar.gz
2
tar -zxvf FastDFS_v3.08.tar.gz
3
cd FastDFS
4
vim make.sh
5
#將 #WITH_HTTPD=1 修改成WITH_HTTPD=1 以支持 http
6
./make.sh C_INCLUDE_PATH=/usr/local/libevent/include LIBRARY_PATH=/usr/local/libevent/lib
7
./make.sh install
FastDFS的配置
配置及啟動Tracker Server,采用9090端口,和常用的80、8080常用http端口分開
1
#修改tracker.conf配置
2
vim /etc/fdfs/tracker.conf
3
base_path=/home/yuqing/fastdfs -> base_path=/home/fastdfs/tracker #日志目錄
4
http.server_port=8080 -> http.server_port=9090 #http端口
5
##include http.conf -> #include http.conf #開啟自帶http服務
6
reserved_storage_space = 4GB -> reserved_storage_space = 1GB
7
8
#啟動Tracker Server
9
/usr/local/bin/fdfs_trackerd /etc/fdfs/tracker.conf
1
#啟動過程中出現的錯誤
2
#./fdfs_trackerd: error while loading shared libraries: libevent-2.0.so.5: cannot open shared object file: No such file or directory
3
#解決辦法
4
ln -s /usr/lib/libevent-2.0.so.5 /usr/lib64/libevent-2.0.so.5
#檢查tracker是否啟動成功,可以查看如下文件
1
vim /home/fastdfs/tracker/logs/trackerd.log
2
#[2012-08-26 19:01:30] INFO - FastDFS v3.08, base_path=/home/fastdfs/tracker, run_by_group=, run_by_user=, connect_timeout=30s, network_timeout=60s, port=22122, bind_addr=, max_connections=256, work_threads=4, store_lookup=0, store_group=, store_server=0, store_path=0, reserved_storage_space=1024MB, download_server=0, allow_ip_count=-1, sync_log_buff_interval=10s, check_active_interval=120s, thread_stack_size=64 KB, storage_ip_changed_auto_adjust=1, storage_sync_file_max_delay=86400s, storage_sync_file_max_time=300s, use_trunk_file=0, slot_min_size=256, slot_max_size=16 MB, trunk_file_size=64 MB, trunk_create_file_advance=0, trunk_create_file_time_base=02:00, trunk_create_file_interval=86400, trunk_create_file_space_threshold=20 GB
1
#啟動成功,加入開機啟動
2
# vim /etc/rc.d/rc.local
3
/usr/local/bin/fdfs_trackerd /etc/fdfs/tracker.conf
配置及啟動存儲服務(Storage Server),采用8887端口
01
#修改storage.conf配置
02
vim /etc/fdfs/storage.conf
03
group_name=group1 -> group_name=group2
04
port=23000 #the storage server port存儲服務端口
05
base_path=/home/yuqing/fastdfs -> /home/fastdfs/fdfs_storage #日志目錄及data數據
06
store_path0=/home/yuqing/fastdfs -> store_path0=/home/fastdfs/fdfs_storage
07
tracker_server=192.168.209.121:22122 -> tracker_server=192.168.127.6:22122
08
http.server_port=8888 -> http.server_port=8887 #http端口
09
##include http.conf ->#include http.conf #開啟自帶http服務
10
11
#啟動storage Server
12
/usr/local/bin/fdfs_storaged /etc/fdfs/storage.conf
13
14
#接下來會出現很多mkdir data path,這是系統在創建數據目錄
15
data path: /home/fastdfs/fdfs_storage/data, mkdir sub dir...
16
mkdir data path: 00 ...
17
mkdir data path: 01 ...
18
mkdir data path: 02 ...
19
mkdir data path: 03 ...
20
.......................
21
data path: /home/fastdfs/fdfs_storage/data, mkdir sub dir done.
1
#啟動成功,加入開機啟動
2
# vim /etc/rc.d/rc.local
3
/usr/local/bin/fdfs_storaged /etc/fdfs/storage.conf
配置及啟動存儲服務(Storage1 Server),采用8889端口
01
重新復制storage.conf 為storage1.conf
02
cp storage.conf storage1.conf
03
#修改storage1.conf配置
04
vim /etc/fdfs/storage1.conf
05
group_name=group2 -> group_name=group3
06
port=23000 -> port=23001 #the storage server port存儲服務端口
07
base_path=/home/yuqing/fastdfs -> /home/fastdfs/fdfs_storage1 #日志目錄及data數據
08
store_path0=/home/yuqing/fastdfs -> store_path0=/home/fastdfs/fdfs_storage1
09
tracker_server=192.168.209.121:22122 -> tracker_server=192.168.127.6:22122
10
http.server_port=8888->http.server_port=8889 #http端口
11
##include http.conf ->#include http.conf #開啟自帶http服務
12
13
#啟動storage Server
14
/usr/local/bin/fdfs_storaged /etc/fdfs/storage1.conf
15
16
#接下來會出現很多mkdir data path,這是系統在創建數據目錄
17
data path: /home/fastdfs/fdfs_storage1/data, mkdir sub dir...
18
mkdir data path: 00 ...
19
mkdir data path: 01 ...
20
mkdir data path: 02 ...
21
mkdir data path: 03 ...
22
.......................
23
data path: /home/fastdfs/fdfs_storage1/data, mkdir sub dir done.
1
#啟動成功,加入開機啟動
2
# vim /etc/rc.d/rc.local
3
/usr/local/bin/fdfs_storaged /etc/fdfs/storage.conf
測試及使用FastDFS
FastDFS之配置client
1
vim /etc/fdfs/client.conf
2
base_path=/home/yuqing/fastdfs-> base_path=/home/fastdfs/tracker
3
tracker_server=192.168.209.121:22122 -> tracker_server=192.168.127.6:22122
4
http.tracker_server_port=8080 ->http.tracker_server_port=9090
5
##include http.conf ->#include http.conf
1
cd /usr/local/bin
2
vim aa.txt 增加內容:展示aa.txt文本數據 :wq
3
./fdfs_test /etc/fdfs/client.conf upload aa.txt
執行成功後會出現如下提示:
01
# ./fdfs_test /etc/fdfs/client.conf upload aa.txt
02
[2012-08-25 02:08:26] INFO - base_path=/home/fastdfs/tracker, connect_timeout=30, network_timeout=60, tracker_server_count=1, anti_steal_token=0, anti_steal_secret_key length=0
03
tracker_query_storage_store_list_without_group:
04
server 1. group_name=group2, ip_addr=192.168.127.6, port=23000
05
group_name=group2, ip_addr=192.168.127.6, port=23000
06
storage_upload_by_filename
07
group_name=group2, remote_filename=M00/00/00/wKh_BlA3wxql4hTXAAAAB8v-VvY710.txt
08
source ip address: 192.168.127.6
09
file timestamp=2012-08-25 02:08:26
10
file size=7
11
file crc32=3422443254
12
file url: http://192.168.127.6:9090/group2/M00/00/00/wKh_BlA3wxql4hTXAAAAB8v-VvY710.txt
13
storage_upload_slave_by_filename
14
group_name=group2, remote_filename=M00/00/00/wKh_BlA3wxql4hTXAAAAB8v-VvY710_big.txt
15
source ip address: 192.168.127.6
16
file timestamp=2012-08-25 02:08:26
17
file size=7
18
file crc32=3422443254
19
file url: http://192.168.127.6:9090/group2/M00/00/00/wKh_BlA3wxql4hTXAAAAB8v-VvY710_big.txt
1
執行過程中可能出現防火牆封口:
2
# ERROR - file: tracker_proto.c, line: 420, connect to 192.168.127.6:22122 fail, errno: 113, error info: No route to host
3
解決:
4
#iptables -L;iptables -F
5
service iptables stop
測試下載文件
在浏覽器中,輸入上圖中的url地址, tracker server會自動重定向到存儲文件的storage server,文件下載成功。至此,已經成功搭建了FastDFS,編寫你自己的client來進行訪問吧:
1
展示aa.txt文本數據
常規命令范例:
1
#重啟tracker、storaged
2
/usr/local/bin/restart.sh /usr/local/bin/fdfs_trackerd /etc/fdfs/tracker.conf
3
/usr/local/bin/restart.sh /usr/local/bin/fdfs_storaged /etc/fdfs/storage.conf
1
#重啟tracker、storaged
2
/usr/local/bin/stop.sh /usr/local/bin/fdfs_trackerd /etc/fdfs/tracker.conf
3
/usr/local/bin/stop.sh /usr/local/bin/fdfs_storaged /etc/fdfs/storage.conf
view source
1
#監控storage
2
/usr/local/bin/fdfs_monitor /etc/fdfs/storage.conf
3
#如果存在多個多個組,只需要監控其中一個組,就能調出所有組的狀態
端口查看: