


Nagios簡介
Nagios是一個用來監視系統和網絡的開源應用軟件,它通常運行於一個主服務器上,這個服務器運行 Liunx 或 Unix 操作系統。Nagios 利用其眾多的插件實現對本機和遠端服務的監控,當被監控對象出現異常,Nagios 就會及時給管理人員告警。它是一個基於TCP/IP協議的軟件包,包含有nagios主程序和它的各個插件,配置非常靈活,可以監視的項目很多,也可以通過自定義 shell 腳本進行監控服務,非常適合各類企業的網絡應用。
Nagios功能非常強大,它可以監控服務和主機,但是他自身並不包括這部分功能的代碼,所有的監控、檢測功能都是有插件來完成的。再說報警功能,如果監控系統發現問題不能報警那就沒有意義了,所以報警也是nagios很重要的功能之一。但是,同樣的,nagios自身也沒有報警部分的代碼,甚至沒有插件,而是交給用戶或者其他相關開源項目組去完成。nagios安裝,是指基本平台,也就是nagios軟件包的安裝。它是監控體系的框架,也是所有監控的基礎。
打開nagios官方的文檔,會發現nagios基本上沒有什麼依賴包,只要求系統是linux或者其他nagios支持的系統。不過如果你沒有安裝apache(http服務),那麼你就沒有那麼直觀的界面來查看監控信息了,所以apache姑且算是一個前提條件。
Nagios 系統的特點主要有下面幾點:
監控主機資源和網絡服務
允許用戶通過設計實現簡單的插件來監控自己特定的服務
當被監控對象出現問題時,會及時通知管理人員
事先定義事件處理程序,當對象出現問題時自動調用對應的處理程序
通過 web 頁面來監視對象狀態,警告提示和日志文件。
需要安裝軟件列表:
php-devel-5.1.6-23.2.el5_3.i386.rpm
php-json-ext-1.2.1.tar.bz2
cacti-plugin-0.8.7e-PA-v2.6.zip
nagios-3.2.1.tar.gz
nagios-plugins-1.4.14
ndoutils-1.4b9.tar.gz
npc-2.0.4.tar.gz
Nagios安裝
http://sourceforge.net/projects/nagios/files/
[root@cacti-qmail soft]# wget http://ncu.dl.sourceforge.net/project/nagios/nagios-3.x/nagios-3.2.1/nagios-3.2.1.tar.gz
[root@cacti-qmail soft]# tar -zxvf nagios-3.2.1.tar.gz
[root@cacti-qmail soft]#cd nagios-3.2.1
[root@cacti-qmail nagios-3.2.1]# ./configure --prefix=/usr/local/nagios
[root@cacti-qmail nagios-3.2.1]#make all
輸入make all 得到下面具體信息
==============================================================
*** Compile finished ***
If the main program and CGIs compiled without any errors, you
can continue with installing Nagios as follows (type 'make'
without any arguments for a list of all possible options):
make install
- This installs the main program, CGIs, and HTML files
使用make install來安裝主程序,CGI和HTML文件
make install-init
- This installs the init script in /etc/rc.d/init.d
使用make install-init在/etc/rc.d/init.d安裝啟動腳本
make install-commandmode
- This installs and configures permissions on the
directory for holding the external command file
URL:http://www.bianceng.cn/OS/Linux/201410/46045.htm
使用make install-commandmode來配置目錄權限
make install-config
- This installs *SAMPLE* config files in /usr/local/nagios/etc
You'll have to modify these sample files before you can
use Nagios. Read the HTML documentation for more info
on doing this. Pay particular attention to the docs on
object configuration files, as they determine what/how
things get monitored!
使用make install-commandmode來安裝示例配置文件,安裝的路徑是/usr/local/nagios/etc
make install-webconf
- This installs the Apache config file for the Nagios
web interface
使用make install-webconf來安裝apache的配置文件
=================================================================
make install在安裝這個動作之前要增加一個nagios用戶,並修改它的權限,不然會出現以下錯誤:
=================================================================
cd ./base && make install
make[1]: Entering directory `/home/yahoon/nagios/nagios-2.9/base'
make install-basic
make[2]: Entering directory `/home/yahoon/nagios/nagios-2.9/base'
/usr/bin/install -c -m 775 -o nagios -g nagios -d /usr/local/nagios/bin
/usr/bin/install: invalid user `nagios' 非法用戶nagios
make[2]: *** [install-basic] Error 1
make[2]: Leaving directory `/home/yahoon/nagios/nagios-2.9/base'
make[1]: *** [install] Error 2
make[1]: Leaving directory `/home/yahoon/nagios/nagios-2.9/base'
make: *** [install] Error 2
=====================================================================
[root@cacti-qmail nagios-3.2.1]# useradd nagios
[root@cacti-qmail nagios-3.2.1]#mkdir /usr/local/nagios
[root@cacti-qmail nagios-3.2.1]#chown nagios.nagios /usr/local/nagios
[root@cacti-qmail nagios-3.2.1]#make all
[root@cacti-qmail nagios-3.2.1]#make install; make install-init;make install-commandmode;make install-config;make install-webconf
驗證程序是否被正確安裝
切換目錄到安裝路徑(這裡是/usr/local/nagios),看是否存在 etc、bin、 sbin、 share、 var這五個目錄,如果存在則可以表明程序被正確的安裝到系統了。後表是五個目錄功能的簡要說明:
bin Nagios執行程序所在目錄,nagios文件即為主程序
etc Nagios配置文件位置,初始安裝完後,只有幾個*.cfg-sample文件
sbin Nagios Cgi文件所在目錄,也就是執行外部命令所需文件所在的目錄
Share Nagios網頁文件所在的目錄
Var Nagios日志文件、spid 等文件所在的目錄
修改nagios頁面文件
[root@cacti-qmail nagios-3.2.1]# more /etc/httpd/conf/nagios.conf
# SAMPLE CONFIG SNIPPETS FOR APACHE WEB SERVER
# Last Modified: 11-26-2005
#
# This file contains examples of entries that need
# to be incorporated into your Apache web server
# configuration file. Customize the paths, etc. as
# needed to fit your system.
ScriptAlias /nagios/cgi-bin "/usr/local/nagios/sbin"
<Directory "/usr/local/nagios/sbin">
# SSLRequireSSL
Options ExecCGI
AllowOverride None
Order allow,deny
Allow from all
# Order deny,allow
# Deny from all
# Allow from 127.0.0.1
AuthName "Nagios Access"
AuthType Basic
AuthUserFile /usr/local/nagios/etc/htpasswd.users
Require valid-user
</Directory>
Alias /nagios "/usr/local/nagios/share"
<Directory "/usr/local/nagios/share">
# SSLRequireSSL
Options None
AllowOverride None
Order allow,deny
Allow from all
# Order deny,allow
# Deny from all
# Allow from 127.0.0.1
AuthName "Nagios Access"
AuthType Basic
AuthUserFile /usr/local/nagios/etc/htpasswd.users
Require valid-user
</Directory>
基本上這個文件可以直接使用,所以直接復制過去
[root@cacti-qmail nagios-3.2.1]# cp /etc/httpd/conf/nagios.conf /var/www/html/
URL:http://www.bianceng.cn/OS/Linux/201410/46045.htm
生成nagios頁面訪問賬號
根據這個配置文件中指定的AuthUserFile項,它指定的是通過Apache訪問Nagios的合法用戶的帳戶名單庫文件,需要使用htpasswd命令對這個名單庫進行用戶的添加。而默認安裝環境下在/usr/local/nagios/etc/目錄下是沒有 htpasswd.uses這個文件的,所以需要手動添加。請特別注意,用root身份建立的htpasswd.user文件的權限問題,應該在建立該文件完畢後立即更改為nagios用戶nagios組的所有權
[root@cacti-qmail nagios-3.2.1]# touch /usr/local/nagios/etc/htpasswd.users
建立Nagios的網頁訪問用戶帳戶文件(這裡必須要與Nagios網頁配置文件當中AuthUserFile指定的路徑文件名一致)
[root@cacti-qmail nagios-3.2.1]# /usr/bin/htpasswd -c /usr/local/nagios/etc/htpasswd.users
viong
New password:
Re-type new password:
Adding password for user viong
[root@cacti-qmail nagios-3.2.1]# cat /usr/local/nagios/etc/htpasswd.user
viong:HbfEis6w0gKqI
修改nagios主配置文件
[root@cacti-qmail nagios-3.2.1]# vi /usr/local/nagios/etc/nagios.cfg
log_file=/usr/local/nagios/var/nagios.log( 默認無nagios.log文件,需要手動創建)
command_check_interval=15s
#command_check_interval=-1
設定命令檢查的時間間隔,將原來值-1的項注釋掉,啟用原來備用值為15s(15秒)。這項的時間間隔值請按實際需求情況設定。
[root@cacti-qmail nagios-3.2.1]# touch /usr/local/nagios/var/nagios.log
[root@cacti-qmail nagios-3.2.1]# chown nagios.nagios /usr/local/nagios/var/nagios.log
Nagios的CGI配置文件
[root@cacti-qmail nagios-3.2.1]# vi /usr/local/nagios/etc/cgi.cfg
use_authentication=1 (默認是啟動身份驗證)
設定啟用身份驗證
authorized_for_system_information=viong
設定系統信息的授權用戶
authorized_for_configuration_information=viong
設定配置信息的授權用戶
authorized_for_system_commands=viong
設定系統命令的授權用戶
authorized_for_all_services=viong
設定全部監測服務的授權用戶。
authorized_for_all_hosts=viong
設定全部被監測主機的授權用戶
authorized_for_all_service_commands=viong
設定全部監測服務命令的授權用
authorized_for_all_host_commands=viong
設定全部主機命令的授權用戶
測試nagios是否成功
設置nagios為開機啟動
[root@cacti-qmailnagios-plugins-1.4.14]#chkconfig nagios on
[root@cacti-qmailnagios-plugins-1.4.14]# service nagios start
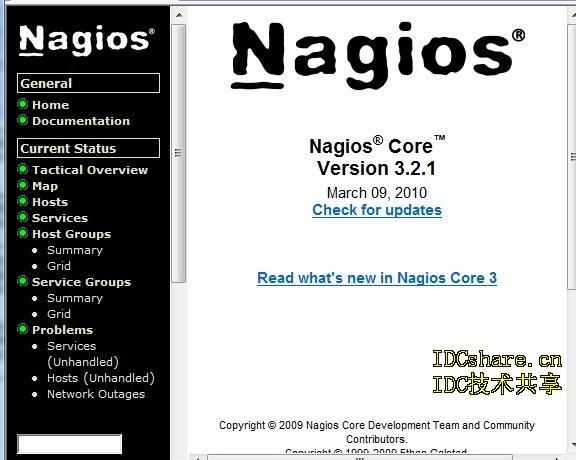
測試nagios是否成功啟動
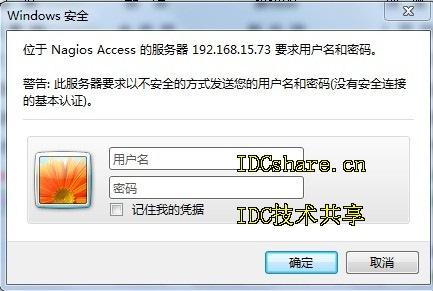
在IE輸入 http://192.168.15.73/nagios/ 跳出以下窗口
URL:http://www.bianceng.cn/OS/Linux/201410/46045.htm
nagios-plugins插件安裝
[root@cacti-qmail soft]#wget
http://kent.dl.sourceforge.net/sourceforge/nagiosplug/nagios-plugins-1.4.14.tar.gz
[root@cacti-qmail soft]# tar -zxvf nagios-plugins-1.4.14.tar.gz
[root@cacti-qmail nagios-plugins-1.4.14]#./configure --prefix=/usr/local/nagios/
(注意:安裝目錄是nagios而不是nagios-plugins的原因是直接把libexec目錄的插件覆蓋到nagios裡面去的)
[root@cacti-qmail nagios-plugins-1.4.14]#make;make install
[root@cacti-qmail nagios-plugins-1.4.14]# grep ^User /etc/httpd/conf/httpd.conf
將apache的運行用戶加到nagios組裡面,從httpd.conf中過濾出當前的apache運行用戶
我這裡過濾出的用戶無,如有用戶需要運行以下命令
usermod -G nagios 用戶名
PHP支持JSON擴展
PHP必須安裝PDO 和 JSON擴展。由於NPC使用了Ext JS,如果沒有JSON擴展,NPC的界面不會出來,只能看到一個空白頁面。初始化PHP環境 需要用phpize命令,所以也要安裝 php-devel。
root@cacti-qmail soft]#wget http://www.aurore.net/projects/php-json/php-json-ext-1.2.1.tar.bz2
root@cacti-qmail soft]# tar jxvf php-json-ext-1.2.1.tar.bz2
[root@cacti-qmail soft]# cd php-json-ext-1.2.1
[root@cacti-qmail php-json-ext-1.2.1]# phpize
-bash: phpize: command not found
[root@cacti-qmail php-json-ext-1.2.1]# cd /misc/Server/
[root@cacti-qmail Server]# rpm -ivh php-devel-5.1.6-23.2.el5_3.i386.rpm
warning: php-devel-5.1.6-23.2.el5_3.i386.rpm: Header V3 DSA signature: NOKEY, key ID 37017186
Preparing... ########################################### [100%]
1:php-devel ########################################### [100%]
[root@cacti-qmail Server]# cd /root/soft/php-json-ext-1.2.1
[root@cacti-qmail php-json-ext-1.2.1]# phpize
Configuring for:
PHP Api Version: 20041225
Zend Module Api No: 20050922
Zend Extension Api No: 220051025
[root@cacti-qmail php-json-ext-1.2.1]# ./configure
===================================================================
如果遇到報以下錯誤,請直接yum install gcc-c++
a.configure: error: no acceptable C compiler found in $PATH
See `config.log' for more details. 請直接yum install gcc
b.configure: error: C++ preprocessor "/lib/cpp" fails sanity check
====================================================================
[root@cacti-qmail php-json-ext-1.2.1]# make;make install
[root@cacti-qmail php-json-ext-1.2.1]# find / -name *json.so
/usr/lib/php/modules/json.so
/root/soft/php-json-ext-1.2.1/modules/json.so
/root/soft/php-json-ext-1.2.1/.libs/json.so
[root@cacti-qmail php-json-ext-1.2.1]# vi /etc/php.d/json.ini
添加以下內容
extension=json.so
保存退出
[root@cacti-qmail php-json-ext-1.2.1]# service httpd restart
測試PHP是否支持json擴展
[root@cacti-qmail php-json-ext-1.2.1]#vi /var/www/html/test.php
添加以下內容
<?php
phpinfo();
phpinfo(INFO_GENERAL);
phpinfo(1);
?>
保存退出
在IE輸入http://192.168.15.73/test.php 看到以下信息

URL:http://www.bianceng.cn/OS/Linux/201410/46045.htm
ndoutils安裝
ndoutils是將Nagios的配置及監控信息存儲到數據庫裡,NPC通過調用ndo所存儲的數據來展現Nagios的信息。ndoutils需要用到mysql的mysql-lib及mysql-inc,因此需要安裝mysql-devel。由於剛裝系統的時候已經裝過了.這個軟件本節就不用安裝.
[root@cacti-qmail soft]# tar -zxvf ndoutils-1.4b9.tar.gz
[root@cacti-qmail soft]# cd ndoutils-1.4b9
[root@cacti-qmail ndoutils-1.4b9]#./configure
--with-mysql-inc=/usr/include/mysql --with-mysql-lib=/usr/lib/mysql --enable-mysql --with-ndo2db-user=nagios --with-ndo2db-group=nagios
[root@cacti-qmail ndoutils-1.4b9]#make
編譯完成後(不需要make install)
[root@cacti-qmail ndoutils-1.4b9]# cd src/
[root@cacti-qmail src]# ll
總計 1624
-rw-r--r-- 1 1001 1001 22480 09-15 20:04 db.c
-rw-r--r-- 1 root root 145468 03-02 01:54 dbhandlers-2x.o
-rw-r--r-- 1 root root 145444 03-02 01:54 dbhandlers-3x.o
-rw-r--r-- 1 1001 1001 169907 10-27 15:51 dbhandlers.c
-rw-r--r-- 1 root root 37872 03-02 01:54 db.o
-rwxr-xr-x 1 root root 31342 03-02 01:54 file2sock
-rw-r--r-- 1 1001 1001 5421 10-27 16:08 file2sock.c
-rw-r--r-- 1 1001 1001 11485 10-21 15:53 io.c
-rw-r--r-- 1 root root 16432 03-02 01:54 io.o
-rwxr-xr-x 1 root root 32602 03-02 01:54 log2ndo
-rw-r--r-- 1 1001 1001 6780 10-27 16:08 log2ndo.c
-rw-r--r-- 1 root root 4427 03-02 01:53 Makefile
-rw-r--r-- 1 1001 1001 4336 09-15 20:04 Makefile.in
-rwxr-xr-x 1 root root 224645 03-02 01:54 ndo2db-2x
-rwxr-xr-x 1 root root 224629 03-02 01:54 ndo2db-3x
-rw-r--r-- 1 1001 1001 57565 10-27 16:08 ndo2db.c
-rwxr-xr-x 1 root root 120333 03-02 01:54 ndomod-2x.o
-rwxr-xr-x 1 root root 128498 03-02 01:54 ndomod-3x.o
-rw-r--r-- 1 1001 1001 136855 10-27 16:08 ndomod.c
-rw-r--r-- 1 1001 1001 514 2007-01-08 protonum.c
-rwxr-xr-x 1 root root 28503 03-02 01:54 sockdebug
-rw-r--r-- 1 1001 1001 3418 10-27 16:08 sockdebug.c
-rw-r--r-- 1 1001 1001 4623 2009-07-17 utils.c
-rw-r--r-- 1 root root 8824 03-02 01:54 utils.o
[root@cacti-qmail src]# cp ndomod-3x.o ndo2db-3x log2ndo file2sock /usr/bin/
[root@cacti-qmail src]# cd ../config
[root@cacti-qmail config]# ll
總計 64
-rw------- 1 root root 439 03-02 01:53 misccommands.cfg
-rw-r--r-- 1 1001 1001 427 09-07 04:51 misccommands.cfg.in
-rw------- 1 root root 566 03-02 01:53 nagios.cfg
-rw-r--r-- 1 1001 1001 522 09-07 04:51 nagios.cfg.in
-rw------- 1 root root 4486 03-02 02:06 ndo2db.cfg
-rw------- 1 root root 4493 03-02 01:53 ndo2db.cfg-sample
-rw-r--r-- 1 1001 1001 4489 09-15 20:08 ndo2db.cfg-sample.in
-rw------- 1 root root 5130 03-02 01:59 ndomod.cfg
-rw------- 1 root root 5130 03-02 01:53 ndomod.cfg-sample
-rw-r--r-- 1 1001 1001 5112 09-07 04:51 ndomod.cfg-sample.in
[root@cacti-qmail config]#cp ndo2db.cfg-sample ndo2db.cfg
[root@cacti-qmail config]#cp ndomod.cfg-sample ndomod.cfg
[root@cacti-qmail config]#cp ndo2db.cfg ndomod.cfg /usr/local/nagios/etc/
[root@cacti-qmail config]#cd /usr/local/nagios/etc
[root@cacti-qmail etc]# vi ndo2db.cfg
URL:http://www.bianceng.cn/OS/Linux/201410/46045.htm
修改以下參數
socket_name=/usr/local/nagios/var/ndo.sock
db_name=cacti
db_prefix=npc_
db_user=viong
db_pass=viong0623
debug_level=1
debug_file=/usr/local/nagios/var/ndo2db.debug
保存退出
[root@cacti-qmail etc]# vi ndomod.cfg
修改以下參數
output=/usr/local/nagios/var/ndo.sock
buffer_file=/usr/local/nagios/var/ndomod.tmp
保存退出
NPC安裝
NPC(Nagios Plugin for Cacti)是一個Cacti插件,安裝後可以在Cacti界面裡使用Nagios的功能
[root@cacti-qmail soft]# wget http://www.constructaegis.com/downloads/npc-2.0.4.tar.gz
[root@cacti-qmail soft]# tar -zxvf npc-2.0.4.tar.gz
[root@cacti-qmail soft]# mv npc/ /var/www/html/cacti/plugins/
[root@cacti-qmail soft]# vi /var/www/html/cacti/include/global.php
添加以下參數
$plugins= array();
$plugins[] = 'npc';
如下圖:
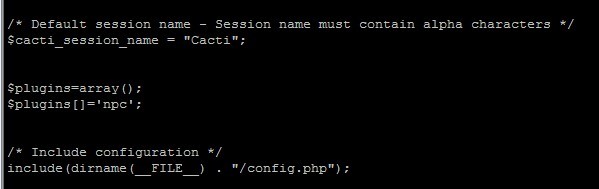
保存退出
NPC界面設置
點擊(console)菜單欄 user management------->admin
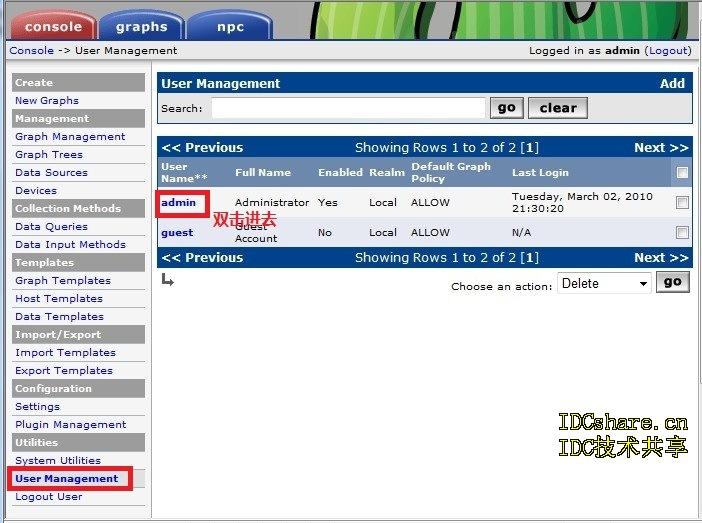
在realm permission---plugin management(打勾)
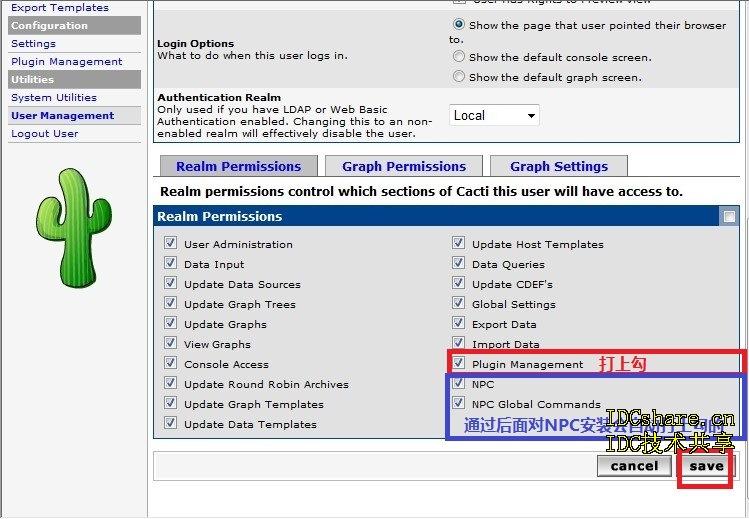
URL:http://www.bianceng.cn/OS/Linux/201410/46045.htm
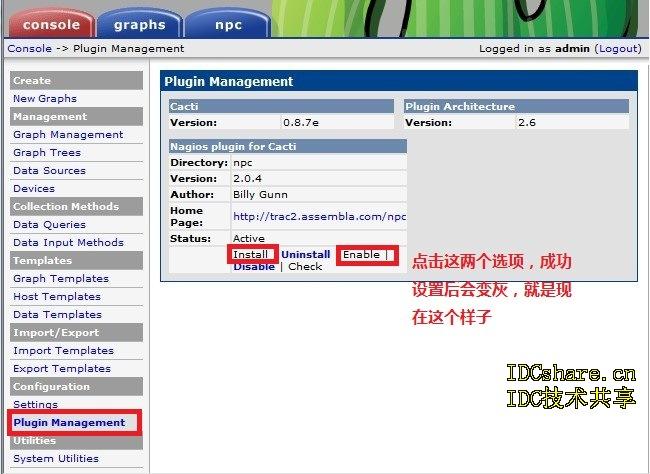
返回(console)菜單欄,點擊configuration--------plugin management—安裝並激活npc插件
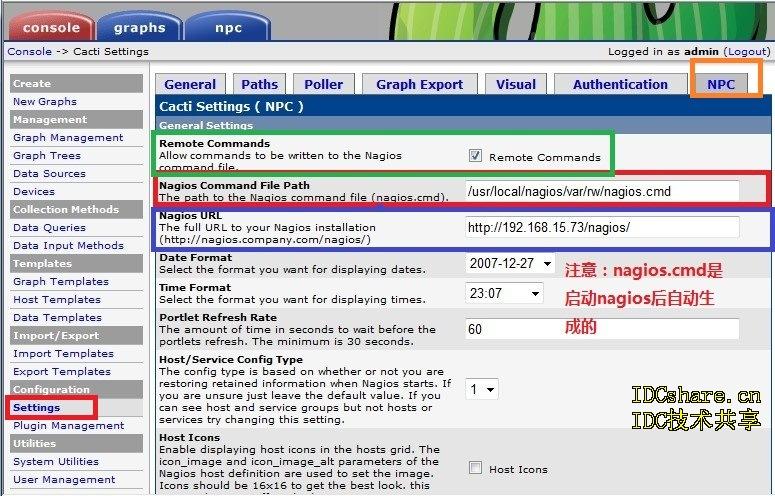
返回(console)菜單欄,點擊configuration-------settings----NPC,修改一下三個參數
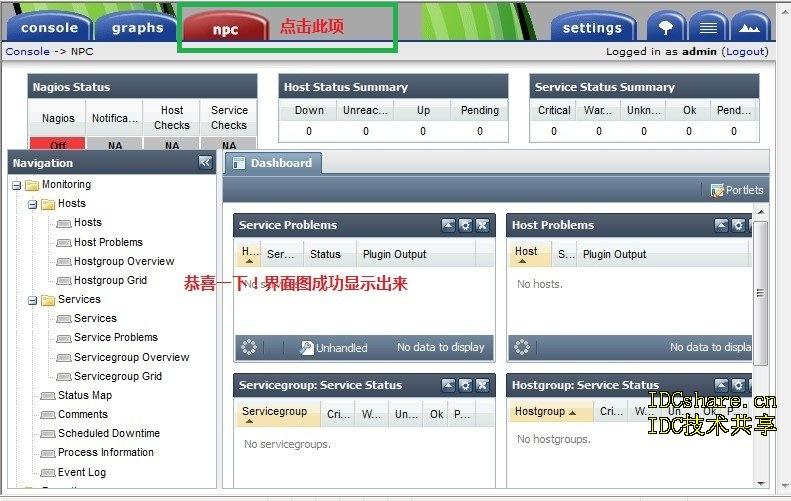
返回(console)菜單欄,點擊插件鏈接區-NPC
關於nagios 使用設置-後續