cacti-0.8.7e.tar.gz
cacti-plugin-0.8.7e-PA-v2.6.zip
nagios-3.4.1.tar.gz
nagios-plugins-1.4.16.tar.gz
ndoutils-1.4b9.tar.gz
npc-2.0.4.tar.gz
PDO_MYSQL-1.0.2.tgz
php-json-ext-1.2.1.tar.gz
rrdtool-1.4.4.tar.gz
#yum -y install *gcc*
#yum -y install httpd httpd-manual mysql mysql-devel mysql-server php php-devel php-mysql php-common php-pdo php-gd lm_sensors net-snmp php-snmp net-snmp-utils

# chkconfig mysqld on
# chkconfig httpd on
# chkconfig snmpd on
# service mysqld start
# service httpd start
# service snmpd start

# mysqladmin -u root password 'redhat321'

# mysql -u root -p
:輸入密碼
mysql> create database cacti;
Query OK, 1 row affected (0.00 sec)

mysql> grant all on cacti.* to cactiadmin@localhost identified by 'cacti321';
Query OK, 0 rows affected (0.01 sec)

mysql> flush privileges;
Query OK, 0 rows affected (0.00 sec)
yum -y install cairo-devel libxml2-devel pango pango-devel
# tar xf rrdtool-1.4.4.tar.gz
# cd rrdtool-1.4.4
# ./configure --prefix=/usr/local/rrdtool && make && make install
# ln -s /usr/local/rrdtool/bin/* /usr/local/bin/
# tar xf cacti-0.8.7e.tar.gz -C /var/www/html/
# cd /var/www/html/
# mv cacti-0.8.7e/ cacti
# chown -R root.root /var/www/html/cacti/
# mysql -u root -p cacti < cacti/cacti.sql
Enter password:
# vim /var/www/html/cacti/include/config.php
$database_username = "cactiadmin";
$database_password = "cacti321";

# vim /var/www/html/cacti/include/global.php
$database_username = "cactiadmin";
$database_password = "cacti321";
# wget http://mirror.cactiusers.org/downloads/plugins/cacti-plugin-0.8.7e-PA-v2.6.zip
# unzip cacti-plugin-0.8.7e-PA-v2.6.zip
# cd cacti-plugin-arch/
# cp cacti-plugin-arch/{cacti-plugin-0.8.7e-PA-v2.6.diff,pa.sql} /var/www/html/cacti/
# cd /var/www/html/cacti/
# patch -p1 -N <cacti-plugin-0.8.7e-PA-v2.6.diff
# mysql -uroot -p cacti<pa.sql
# vim include/global.php
$config['url_path'] = '/cacti/';
# crontab -e
*/5 * * * * /usr/bin/php /var/www/html/cacti/poller.php
# service crond restart
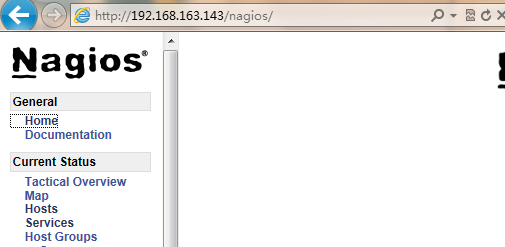
10、浏覽器輸入http://192.168.163.143/cacti/install初始化cacti,最後如下:

另外cacti無法顯示圖片,圖片顯紅叉,但是點進去有圖:
解決方法:
settings裡面的RRDTOOLS版本設置不對,默認為1.0.x,改為1.2.x就行了。
rpm -ivh lm_sensors-2.10.7-4.el5.i386.rpm net-snmp-5.3.2.2-7.el5.i386.rpm
# vim /etc/snmp/snmpd.conf
com2sec notConfigUser default public
group notConfigGroup v1 notConfigUser
group notConfigGroup v2c notConfigUser
view systemview included .1.3.6.1.2.1.1
view systemview included .1.3.6.1.2.1.25.1.1
access notConfigGroup "" any noauth exact mib2 none none
view mib2 included .iso.org.dod.internet.mgmt.mib-2 fc
syslocation Unknown (edit /etc/snmp/snmpd.conf)
syscontact Root <root@localhost> (configure /etc/snmp/snmp.local.conf)
pass .1.3.6.1.4.1.4413.4.1 /usr/bin/ucd5820stat
service snmpd restart
snmpwalk -v 2c -c public ServerIP if
四、安裝nagios
1、建立用戶
# useradd -s /sbin/nologins nagios
# mkdir -p /usr/local/nagios
# chown -R  nagios.nagios /usr/local/nagios/
# tar xf nagios-3.4.1.tar.gz
# cd nagios
# ./configure --prefix=/usr/local/nagios/
# make all
# make install
# make install-init
# make install-commandmode
# make install-config
# make install-webconf

# chkconfig --add nagios
# chkconfig nagios on
# service nagios start
# tar xf nagios-plugins-1.4.16.tar.gz
# cd nagios-plugins-1.4.16
# ./configure --prefix=/usr/local/nagios/ && make && make install
# vim /etc/httpd/conf/httpd.conf

最後添加如下內容,設置成需要輸入密碼才能登陸
ScriptAlias /nagios/cgi-bin "/usr/local/nagios/sbin"
<Directory "/usr/local/nagios/sbin">
        AuthType Basic
        Options ExecCGI
        AllowOverride   None
        Order allow,deny
        Allow from all
        AuthName "Nagions Access"
        AuthUserFile /usr/local/nagios/etc/Linux/1727.html' target='_blank'>htpasswd
        Require valid-user
</Directory>

Alias /nagios   "/usr/local/nagios/share"
<Directory "/usr/local/nagios/share">
        AuthType Basic
        Options None
        AllowOverride None
        Order allow,deny
        Allow from all
        AuthName "Nagios Access"
        AuthUserFile /usr/local/nagios/etc/htpasswd
        Require valid-user
</Directory>
(1)hosts.cfg定義主機的文件
define host{
 use linux-server
 host_name 192.168.163.143
 alias 192.168.163.143
 address 192.168.163.143
}

(2)services.cfg 定義主機服務的文件
define service{
 use local-service  //引用local-service的屬性信息,在template.cfg中定義
 host_name 192.168.163.143 //監控那個主機,host-142在hosts.cfg中定義
 service_description ssh //對監控內容的描述
 check_command check_ssh //指定監控的命令,check_ping在commands.cfg中定義
}
define service{
 use local-service
 host_name 192.168.163.143
 service_description Ping
 check_command check_ping
}

# chown nagios.nagios /usr/local/nagios/etc/objects/{hosts.cfg,services.cfg}
# htpasswd -c /usr/local/nagios/etc/htpasswd nagiosadmin
cfg_file=/usr/local/nagios/etc/objects/hosts.cfg
cfg_file=/usr/local/nagios/etc/objects/services.cfg
cfg_file=/usr/local/nagios/etc/objects/commands.cfg
cfg_file=/usr/local/nagios/etc/objects/contacts.cfg
cfg_file=/usr/local/nagios/etc/objects/timeperiods.cfg
cfg_file=/usr/local/nagios/etc/objects/templates.cfg
# /usr/local/nagios/bin/nagios -v /usr/local/nagios/etc/nagios.cfg
四、整合cacti+nagios
整合cacti和nagios是利用了cacti的一個插件nagios for cacti,它的原理是將nagios的數據通過ndo2db導入到mysql數據庫(cacti的庫中),然後cacti讀取數據庫信息將nagios
的結果展示出來。
1、安裝php-json擴展,因為NPC使用了ExtJS,如過沒有json的擴展NPC界面無法出來。
# tar xf php-json-ext-1.2.1.tar.gz
# cd php-json-ext-1.2.1
# phpize
如果沒有命令的話安裝下面的軟件包
# rpm -ihv /media/CentOS/php-devel-5.1.6-27.el5.i386.rpm

# sh configure && make && make install
# vim /etc/php.d/json.ini
extension=json.so
安裝完成後如果先驗證的話,可以寫個index.php的頁面看下,有json信息即可,如下:

3、安裝ndoutils,需要安裝mysql-devel前面已經裝過這裡就不用再裝了
# tar xf ndoutils-1.4b9.tar.gz
# cd ndoutils-1.4b9
# ./configure --with-mysql-inc=/usr/include/mysql --with-mysql-lib=/usr/lib/mysql --enable-mysql --with-ndo2db-user=nagios --with-ndo2db-group=nagios
# make(不用make install)
# cp src/{ndomod-3x.o,ndo2db-3x,log2ndo,file2sock} /usr/bin/
# cp config/ndo2db.cfg-sample /usr/local/nagios/etc/ndo2db.cfg
# cp config/ndomod.cfg-sample /usr/local/nagios/etc/ndomod.cfg
# chmod 644 /var/www/html/nagios/etc/ndo*
# vim /usr/local/nagios/etc/ndo2db.cfg
socket_type=tcp
db_host=127.0.0.1
db_port=3306
db_name=cacti
db_prefix=npc_
db_user=cactiadmin
db_pass=cacti321
debug_level=1

# vim /usr/local/nagios/etc/ndomod.cfg
output_type=tcpsocket
output=127.0.0.1
6、添加啟動腳本,並修改Ndo2dbBin
# cp /download/ndoutils-1.4b9/daemon-init /etc/init.d/ndo2db
# vim /etc/init.d/ndo2db
Ndo2dbBin=/usr/bin/ndo2db-3x

# chmod +x /etc/init.d/ndo2db
# service ndo2db start
7、安裝npc
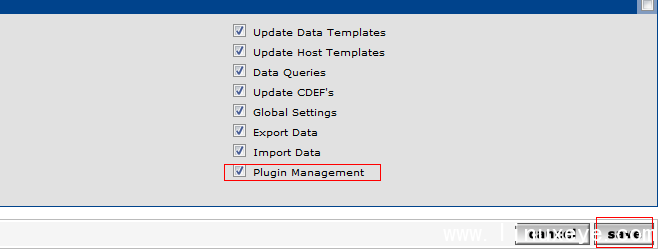
# tar xf npc-2.0.4.tar.gz
# mv npc /var/www/html/cacti/plugins/

修改配置文件,添加如下信息
# vim /var/www/html/cacti/include/global.php
$plugins = array();
$plugins[]='npc';
8、修改nagios添加信息:
# vim /usr/local/nagios/etc/nagios.cfg
broker_module=/usr/bin/ndomod-3x.o config_file=/usr/local/nagios/etc/ndomod.cfg
event_broker_options=-1
# service nagios restar
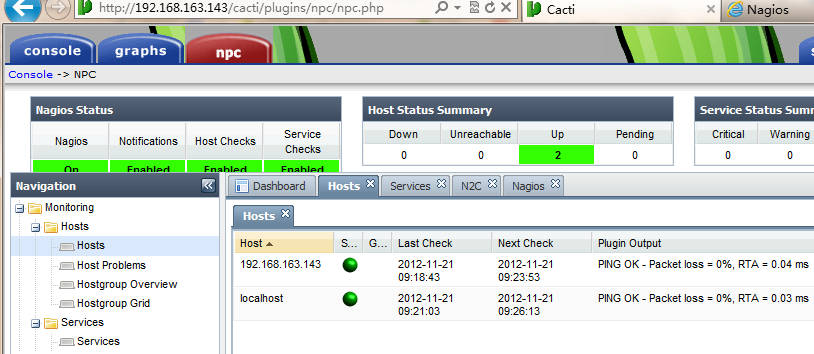
啟動之後在cacti中添加npc,如下:
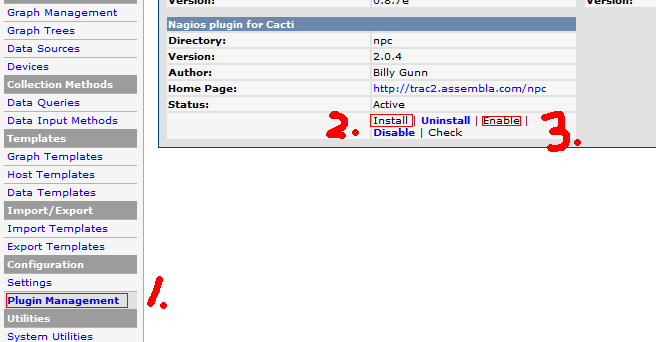
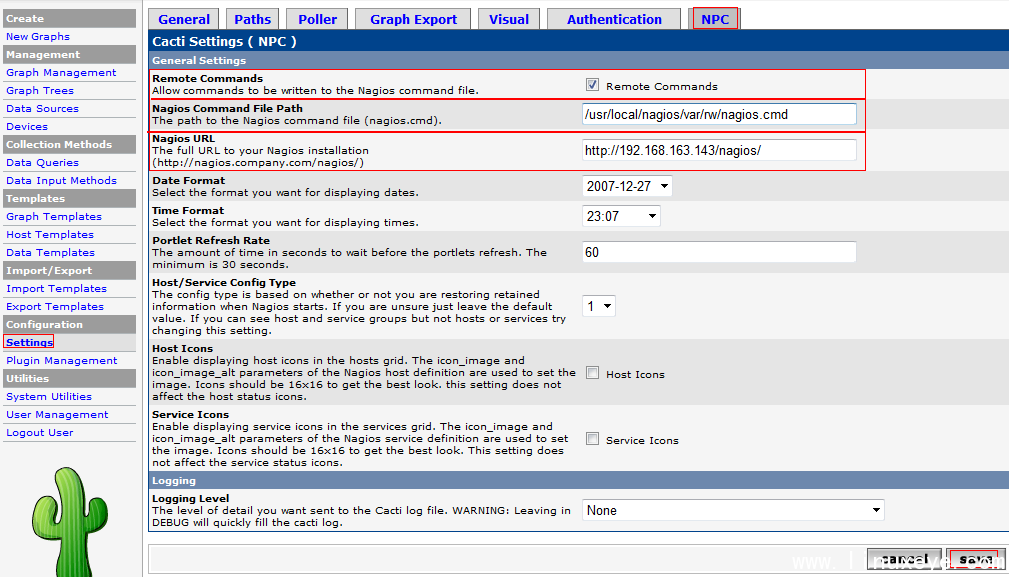
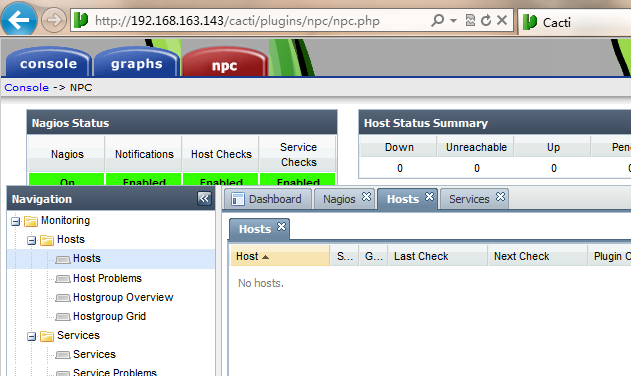
當訪問到npc這個頁面的時候已經擦不多了
9、但是看npc裡發現空白的,沒有數據,是因為php沒有PDO_MYSQL支持,所以安裝PDO_MYSQL
# wget http://pecl.php.net/get/PDO_MYSQL-1.0.2.tgz
# tar zxvf PDO_MYSQL-1.0.2.tgz
# cd PDO_MYSQL-1.0.2
# /usr/local/php/bin/phpize
#./configure --with-php-config=/usr/bin/php-config
#make
#make install

修改php.ini,添加如下信息,之後重啟httpd即可
extension = "pdo_mysql.so"
10、之後再訪問還不行,還要修改數據庫結構:
# mysql -u root -p
mysql> alter table npc_eventhandlers add long_output TEXT NOT NULL default '' after output;
mysql> alter table npc_hostchecks add long_output TEXT NOT NULL default '' after output;
mysql> alter table npc_hoststatus add long_output TEXT NOT NULL default '' after output;
mysql> alter table npc_notifications add long_output TEXT NOT NULL default '' after output;mysql> alter table npc_servicechecks add long_output TEXT NOT NULL default '' after output;
mysql> alter table npc_servicestatus add long_output TEXT NOT NULL default '' after output;
mysql> alter table npc_statehistory add long_output TEXT NOT NULL default '' after output; mysql> alter table npc_systemcommands add long_output TEXT NOT NULL default '' after output;
之後再訪問就可看到有數據了: