一、為什麼?
在中小型企業,公司不同運維人員基本都是以root 賬戶進行服務器的登陸管理,缺少了賬戶權限審計制度。不出問題還好,出了問題,就很難找出源頭。
這裡介紹下,如何利用編譯bash 使不同的客戶端在使用root 登陸服務器使,記錄各自的操作,並且可以在結合ELK 日志分析系統,來收集登陸操作日志
二、環境
服務器:CentOS 6.5、Development tools、使用密鑰認證,SElinux 關閉。
客戶端:生成密鑰對,用於登錄服務器 (2台)
三、搭建部署 (服務器操作 192.168.30.72)
3.1 下載編譯bash
[root@open1 ~]# wget http://ftp.gnu.org/gnu/bash/bash-4.1.tar.gz
[root@open1 ~]# tar xvf bash-4.1.tar.gz
[root@open1 ~]# cd bash-4.1
3.2 先修改下 config-top.c文件,大概94行、104行,由於c 語言中 注釋是/**/ ,所以不要刪除錯了。修改如下:
[root@open1 bash-4.1]# vim config-top.c
#define SSH_SOURCE_BASHRC
#define SYSLOG_HISTORY
3.3 修改下bashhist.c 文件,讓終端上的命令記錄到系統messages 中,並且以指定的格式。並傳入獲得的變量。修改後的內容如下:
[root@open1 bash-4.1]# vim bashhist.c
#... 省略部分段落
void
bash_syslog_history (line)
    const char *line;
{
  char trunc[SYSLOG_MAXLEN];
    const char *p;
    p = getenv("NAME_OF_KEY");
  if (strlen(line) < SYSLOG_MAXLEN)
    syslog (SYSLOG_FACILITY|SYSLOG_LEVEL, "HISTORY: PID=%d PPID=%d SID=%d  User=%s USER=%s CMD=%s", getpid(), getppid(), getsid(getpid()),  current_user.user_name, p, line);
  else
    {
      strncpy (trunc, line, SYSLOG_MAXLEN);
      trunc[SYSLOG_MAXLEN - 1] = ' ';
      syslog (SYSLOG_FACILITY|SYSLOG_LEVEL, "HISTORY (TRUNCATED): PID=%d  PPID=%d SID=%d User=%s USER=%s CMD=%s", getpid(), getppid(), getsid(getpid()), current_user.user_name, p, trunc);
    }
}
3.4 配置安裝路徑,編譯安裝,編譯到/usr/local/目錄下。
[root@open1 bash-4.1]# ./configure --prefix=/usr/local/bash_new
[root@open1 bash-4.1]# make && make install
...
if test "bash" = "gettext-tools"; then \
          /bin/sh /root/bash-4.1/./support/mkinstalldirs /usr/local/bash_new/share/gettext/po; \
          for file in Makefile.in.in remove-potcdate.sin quot.sed boldquot.sed [email protected] [email protected] insert-header.sin Rules-quot   Makevars.template; do \
            /usr/bin/install -c -m 644 ./$file \
                            /usr/local/bash_new/share/gettext/po/$file; \
          done; \
          for file in Makevars; do \
            rm -f /usr/local/bash_new/share/gettext/po/$file; \
          done; \
        else \
          : ; \
        fi
make[1]: Leaving directory `/root/bash-4.1/po'
編譯完成後,將新的bash 追加到 /etc/shells 中,並修改root用戶的登陸shell 環境為新編譯的shell。如下
[root@open1 bash-4.1]# echo "/usr/local/bash_new/bin/bash" >> /etc/shells
[root@open1 bash-4.1]# cat /etc/shells
/bin/sh
/bin/bash
/sbin/nologin
/bin/dash
/usr/local/bash_new/bin/bash
[root@open1 bash-4.1]# vim /etc/passwd
root:x:0:0:root:/root:/usr/local/bash_new/bin/bash
注銷當前root用戶,重新登陸後,查看/var/log/messages,如下就可以看到記錄了操作命令
四、SSH客戶端生成密鑰部分
4.1 在client1上(192.168.30.99)操作,用戶zhangsan
[root@rsyslog ~]# ssh-keygen -t rsa -C "root@zhangsan"
Generating public/private rsa key pair.
Enter file in which to save the key (/root/.ssh/id_rsa):
Enter passphrase (empty for no passphrase):
Enter same passphrase again:
Your identification has been saved in /root/.ssh/id_rsa.
Your public key has been saved in /root/.ssh/id_rsa.pub.
The key fingerprint is:
c8:bd:5d:3b:a5:d9:6d:09:b6:5f:db:55:1d:43:96:3d root@zhangsan
The key's randomart image is:
+--[ RSA 2048]----+
|               oo|
|              oE.|
|               o.|
|     . o        +|
|      o S   .o. o|
|         o ..*o.o|
|        . . =...=|
|             ...=|
|               o.|
+-----------------+
-t 加密算法
-C 注釋 (加上這個也是為了最後進行對服務器訪問人員進行辨別的一個關鍵點)
將公鑰上傳到服務器上的.ssh/authorized_keys 文件中。ssh-copy-id 命令會自動在服務器上創建.ssh/authorized_keys文件,即使該目錄不存在,並自動賦予600權限。
[root@rsyslog ~]# ssh-copy-id -i /root/.ssh/id_rsa.pub [email protected]
[email protected]'s password:
Now try logging into the machine, with "ssh '[email protected]'", and check in:

  .ssh/authorized_keys

to make sure we haven't added extra keys that you weren't expecting.
4.3 client 2(192.168.30.71) 上同樣的操作,用戶lisi
[root@swift3 ~]# ssh-keygen -t rsa -C "root@lisi" Generating public/private rsa key pair.上傳公鑰到服務器上
[root@swift3 ~]# ssh-copy-id -i /root/.ssh/id_rsa.pub [email protected]
The authenticity of host '192.168.30.72 (192.168.30.72)' can't be established.
RSA key fingerprint is 8f:a7:1b:8d:e4:92:ad:ae:ea:1b:fb:67:0b:0b:7c:ac.
Are you sure you want to continue connecting (yes/no)? yes
Warning: Permanently added '192.168.30.72' (RSA) to the list of known hosts.
[email protected]'s password:
Now try logging into the machine, with "ssh '[email protected]'", and check in:

  .ssh/authorized_keys

to make sure we haven't added extra keys that you weren't expecting.
4.4 現在去服務器上驗證下該文件。
[root@open1 ~]# cat ~/.ssh/authorized_keys
ssh-rsa AAAAB3NzaC1yc2EAAAABIwAAAQEA6fM+bpWEP3luauvOjmTB55ugUzVVMesmHCw4RNZ/C2e+KGXAYuxuAmEBbMcXQQj7OTAqVCQ0PWja58wReyZ7etiUGAtvoSBmSBpTPXteBMl40kDn4GdmXQ9UT/jnQ9gSZUQYJLMLJGWJks9S4xUI2cZ7oIytclrsUnKuOA1U6+luIJwJu9z7ya5OXh5FmmJQFnYtAEIhrLt4S8Ru5S00c0jiQCRk3RFlHYNc0IR02MXMH7d9bq7l04heAcT/y1EBS3EwINX8r0y6OridjJPCwxnm1sSfMKvLAbq/B+ufDjEOp7Y2SatL3qXaiP7NxdnhoJ4+Xar0zCoYi2A9oRGgUQ== root@zhangsan
ssh-rsa AAAAB3NzaC1yc2EAAAABIwAAAQEAupGSgXOWpQfzOVkHXYqN2BjMiAyaFRdKs6Wam3xGpMYRjZbIFX14kNR4CbrQtbUK8YonZPYdXG589blFmqF17sUPCNEqZEjCNer+yzDu+hYg/jAn4dCVtTBqUtBsTYUHSHIR0srruJ9keHNgU9aDRok8nulMUi/9Ej0NJZsBQ2npVNCf0YHgAd/ON5VsBYVLPvAT/cG3MuCjg5mgtU59qgAHyLKxkfpVc0/TRZ4eamX/1V0dsCxx9oYDbpn4YKLBAOaAS4kF6qEdrwRh0ssyWtWOo/CdyfLXKgwdbPtPfWZ63SM7wY7bAtcdxxu/QDkYVP+4oDfAtMxXZlY2bT5qMQ== root@lisi
View Code
現在上面兩個客戶端已經可以免密鑰登陸了,現在去服務器上配置,並創建腳本。
五、配置服務器
5.1 在log目錄下創建一個 keys 文件,用於登陸時存進去公鑰,之後對其進行取出判斷的
[root@open1 ~]# touch /var/log/keys
創建檢測腳本,內容如下:
[root@open1 ~]# cat /etc/CheckUser.sh5.2 配置 profile,在文件末尾添加一行內容,如下:
[root@open1 ~]# echo "test -f /etc/CheckUser.sh && . /etc/CheckUser.sh" >> /etc/profile
在/etc/bashrc 末尾添加下面內容:
[root@open1 ~]# tail -1f /etc/bashrc
test -z "$BASH_EXECUTION_STRING" || { test -f /etc/CheckUser.sh && . /etc/CheckUser.sh; logger -t -bash -s "HISTORY $SSH_CLIENT USER=$NAME_OF_KEY CMD=$BASH_EXECUTION_STRING " >/dev/null 2>&1;}
5.3 修改sshd 配置文件,開啟debug 模式,並重啟sshd 服務
[root@open1 ~]# sed -i 's/#LogLevel INFO/LogLevel DEBUG/g' /etc/ssh/sshd_config
[root@open1 ~]# service sshd restart
Stopping sshd:                                             [  OK  ]
Starting sshd:                                             [  OK  ]
六、驗證
6.1 在client1 上進行登陸,並刪除個文件試下(zhangsan)
6.2 在client2 上進行登陸,也刪除個文件,並執行個重啟服務的命令(lisi)
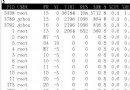
6.3 去服務器上查看下 messages 日志,內容如下
通過上圖,可以看出,不通用戶的客戶端通過公鑰登陸的方式,分辨出了誰操作了什麼,什麼時候操作的。
(注:上圖第4段 swift1 是這台服務器的主機名,由於我只是運行了hostname 命令修改主機名,並沒有修改networks,所以內核裡還是之前的名字:swift1。)
七、結束
通過這種方式,極大的解決了多root 用戶登陸操作,無法審計的問題。並且可以結合日志轉發,將系統日志轉發到其它服務器,即使主機被黑了,也能具體的審查登陸時間以及做了哪些操作。