本文介紹Linux下的文件權限 操作系統為RHEL7.2_X86_64
可以從以下三種訪問方式限制訪問權限:
1 只允許用戶自己訪問
2 允許一個預先指定的用戶組中的用戶訪問
3 允許系統中的任何用戶訪問
文件的所屬用戶或者root用戶可以將這些權限改變為任何他想指定的權限。
一個只有讀權限的文件,是禁止進行任何修改的。
只有執行權限的,允許它想一個程序一樣執行。
我們之前已經很多次用到 ls命令了,如你所見,我們用它來列出並顯示當前目錄下的文件,當然這是在不帶任何參數的情況下,它能做的當然不止這麼多,現在我們就要用它來查看文件權限。
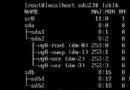
[root@VM_200_13_CentOS ~]# ls -l
total 8
drwxr-xr-x 2 root root 4096 Aug 14 11:37 auth
-rw-r--r-- 1 root root    7 Aug 14 11:34 auth.txt
| 基本權限 | 說明 |
| :------------- | :------------- |
| r | 對文件而言,具有讀取文件內容的權限
對目錄來說,具有浏覽目錄的權限 |
| w | 對文件而言,具有新增、修改文件內容的權限
對目錄來說,具有刪除、移動目錄內文件的權限 |
| x | 對文件而言,具有執行文件的權限
對目錄了來說該用戶具有進入目錄的權限 |
| - | 表示不具有該項權限 |
舉例說明:
其實文件與目錄設置不止這些,還有所謂的特殊權限。由於特殊權限會擁有一些“特權”。
因而用戶若無特殊需求,不應該啟用這些權限,避免安全方面出現嚴重漏洞,造成入侵,甚至摧毀系統!
SUID(Set UID)當一個可以執行文件具有SUID權限,用戶執行這個程序時,將以這個程序的所有者身份執行。
在設置s權限時文件屬主必須先設置相應的x權限,否則s權限並不能正真生效。
chmod命令不進行必要的完整性檢查,即使不設置x權限就設置s權限,chmod也不會報錯,當我們ls -l時看到rwS,大寫S說明s權限未生效。
Linux修改密碼的passwd便是個設置了SUID的程序,普通用戶無讀寫/etc/shadow文件的權限確可以修改自己的密碼。
可執行的文件搭配這個權限,便能得到特權,任意存取該文件的所有者能使用的全部系統資源。
請注意具備SUID權限的文件,駭客經常利用這種權限,以SUID配上root帳號擁有者,無聲無息地在系統中開扇後門,供日後進出使用
[root@VM_200_13_centos ~]# su - test
Last login: Sun Aug 14 19:05:04 CST 2016 on pts/0
[test@VM_200_13_centos ~]$ which passwd
/bin/passwd
[test@VM_200_13_centos ~]$ ll /bin/passwd
-rwsr-xr-x. 1 root root 27832 Jun 10  2014 /bin/passwd
該文件的所屬用戶和所屬用戶組均為root,顯然test用戶不具有該執行文件的讀寫執行權限
但是該文件被賦予了SUID權限,任意執行該執行文件的用戶都能以該文件所屬用戶(root用戶)的身份執行該文件
[test@VM_200_13_centos ~]$ passwd
Changing password for user test.
Changing password for test.
(current) UNIX password:
New password:
Retype new password:
passwd: all authentication tokens updated successfully.
因為具有SUID權限所有普通用戶執行該命令能修改密碼
設置在文件上面,其效果與SUID相同,只不過將文件所有者換成用戶組,該文件就可以任意存取整個用戶組所能使用的系統資源。
強調: SUID一般用在文件上(腳本) SGID用在目錄上比較多
t權限代表SBIT(Sticky):只針對目錄有效,對文件無效,作用是防止別人刪除掉對方的資料
因為SUID、SGID、Sticky占用x的位置來表示,所以在表示上會有大小寫之分。
加入同時開啟執行權限和SUID、SGID、Sticky,則權限表示字符是小寫的
如果不具有x權限,會以大寫顯示
[root@VM_200_13_centos ~]# mkdir test
[root@VM_200_13_centos ~]# ll
total 4
drwxr-xr-x 2 root root 4096 Aug 14 19:59 test
[root@VM_200_13_centos ~]# chmod u+s test/
[root@VM_200_13_centos ~]# ll
total 4
drwsr-xr-x 2 root root 4096 Aug 14 19:59 test
[root@VM_200_13_centos ~]# chmod u-x test/
[root@VM_200_13_centos ~]# ll
total 4
drwSr-xr-x 2 root root 4096 Aug 14 19:59 test
[root@VM_200_13_centos ~]# chmod g+s test/
[root@VM_200_13_centos ~]# ll
total 4
drwSr-sr-x 2 root root 4096 Aug 14 19:59 test
[root@VM_200_13_centos ~]# chmod g-x test/
[root@VM_200_13_centos ~]# ll
total 4
drwSr-Sr-x 2 root root 4096 Aug 14 19:59 test
[root@VM_200_13_centos ~]# chmod o+t test/
[root@VM_200_13_centos ~]# ll
total 4
drwSr-Sr-t 2 root root 4096 Aug 14 19:59 test
[root@VM_200_13_centos ~]# chmod o-x test/
[root@VM_200_13_centos ~]# ll
total 4
drwSr-Sr-T 2 root root 4096 Aug 14 19:59 test
命令:chmod
作用:修改文件的權限
語法:chmod [選項] MODE 文件...
-rwxrwxrwx
-rwxrwxrwx的第一個字符表示這是一個普通文件,之後每三個字符分別代表的是用戶權限、用戶組權限、其他用戶權限
用戶權限用u表示
用戶組權限用g表示
其他用戶權限用o表示
那麼chmod命令的MODE第一種方式可以為指定用戶或用戶組或其他用戶授權
u+x:表示授予用戶對該文件的可執行權限
g+r:表示授予用戶組對該文件的可讀權限
o-w:表示取消其他用戶對該文件的寫權限
[root@VM_200_13_centos ~]# ll
total 4
drwsr-Sr-T 2 root root 4096 Aug 14 19:59 test
[root@VM_200_13_centos ~]# chmod u-x test/
[root@VM_200_13_centos ~]# chmod g+w test/
[root@VM_200_13_centos ~]# chmod o+w test/
[root@VM_200_13_centos ~]# ll
total 4
drwSrwSrwT 2 root root 4096 Aug 14 19:59 test
如果要為文件設置多個用戶權限(用戶權限、用戶組用戶權限、其他用戶權限)這種方式就很麻煩,需要多次設置
這種情況使用權限的二進制數表達形式設置會非常效率
對於 -rwxrwxrwx 除去第一位表示文件類型外
rwxrwxrwx每三位為一組用二進制表示:111 111 111
rwxrwxrwx每三位為一組用十進制表示:7 7 7
最終我們使用計算出的十進制數為文件進行授權
[root@VM_200_13_centos ~]# ll
total 0
-rw-r--r-- 1 root root 0 Aug 14 20:41 a
[root@VM_200_13_centos ~]# chmod 000 a
[root@VM_200_13_centos ~]# ll
total 0
---------- 1 root root 0 Aug 14 20:41 a[root@VM_200_13_centos ~]# chmod 711 a
[root@VM_200_13_centos ~]# ll
total 0
-rwx--x--x 1 root root 0 Aug 14 20:41 a如果要授予特殊權限SUID(4)、SGIU(2)、SBIT(1)則要使用4位1進制數表示
[root@VM_200_13_centos ~]# ll
total 0
---------- 1 root root 0 Aug 14 20:41 a
[root@VM_200_13_centos ~]# chmod 7000 a
[root@VM_200_13_centos ~]# ll
total 0
---S--S--T 1 root root 0 Aug 14 20:41 a命令:chown
作用:修改文件擁有者和所屬組
語法:chown [選項] [所屬用戶][:所屬用戶組] 文件...
[root@VM_200_13_centos ~]# ll
total 0
---S--S--T 1 root root 0 Aug 14 20:41 a
[root@VM_200_13_centos ~]# chown test:test a
[root@VM_200_13_centos ~]# ll
total 0
------S--T 1 test test 0 Aug 14 20:41 a
[root@VM_200_13_centos ~]# chown root a
[root@VM_200_13_centos ~]# ll
total 0
------S--T 1 root test 0 Aug 14 20:41 a
[root@VM_200_13_centos ~]# chown :test1 a
[root@VM_200_13_centos ~]# ll
total 0
------S--T 1 root test1 0 Aug 14 20:41 a
[root@VM_200_13_centos ~]# mkdir -p ~/aa/b/c
[root@VM_200_13_centos ~]# touch aa/a
[root@VM_200_13_centos ~]# chown -R -v  :test1 aa/
ownership of 'aa/a' retained as root:test1
ownership of 'aa/b/c' retained as root:test1
ownership of 'aa/b' retained as root:test1
ownership of 'aa/' retained as root:test1
我們創建文件的默認權限是怎麼來的?如何改變這個默認權限呢?
umask設置了用戶創建文件的默認權限,它與chmod的效果剛好相反。
umask設置的是權限補碼,而chmod設置的是文件權限碼。
一般在/etc/profile、宿主目錄下的.bash_profile或 .profile中設置了umask的默認值。
umask命令允許你設定文件創建時的缺省模式,對應每一類用戶(文件屬主、同組用戶、其他用戶)存在一個相應的umask值中的數字。
對於文件來說,這一數字的最大值分別是6。
系統不允許你在創建一個文本文件時就賦予它執行權限,必須在創建後用chmod命令增加這一權限。
目錄則允許設置執行權限,這樣針對目錄來說,umask中各個數字最大可以到7。
該命令的一般形式為:umask nnn 其中nnn為umask置000 - 777。
我們只要記住umask是從權限中拿走相應的位即可。
如:umask值為022,則默認目錄權限為755,默認文件權限為644。
計算方法:
文件默認權限=666-umask值 666-022=644
目錄默認權限=777-umask 值 777-022=755
舉例:創建 一個文件:
umask=033
touch c.txt
那麼c.txt的默認文件權限是?
umask掩碼為033
666-033=633 結果為:644
命令:chattr
作用:可改變存放在ext2、ext3、ext4、xfs、ubifs、reiserfs、jfs等文件系統上的文件或目錄屬性
語法:chattr [選項] [屬性] [-v(版本)] 文件...
注意事項:
chattr命令的作用很大,其中一些功能是由Linux內核版本來支持的,不過現在生產絕大部分跑的
linux系統都是2.6以上內核了。
通過chattr命令修改屬性能夠提高系統的安全性,但是它並不適合所有的目錄。
chattr命令不能保護/、/dev、/tmp、/var目錄。
lsattr命令是顯示chattr命令設置的文件屬性。
這兩個命令是用來查看和改變文件、目錄屬性的,與chmod這個命令相比,chmod只是改變文件的讀寫、執行權限,更底層的屬性控制是由chattr來改變的。
應用舉例:
用chattr命令防止關鍵密碼文件被修改
[root@VM_200_13_centos ~]# chattr +i /etc/passwd
[root@VM_200_13_centos ~]# lsattr /etc/passwd
----i----------- /etc/passwd
要想修改此文件就要把i屬性去掉
[root@VM_200_13_centos ~]# chattr -i /etc/passwd
[root@VM_200_13_centos ~]# lsattr /etc/passwd
---------------- /etc/passwd
讓某個文件只能往裡面追加數據但不能刪除
適用於各種日志文件,還是以密碼文件為例
[root@VM_200_13_centos ~]# chattr +a /etc/passwd
[root@VM_200_13_centos ~]# lsattr /etc/passwd
-----a---------- /etc/passwd
[root@VM_200_13_centos ~]# chattr -a /etc/passwd
[root@VM_200_13_centos ~]# lsattr /etc/passwd
---------------- /etc/passwd