XEN 是一種直接運行在硬件上一層軟件,它可以讓電腦硬件上同時跑多個用戶的操作系統。由於對 x86, x86-64, Itanium, Power PC,
和 ARM 這些處理器的支持,所以 XEN 管理工具可以支持的操作系統有 Linux, NetBSD,FreeBSD,Solaris, Windows 和其他一些
運行在 XEN 上的正常的操作系統。
下面我將分3步講解Fedora16下如何安裝XEN虛擬機,並創建DomU:
建議:
在安裝XEN時,為保證用戶權限不受限避免出現權限錯誤,建議用root用戶登錄安裝。
如不知道如何開啟root用戶登錄,請閱讀《設置Fedora能夠使用root用戶登錄》 http://www.linuxidc.com/Linux/2011-12/48728.htm
--------------------------------------------------------------------
安裝好Fedora16後,先對其進行適當配置再進行XEN的安裝,可提高XEN安裝的成功率。
[root@localhost ~]$ chkconfig network on
[root@localhost ~]$ /etc/init.d/network start
[root@localhost ~]$ gedit /etc/selinux/config
[root@localhost ~]$ gedit /etc/hosts
[root@localhost ~]$ yum update
[root@localhost ~]$ chkconfig iptables off
[root@localhost ~]$ chkconfig ksmtuned off
[root@localhost ~]$ reboot
重啟選擇新內核登錄後,就可以安裝XEN了,在安裝XEN之前,我們先安裝一些XEN運行時可能會用到到包。
[root@localhost ~]$ yum groupinstall "Development Libraries"
[root@localhost ~]$ yum groupinstall "Development Tools"
[root@localhost ~]$ yum install transfig wget texi2html libaio-devel dev86 glibc-devel e2fsprogs-devel gitk mkinitrd iasl xz-devel bzip2-devel
pciutils-libs pciutils-devel SDL-devel libX11-devel gtk2-devel bridge-utils PyXML qemu-common qemu-img mercurial[root@localhost ~]$ yum install glibc-devel.i686
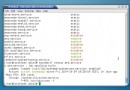
[root@localhost ~]$ yum install xen
[root@localhost ~]# /etc/init.d/xenconsoled start
[root@localhost ~]# /etc/init.d/xend start
[root@localhost ~]# /etc/init.d/xendomains start
[root@localhost ~]# /etc/init.d/xencommons start
[root@localhost ~]# /etc/init.d/xenstored start
[root@localhost ~]# /etc/init.d/libvirtd start
[root@localhost ~]$ reboot