[b]schedule_work函數的功能[/b]
只考慮使用系統的keventd管理的工作隊列
驅動程序調用schedule_work向工作隊列遞交新的工作節點,schedule_work內部會喚醒worker_thread內核線程(使之進 程狀態為可調度)。在下一次進程調度時刻,worker_thread被調度執行,其主要任務便是調用它所管理工作隊列中每個工作節點上掛載的函數,調用 完畢該工作節點會從任務隊列中被刪除。當所有節點上的函數調用完畢,worker_thread繼續sleep,直到schedule_work再次被某 個驅動程序調用。1. 什麼是workqueue
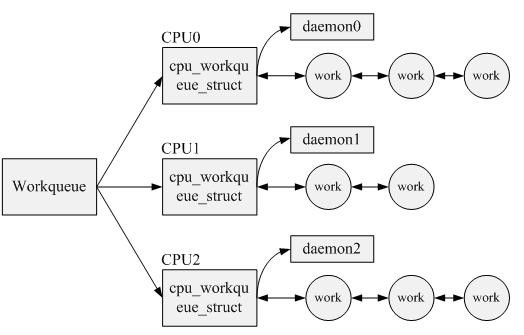
Linux中的Workqueue機制就是為了簡化內核線程的創建。通過調用workqueue的接口就能創建內核線程。並且可以根據當前系統CPU的個數創建線程的數量,使得線程處理的事務能夠並行化。workqueue是內核中實現簡單而有效的機制,他顯然簡化了內核daemon的創建,方便了用戶的編程.
工作隊列(workqueue)是另外一種將工作推後執行的形式.工作隊列可以把工作推後,交由一個內核線程去執行,也就是說,這個下半部分可以在進程上下文中執行。最重要的就是工作隊列允許被重新調度甚至是睡眠。
2. 數據結構
我們把推後執行的任務叫做工作(work),描述它的數據結構為work_struct:
[cpp] view plain
copy
print?
struct work_struct {
    atomic_long_t data;       /*工作處理函數func的參數*/
#define WORK_STRUCT_PENDING 0        /* T if work item pending execution */
#define WORK_STRUCT_STATIC 1        /* static initializer (debugobjects) */
#define WORK_STRUCT_FLAG_MASK (3UL)
#define WORK_STRUCT_WQ_DATA_MASK (~WORK_STRUCT_FLAG_MASK)
    struct list_head entry;        /*連接工作的指針*/
    work_func_t func;              /*工作處理函數*/
#ifdef CONFIG_LOCKDEP
    struct lockdep_map lockdep_map;
#endif
};
struct work_struct {
atomic_long_t data; /*工作處理函數func的參數*/
#define WORK_STRUCT_PENDING 0 /* T if work item pending execution */
#define WORK_STRUCT_STATIC 1 /* static initializer (debugobjects) */
#define WORK_STRUCT_FLAG_MASK (3UL)
#define WORK_STRUCT_WQ_DATA_MASK (~WORK_STRUCT_FLAG_MASK)
struct list_head entry; /*連接工作的指針*/
work_func_t func; /*工作處理函數*/
#ifdef CONFIG_LOCKDEP
struct lockdep_map lockdep_map;
#endif
}; 這些工作以隊列結構組織成工作隊列(workqueue),其數據結構為workqueue_struct:
[cpp] view plain
copy
print?
struct workqueue_struct {
 struct cpu_workqueue_struct *cpu_wq;
 struct list_head list;
 const char *name;   /*workqueue name*/
 int singlethread;   /*是不是單線程 - 單線程我們首選第一個CPU -0表示采用默認的工作者線程event*/
 int freezeable;  /* Freeze threads during suspend */
 int rt;
};
struct workqueue_struct {
struct cpu_workqueue_struct *cpu_wq;
struct list_head list;
const char *name; /*workqueue name*/
int singlethread; /*是不是單線程 - 單線程我們首選第一個CPU -0表示采用默認的工作者線程event*/
int freezeable; /* Freeze threads during suspend */
int rt;
}; 如果是多線程,Linux根據當前系統CPU的個數創建cpu_workqueue_struct 其結構體就是:
[cpp] view plain
copy
print?
truct cpu_workqueue_struct {
 spinlock_t lock;/*因為工作者線程需要頻繁的處理連接到其上的工作,所以需要枷鎖保護*/
 struct list_head worklist;
 wait_queue_head_t more_work;
 struct work_struct *current_work; /*當前的work*/
 struct workqueue_struct *wq;   /*所屬的workqueue*/
 struct task_struct *thread; /*任務的上下文*/
} ____cacheline_aligned;
truct cpu_workqueue_struct {
spinlock_t lock;/*因為工作者線程需要頻繁的處理連接到其上的工作,所以需要枷鎖保護*/
struct list_head worklist;
wait_queue_head_t more_work;
struct work_struct *current_work; /*當前的work*/
struct workqueue_struct *wq; /*所屬的workqueue*/
struct task_struct *thread; /*任務的上下文*/
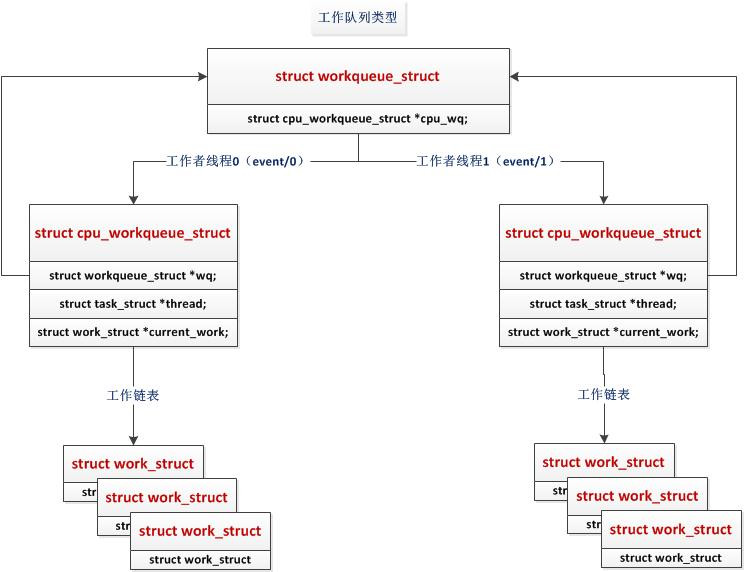
} ____cacheline_aligned; 在該結構主要維護了一個任務隊列,以及內核線程需要睡眠的等待隊列,另外還維護了一個任務上下文,即task_struct。
三者之間的關系如下:
 3. 創建工作
3.1 創建工作queue
a. create_singlethread_workqueue(name)
該函數的實現機制如下圖所示,函數返回一個類型為struct workqueue_struct的指針變量,該指針變量所指向的內存地址在函數內部調用kzalloc動態生成。所以driver在不再使用該work queue的情況下調用:
void destroy_workqueue(struct workqueue_struct *wq)來釋放此處的內存地址。
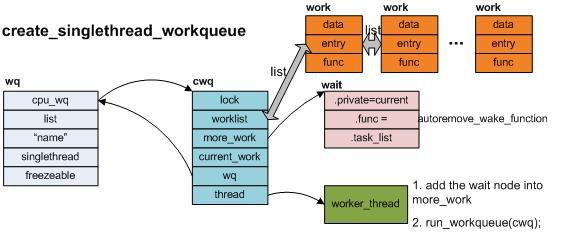
圖中的cwq是一per-CPU類型的地址空間。對於create_singlethread_workqueue而言,即使是對於多CPU系統,內核也只負責創建一個worker_thread內核進程。該內核進程被創建之後,會先定義一個圖中的wait節點,然後在一循環體中檢查cwq中的worklist,如果該隊列為空,那麼就會把wait節點加入到cwq中的more_work中,然後休眠在該等待隊列中。
Driver調用queue_work(struct workqueue_struct *wq, struct work_struct *work)向wq中加入工作節點。work會依次加在cwq->worklist所指向的鏈表中。queue_work向cwq->worklist中加入一個work節點,同時會調用wake_up來喚醒休眠在cwq->more_work上的worker_thread進程。wake_up會先調用wait節點上的autoremove_wake_function函數,然後將wait節點從cwq->more_work中移走。
worker_thread再次被調度,開始處理cwq->worklist中的所有work節點...當所有work節點處理完畢,worker_thread重新將wait節點加入到cwq->more_work,然後再次休眠在該等待隊列中直到Driver調用queue_work...
b. create_workqueue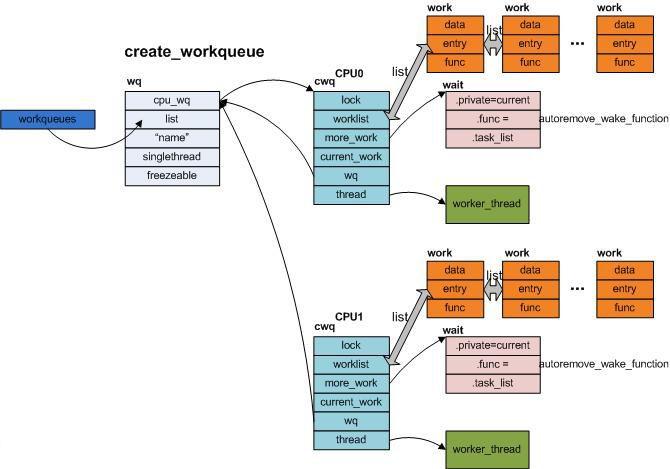
相對於create_singlethread_workqueue, create_workqueue同樣會分配一個wq的工作隊列,但是不同之處在於,對於多CPU系統而言,對每一個CPU,都會為之創建一個per-CPU的cwq結構,對應每一個cwq,都會生成一個新的worker_thread進程。但是當用queue_work向cwq上提交work節點時,是哪個CPU調用該函數,那麼便向該CPU對應的cwq上的worklist上增加work節點。
c.小結
當用戶調用workqueue的初始化接口create_workqueue或者create_singlethread_workqueue對workqueue隊列進行初始化時,內核就開始為用戶分配一個workqueue對象,並且將其鏈到一個全局的workqueue隊列中。然後Linux根據當前CPU的情況,為workqueue對象分配與CPU個數相同的cpu_workqueue_struct對象,每個cpu_workqueue_struct對象都會存在一條任務隊列。緊接著,Linux為每個cpu_workqueue_struct對象分配一個內核thread,即內核daemon去處理每個隊列中的任務。至此,用戶調用初始化接口將workqueue初始化完畢,返回workqueue的指針。
workqueue初始化完畢之後,將任務運行的上下文環境構建起來了,但是具體還沒有可執行的任務,所以,需要定義具體的work_struct對象。然後將work_struct加入到任務隊列中,Linux會喚醒daemon去處理任務。
上述描述的workqueue內核實現原理可以描述如下:
 3.2 創建工作
要使用工作隊列,首先要做的是創建一些需要推後完成的工作。可以通過DECLARE_WORK在編譯時靜態地建該結構:
DECLARE_WORK(name,void (*func) (void *), void *data);
這樣就會靜態地創建一個名為name,待執行函數為func,參數為data的work_struct結構。
同樣,也可以在運行時通過指針創建一個工作:
INIT_WORK(structwork_struct *work, woid(*func) (void *), void *data);
4. 調度
a. schedule_work 在大多數情況下, 並不需要自己建立工作隊列,而是只定義工作, 將工作結構掛接到內核預定義的事件工作隊列中調度, 在kernel/workqueue.c中定義了一個靜態全局量的工作隊列static struct workqueue_struct *keventd_wq;默認的工作者線程叫做events/n,這裡n是處理器的編號,每個處理器對應一個線程。比如,單處理器的系統只有events/0這樣一個線程。而雙處理器的系統就會多一個events/1線程。
調度工作結構, 將工作結構添加到全局的事件工作隊列keventd_wq,調用了queue_work通用模塊。對外屏蔽了keventd_wq的接口,用戶無需知道此參數,相當於使用了默認參數。keventd_wq由內核自己維護,創建,銷毀。這樣work馬上就會被調度,一旦其所在的處理器上的工作者線程被喚醒,它就會被執行。
b. schedule_delayed_work(&work,delay);
有時候並不希望工作馬上就被執行,而是希望它經過一段延遲以後再執行。在這種情況下,同時也可以利用timer來進行延時調度,到期後才由默認的定時器回調函數進行工作注冊。延遲delay後,被定時器喚醒,將work添加到工作隊列wq中。
工作隊列是沒有優先級的,基本按照FIFO的方式進行處理。
5. 示例
[cpp] view plain
copy
print?
#include <linux/module.h>
#include <linux/init.h>
#include <linux/workqueue.h>

static struct workqueue_struct *queue=NULL;
static struct work_struct   work;

staticvoid work_handler(struct work_struct *data)
{
       printk(KERN_ALERT"work handler function.\n");
}

static int __init test_init(void)
{
      queue=create_singlethread_workqueue("hello world");/*創建一個單線程的工作隊列*/
      if (!queue)
            goto err;

       INIT_WORK(&work,work_handler);
       schedule_work(&work);

      return0;
err:
      return-1;
}

static   void __exit test_exit(void)
{
       destroy_workqueue(queue);
}
MODULE_LICENSE("GPL");
module_init(test_init);
module_exit(test_exit);
#include <linux/module.h>
#include <linux/init.h>
#include <linux/workqueue.h>
static struct workqueue_struct *queue=NULL;
static struct work_struct work;
staticvoid work_handler(struct work_struct *data)
{
printk(KERN_ALERT"work handler function.\n");
}
static int __init test_init(void)
{
queue=create_singlethread_workqueue("hello world");/*創建一個單線程的工作隊列*/
if (!queue)
goto err;
INIT_WORK(&work,work_handler);
schedule_work(&work);
return0;
err:
return-1;
}
static void __exit test_exit(void)
{
destroy_workqueue(queue);
}
MODULE_LICENSE("GPL");
module_init(test_init);
module_exit(test_exit);序號
接口函數
說明
1
create_workqueue
用於創建一個workqueue隊列,為系統中的每個CPU都創建一個內核線程。輸入參數:
@name:workqueue的名稱
2
create_singlethread_workqueue
用於創建workqueue,只創建一個內核線程。輸入參數:
@name:workqueue名稱
3
destroy_workqueue
釋放workqueue隊列。輸入參數:
@ workqueue_struct:需要釋放的workqueue隊列指針
4
schedule_work
調度執行一個具體的任務,執行的任務將會被掛入Linux系統提供的workqueue——keventd_wq輸入參數:
@ work_struct:具體任務對象指針
5
schedule_delayed_work
延遲一定時間去執行一個具體的任務,功能與schedule_work類似,多了一個延遲時間,輸入參數:
@work_struct:具體任務對象指針
@delay:延遲時間
6
queue_work
調度執行一個指定workqueue中的任務。輸入參數:
@ workqueue_struct:指定的workqueue指針
@work_struct:具體任務對象指針
7
queue_delayed_work
延遲調度執行一個指定workqueue中的任務,功能與queue_work類似,輸入參數多了一個delay。
轉自:http://bgutech.blog.163.com/blog/static/18261124320116181119889/


