轉自:http://blog.csdn.net/lizhiguo0532/article/details/6453595
說明:
1. Based on linux 2.6.32 and Android 2.2,only support SDR(mem).
2. 參考文章:
http://2695477.blog.51cto.com/blog/2685477/484751
http://www.docin.com/p-115475680.html
http://blogold.chinaunix.net/u3/113927/showart_2447111.html
http://www.cnmsdn.com/html/201003/1269407632ID2530.html
一、新增特性介紹實際上,android仍然是利用了標准linux的休眠喚醒系統,只不過添加了一些使用上的新特性,early suspend、late resume、wake lock。
Early suspend - 這個機制定義了在suspend的早期,關閉顯示屏的時候,一些和顯示屏相關的設備,比如背光、重力感應器和觸摸屏等設備都應該被關掉,但是此時系統可能還有持有wake lock的任務在運行,如音樂播放,電話,或者掃描sd卡上的文件等,這個時候整個系統還不能進入真正睡眠,直到所有的wake lock都沒釋放。在嵌入式設備中,悲觀是一個很大的電源消耗,所有android加入了這種機制。
Late resume - 這個機制定義了在resume的後期,也就是喚醒源已經將處理器喚醒,標准linux的喚醒流程已經走完了,在android上層系統識別出這個物理上的喚醒源是上層定義的,那麼上層將會發出late resume的命令給下層,這個時候將會調用相關設備注冊的late resume回調函數。
Wake lock - wakelock在android的電源管理系統中扮演一個核心的角色,wakelock是一種鎖的機制, 只要有task拿著這個鎖,系統就無法進入休眠, 可以被用戶態進程和內核線程獲得。這個鎖可以是有超時的或者是沒有超時的, 超時的鎖會在時間過去以後自動解鎖。如果沒有鎖了或者超時了, 內核就會啟動標准linux的那套休眠機制機制來進入休眠。
二、kernel層源碼解析 - early suspend 和 late resume實現相關源碼:
kernel/kernel/power/main.c
kernel/kernel/power/earlysuspend.c
kernel/kernel/power/wakelock.c
kernel/kernel/power/userwakelock.c
kernel/kernel/power/suspend.c
之前標准的linux的sysfs的接口只需要一個state就夠了,現在至少需要3個接口文件:state、wake_lock、wake_unlock。現在為了配合android為休眠喚醒添加的幾種新特性,可以填入文件state的模式又多了一種:on, 標准android系統中只支持state的on和mem模式,其余的暫不支持。wake_lock和wake_unlock接口對應的讀寫函數在文件userwakelock.c中,對wakelock.c中的create
wakelock或者release wakelock進行了封裝,供用戶空間來使用。
如果上層用戶執行:echo xxx(on or mem) > sys/power/state的話,將會調用到如下函數:
static ssize_t state_store(struct kobject *kobj, struct kobj_attribute *attr,
const char *buf, size_t n)
{
#ifdef CONFIG_SUSPEND // set
#ifdef CONFIG_EARLYSUSPEND //set
suspend_state_t state = PM_SUSPEND_ON; // for early suspend and late resume
#else
suspend_state_t state = PM_SUSPEND_STANDBY;
#endif
const char * const *s;
#endif
char *p;
int len;
int error = -EINVAL;
p = memchr(buf, '/n', n);
len = p ? p - buf : n;
/* First, check if we are requested to hibernate */
if (len == 4 && !strncmp(buf, "disk", len)) {
error = hibernate(); // 檢查是否要求進入disk省電模式,暫時不支持
goto Exit;
}
#ifdef CONFIG_SUSPEND // def
for (s = &pm_states[state]; state < PM_SUSPEND_MAX; s++, state++) {
if (*s && len == strlen(*s) && !strncmp(buf, *s, len))
break;
}
if (state < PM_SUSPEND_MAX && *s)
#ifdef CONFIG_EARLYSUSPEND
if (state == PM_SUSPEND_ON || valid_state(state)) {
// 需要經過平台pm.c文件定義的模式支持檢查函數,mtk只支持mem,同時如果是android發送出來的late
resume命令(on),這裡也會放行,往下執行
error = 0;
request_suspend_state(state); // android休眠喚醒的路線
}
#else
error = enter_state(state);// 標准linux休眠喚醒的路線
#endif
#endif
Exit:
return error ? error : n;
}
@ kernel/kernel/power/earlysuspend.c
enum {
DEBUG_USER_STATE = 1U << 0,
DEBUG_SUSPEND = 1U << 2,
};
int Earlysuspend_debug_mask = DEBUG_USER_STATE;
module_param_named(Earlysuspend_debug_mask, Earlysuspend_debug_mask, int, S_IRUGO | S_IWUSR | S_IWGRP);
static DEFINE_MUTEX(early_suspend_lock);
static LIST_HEAD(early_suspend_handlers);
static void early_sys_sync(struct work_struct *work);
static void early_suspend(struct work_struct *work);
static void late_resume(struct work_struct *work);
static DECLARE_WORK(early_sys_sync_work, early_sys_sync);
static DECLARE_WORK(early_suspend_work, early_suspend);
static DECLARE_WORK(late_resume_work, late_resume);
static DEFINE_SPINLOCK(state_lock);
enum {
SUSPEND_REQUESTED = 0x1,
SUSPENDED = 0x2,
SUSPEND_REQUESTED_AND_SUSPENDED = SUSPEND_REQUESTED | SUSPENDED,
};
static int state; // 初始化為0
static DECLARE_COMPLETION(fb_drv_ready);
void request_suspend_state(suspend_state_t new_state)
{
unsigned long irqflags;
int old_sleep;
spin_lock_irqsave(&state_lock, irqflags);
old_sleep = state & SUSPEND_REQUESTED; // state = 1 or 3
// state的值會在0->1->3->2->0循環變化,後面分析代碼都可以看出這些值代表系統目前處於什麼階段,簡單得說就是:正常->准備進early
suspend->開始early suspend並且對名為mian的wakelock解鎖,如果此時沒有其余wakelock處於lock狀態,那麼系統就走linux的休眠喚醒路線讓整個系統真正休眠,直到喚醒源發生,然後將處理器和linux層喚醒。之後android層判斷本次底層醒來是由於我所定義的喚醒源引起的嗎?如果不是,android將不予理會,過段時間沒有wakelock鎖,系統會再次走linux的休眠路線進入休眠。如果是,那麼android上層就會寫一個on的指令到state接口中,同樣是會調用到函數request_suspend_state() -> 准備執行late
resume -> 開始執行late resume,之後整個系統就這樣被喚醒了。
if (Earlysuspend_debug_mask & DEBUG_USER_STATE) {
struct timespec ts; // 打印出debug信息
struct rtc_time tm;
getnstimeofday(&ts);
rtc_time_to_tm(ts.tv_sec, &tm);
pr_info("[request_suspend_state]: %s (%d->%d) at %lld "
"(%d-%02d-%02d %02d:%02d:%02d.%09lu UTC)/n",
new_state != PM_SUSPEND_ON ? "sleep" : "wakeup",
requested_suspend_state, new_state,
ktime_to_ns(ktime_get()),
tm.tm_year + 1900, tm.tm_mon + 1, tm.tm_mday,
tm.tm_hour, tm.tm_min, tm.tm_sec, ts.tv_nsec);
}
// eg: [request_suspend_state]: sleep (0->3) at 97985478409 (2010-01-03 09:52:59.637902305 UTC), 這裡對時間的獲取和處理,在其他地方可以參考
// ready to enter earlysuspend
if (!old_sleep && new_state != PM_SUSPEND_ON) { // susepnd會進入這裡
state |= SUSPEND_REQUESTED; // state = 1
pr_info("[request_suspend_state]:
sys_sync_work_queue early_sys_sync_work/n");
queue_work(sys_sync_work_queue, &early_sys_sync_work);
pr_info("[request_suspend_state]: suspend_work_queue early_suspend_work/n");
queue_work(suspend_work_queue, &early_suspend_work);
// 在wakelocks_init()函數(wakelock.c)中會創建這兩個工作隊列和工作者線程來專門負責處理sys_sync和early
suspend的工作。關於工作隊列的詳情參考我工作隊列的文章
}
// ready to enter lateresume
else if (old_sleep && new_state == PM_SUSPEND_ON) {
state &= ~SUSPEND_REQUESTED; // state = 2
wake_lock(&main_wake_lock); // 對main wakelock上鎖
pr_info("[request_suspend_state]: suspend_work_queue late_resume_work/n" );
if (queue_work(suspend_work_queue, &late_resume_work)) {
// 提交late resume的工作項
//
// In order to synchronize the backlight turn on timing,
// block the thread and wait for fb driver late_resume()
// callback function is completed
//
wait_for_completion(&fb_drv_ready);
// 等待完成量fb_drv_ready,他會在late
resume結束之後完成
}
}
requested_suspend_state = new_state;
// 存儲本次休眠或者是喚醒的狀態,供下次休眠或者喚醒使用
spin_unlock_irqrestore(&state_lock, irqflags);
}
在系統suspend的時候提交的兩個工作項會陸續被執行到,那麼下面就來看一下執行early suspend的關鍵函數。
static void early_sys_sync(struct work_struct *work)
{
wake_lock(&sys_sync_wake_lock);
printk("[sys_sync work] start/n");
sys_sync(); // 同步文件系統
printk("[sys_sync wrok] done/n");
wake_unlock(&sys_sync_wake_lock);
}
static void early_suspend(struct work_struct *work)
{
struct early_suspend *pos;
unsigned long irqflags;
int abort = 0;
mutex_lock(&early_suspend_lock);
spin_lock_irqsave(&state_lock, irqflags);
if (state == SUSPEND_REQUESTED)
state |= SUSPENDED; // state = 3
else
abort = 1;
spin_unlock_irqrestore(&state_lock, irqflags);
if (abort) { // suspend 中止退出
if (Earlysuspend_debug_mask & DEBUG_SUSPEND)
pr_info("[early_suspend]: abort, state %d/n", state);
mutex_unlock(&early_suspend_lock);
goto abort;
}
if (Earlysuspend_debug_mask & DEBUG_SUSPEND)
pr_info("[early_suspend]: call handlers/n");
list_for_each_entry(pos, &early_suspend_handlers, link) {
if (pos->suspend != NULL)
pos->suspend(pos);
}
// 函數register_early_suspend()會將每一個early suspend項以優先級大小注冊到鏈表early_suspend_handlers中,這裡就是一次取出,然後執行對應的early
suspend回調函數
mutex_unlock(&early_suspend_lock);
// Remove sys_sync from early_suspend,
// and use work queue to complete sys_sync
abort:
spin_lock_irqsave(&state_lock, irqflags);
if (state == SUSPEND_REQUESTED_AND_SUSPENDED)
{
pr_info("[early_suspend]: wake_unlock(main)/n");
wake_unlock(&main_wake_lock);
// main wakelock 解鎖。看到這裡,好像系統執行了early suspend之後就沒有往下執行標准linux的suspend流程了,其實不是,android的做法是,不是你執行完了early
suspend 的回調就可以馬上走標准linux的suspend流程,而是會檢查還有沒有wakelock被持有,如果所有wakelock全是解鎖狀態,那麼就會執行標准linux的suspend步驟。
}
spin_unlock_irqrestore(&state_lock, irqflags);
}
static void late_resume(struct work_struct *work)
{
struct early_suspend *pos;
unsigned long irqflags;
int abort = 0;
int completed = 0;
mutex_lock(&early_suspend_lock);
spin_lock_irqsave(&state_lock, irqflags);
// return back from suspend
if (state == SUSPENDED)
state &= ~SUSPENDED; // state = 0
else
abort = 1;
spin_unlock_irqrestore(&state_lock, irqflags);
if (abort) {
if (Earlysuspend_debug_mask & DEBUG_SUSPEND)
pr_info("[late_resume]: abort, state %d/n", state);
goto abort;
}
if (Earlysuspend_debug_mask & DEBUG_SUSPEND)
pr_info("[late_resume]: call handlers/n");
list_for_each_entry_reverse(pos, &early_suspend_handlers, link)
{
if (!completed && pos->level < EARLY_SUSPEND_LEVEL_DISABLE_FB) {
complete(&fb_drv_ready);
completed = 1;
}
if (pos->resume != NULL)
pos->resume(pos);
}
// 以和early suspend的逆序執行鏈表early_suspend_handlers上的late
resume回調函數
if (Earlysuspend_debug_mask & DEBUG_SUSPEND)
pr_info("[late_resume]: done/n");
abort:
if (!completed)
complete(&fb_drv_ready); // 設置完成量ok
mutex_unlock(&early_suspend_lock);
}
三、kernel層源碼解析 - wakelock的重要地位wakelock在Android的休眠喚醒機制中扮演著及其重要的角色,主要源碼位於文件:kernel/kernel/power/wakelock.c,kernel/include/linux/wakelock.h中。
wakelocks_init()函數所做的工作是整個wakelock可以工作起來的基礎,所有這裡先說說這個函數。
static int __init wakelocks_init(void)
{
int ret;
int i;
for (i = 0; i < ARRAY_SIZE(active_wake_locks); i++)
INIT_LIST_HEAD(&active_wake_locks[i]);
// 初始化active_wake_locks數組中的兩個類型鎖鏈表:
WAKE_LOCK_SUSPEND,WAKE_LOCK_IDLE
#ifdef CONFIG_WAKELOCK_STAT // defined
wake_lock_init(&deleted_wake_locks, WAKE_LOCK_SUSPEND,
"deleted_wake_locks");
// 初始化wakelock deleted_wake_locks,同時將其加入到非活動鎖鏈表中
#endif
wake_lock_init(&main_wake_lock, WAKE_LOCK_SUSPEND, "main");
wake_lock_init(&sys_sync_wake_lock, WAKE_LOCK_SUSPEND, "sys_sync");
wake_lock(&main_wake_lock);
wake_lock_init(&unknown_wakeup, WAKE_LOCK_SUSPEND, "unknown_wakeups");
// 初始化wakelock: main, sys_sync, unknown_wakeups, 同時將其加入到非活動鎖鏈表中
// 給 main_wake_lock 加鎖
ret = platform_device_register(&power_device);
if (ret) {
pr_err("[wakelocks_init]: platform_device_register failed/n");
goto err_platform_device_register;
}
ret = platform_driver_register(&power_driver);
if (ret) {
pr_err("[wakelocks_init]: platform_driver_register failed/n");
goto err_platform_driver_register;
}
// 新建工作隊列和工作者內核線程: sys_sync_work_queue, fs_sync
// suspend_work_queue, suspend
sys_sync_work_queue = create_singlethread_workqueue("fs_sync");
if (sys_sync_work_queue == NULL) {
pr_err("[wakelocks_init] fs_sync workqueue create failed/n");
}
suspend_work_queue = create_singlethread_workqueue("suspend");
if (suspend_work_queue == NULL) {
ret = -ENOMEM;
goto err_suspend_work_queue;
}
#ifdef CONFIG_WAKELOCK_STAT
proc_create("wakelocks", S_IRUGO, NULL, &wakelock_stats_fops);
// 創建proc接口
#endif
return 0;
err_suspend_work_queue:
platform_driver_unregister(&power_driver);
err_platform_driver_register:
platform_device_unregister(&power_device);
err_platform_device_register:
wake_lock_destroy(&unknown_wakeup);
wake_lock_destroy(&main_wake_lock);
#ifdef CONFIG_WAKELOCK_STAT
wake_lock_destroy(&deleted_wake_locks);
#endif
return ret;
}
可以看到該初始化函數中新建了幾個wakelock: deleted_wake_locks、main_wake_lock、sys_sync_wake_lock、unknown_wakeup,他們全部都是WAKE_LOCK_SUSPEND類型的wakelock,說到這裡不得不提到wakelock的兩種類型了:
1. WAKE_LOCK_SUSPEND – 這種鎖如果被某個task持有,那麼系統將無法進入休眠。
2. WAKE_LOCK_IDLE – 這種鎖不會影響到系統進入休眠,但是如果這種鎖被持有,那麼系統將無法進入idle空閒模式。
不過常用的所類型還是WAKE_LOCK_SUSPEND,包括userwakelock.c提供給用戶空間的新建wakelock的接口,都是建立的第一種鎖。另外系統為了分開管理這兩種不同類型的鎖,建立了兩個鏈表來統一鏈接不同類型的鎖:active_wake_locks[],這個是具有兩個鏈表頭的數組,元素0是掛接WAKE_LOCK_SUSPEND類型的鎖,而元素1就是掛接WAKE_LOCK_IDLE類型的wakelock了。
接著上面說,這個初始化函數新建這些鎖之後,直接將主鎖(main_wake_lock)給上鎖了,其余都是非鎖狀態。新建wakelock使用函數wake_lock_init(),該函數設置鎖的名字,類型,最後將新建的鎖掛接到一個專門鏈接這些非鎖狀態的鏈表inactive_locks上(新建的wakelock初期都是出於非鎖狀態的,除非顯示調用函數wake_lock來上鎖)。接著如果使用函數wake_lock()來給特定的wakelock上鎖的話,會將該鎖從鏈表inactive_locks上移動到對應類型的專用鏈表上active_wake_locks[type]上。
wakelock有兩種形式的鎖:超時鎖和非超時鎖,這兩種形式的鎖都是使用函數wake_lock_init()來初始化,只是在上鎖的時候會有一點點差別,超時鎖使用函數wake_lock_timeout(),而非超時鎖使用函數wake_lock(), 這個兩個函數會最終調用到同一個函數wake_lock_internal(),該函數依靠傳入的不同參數來選擇不同的路徑來工作。值得注意的是,非超時鎖必須手工解鎖,否則系統永遠不能進入睡眠。下面是wake_lock_internal()函數的片段:
if (!(lock->flags & WAKE_LOCK_ACTIVE))
lock->flags |= WAKE_LOCK_ACTIVE;// wakelock狀態為inactive,則更改為active
…
if (has_timeout) { // wake_lock_timeout()會傳入1
if (wakelock_debug_mask & DEBUG_WAKE_LOCK)
pr_info("[wake_lock_internal]: %s, type %d, timeout %ld.%03lu/n",
lock->name, type, timeout / HZ,
(timeout % HZ) * MSEC_PER_SEC / HZ);
lock->expires = jiffies + timeout; // 設置超時時間
lock->flags |= WAKE_LOCK_AUTO_EXPIRE; // 超時鎖標志
list_add_tail(&lock->link, &active_wake_locks[type]);
}
// acquire a non-timeout wakelock 添加一個非超時鎖
else { // wake_lock ()會傳入0
if (wakelock_debug_mask & DEBUG_WAKE_LOCK)
pr_info("[wake_lock_internal]: %s, type %d/n", lock->name, type);
lock->expires = LONG_MAX; // 設置成超時時間最大值
lock->flags &= ~WAKE_LOCK_AUTO_EXPIRE; // 非超時鎖標志
list_add(&lock->link, &active_wake_locks[type]);
// 將剛剛設置的非超時鎖加到對應類型的活動鎖鏈表中
}
解鎖的時候,這兩種形式的鎖所使用函數都是一樣了:wake_unlock(),該函數中會首先作如下操作:
lock->flags &= ~(WAKE_LOCK_ACTIVE | WAKE_LOCK_AUTO_EXPIRE);
// 清除鎖活動標志和自動超時標志
list_del(&lock->link); // 從鎖對應的活動鏈表上摘除
list_add(&lock->link, &inactive_locks);
// 將unlock的鎖掛接到非活動鏈表inactive_locks上
前面已經說了只有類型為WAKE_LOCK_SUSPEND的wakelock被上鎖才會阻止系統進入suspend,那麼也就是說只要鏈表active_wake_locks[WAKE_LOCK_SUSPEND]為NULL,那麼系統就可以執行suspend的流程了。Android對linux的改造,讓其可以在三種情況下進入linux的標准suspend的流程:
1. wake_unlock(),這個應該是最容易想到的,只要系統有對WAKE_LOCK_SUSPEND類型的wakelock解鎖的動作,都有可能會進入suspend流程開始休眠,為什麼是有可能呢?因為可能還有超時鎖沒有被超時解鎖。下面看一下代碼片段:
void wake_unlock(struct wake_lock *lock)
{
…
if (type == WAKE_LOCK_SUSPEND) // 貌似只在處理這個類型的wakelock
{
long has_lock = has_wake_lock_locked(type);
// 這個函數蠻重要,它來檢查type類型的鏈表上是否還有鎖被上鎖了。
// 其返回值如果是0,說明沒有該類型的鎖被持有了;返回非0表明就是這個類型的活動鏈表上還存在超時鎖但是沒有非超時鎖了,這個返回值就是當前時間距離最後超時的鎖超時時間的jiffies值;如果返回-1,那表明還有該類型的非超時鎖被持有。
if (wakelock_debug_mask & DEBUG_WAKE_LOCK)
pr_info("[wake_unlock]: has_lock = 0x%x/n" , has_lock);
if (has_lock > 0) {
if (wakelock_debug_mask & DEBUG_EXPIRE)
pr_info("[wake_unlock]: %s, start expire timer, "
"%ld/n", lock->name, has_lock);
mod_timer(&expire_timer, jiffies + has_lock);
// 修改定時器的超時值並add該定時器
}
else // 已經沒有超時鎖了
{
if (del_timer(&expire_timer)) // 刪除定時器
if (wakelock_debug_mask & DEBUG_EXPIRE)
pr_info("[wake_unlock]: %s, stop expire "
"timer/n", lock->name);
if (has_lock == 0)
// !=0,表明還有該類型的非超時鎖被持有,現在還不能進入suspend
{
pr_info("[wake_unlock]: (%s) suspend_work_queue suspend_work/n" , lock->name);
queue_work(suspend_work_queue, &suspend_work);
// 提交suspend的工作項,開始執行標准linux的suspend流程
}
}
…
}
spin_unlock_irqrestore(&list_lock, irqflags);
}
2. 超時鎖超時之後,定時器的回調函數會執行會查看是否有其他的wakelock, 如果沒有, 就在這裡讓系統進入睡眠。
static void expire_wake_locks(unsigned long data)
{
long has_lock;
unsigned long irqflags;
if (debug_mask & DEBUG_EXPIRE)
pr_info("expire_wake_locks: start/n");
spin_lock_irqsave(&list_lock, irqflags);
if (debug_mask & DEBUG_SUSPEND)
print_active_locks(WAKE_LOCK_SUSPEND);
has_lock = has_wake_lock_locked(WAKE_LOCK_SUSPEND);
if (debug_mask & DEBUG_EXPIRE)
pr_info("expire_wake_locks: done, has_lock %ld/n", has_lock);
if (has_lock == 0)
// 如果沒有SUSPEND類型的wakelock處於active,那麼將調用suspend
queue_work(suspend_work_queue, &suspend_work);
spin_unlock_irqrestore(&list_lock, irqflags);
}
static DEFINE_TIMER(expire_timer, expire_wake_locks, 0, 0);
列出以下一個重要的函數源碼:
static long has_wake_lock_locked(int type)
{
struct wake_lock *lock, *n;
long max_timeout = 0;
BUG_ON(type >= WAKE_LOCK_TYPE_COUNT);
list_for_each_entry_safe(lock, n, &active_wake_locks[type], link) {
if (lock->flags & WAKE_LOCK_AUTO_EXPIRE) {
long timeout = lock->expires - jiffies;
if (timeout <= 0)
expire_wake_lock(lock);
else if (timeout > max_timeout)
max_timeout = timeout;
} else
return -1;
}
return max_timeout;
}
3. 這個可能有人覺得匪夷所思,就是在wake_lock{_ _timeout}()函數中,調用了內部函數wake_lock_internal()。這裡只有在對超時鎖上鎖的時候才有可能進入休眠,如果對一個費超時鎖上鎖的話,那麼就沒有必要去檢查活動鏈表了。
static void wake_lock_internal(
struct wake_lock *lock, long timeout, int has_timeout)
{
…
if (type == WAKE_LOCK_SUSPEND) {
current_event_num++;
#ifdef CONFIG_WAKELOCK_STAT
if (lock == &main_wake_lock)
update_sleep_wait_stats_locked(1);
else if (!wake_lock_active(&main_wake_lock))
update_sleep_wait_stats_locked(0);
#endif
if (has_timeout) // 超時鎖的時候傳進來的是1
expire_in = has_wake_lock_locked(type);
// 檢查當前鎖類型鏈表上是否還有鎖處於active的狀態,無返回0
else
expire_in = -1;
// 如果是非超時鎖的話,這裡直接賦值-1,省去了活動鏈表檢查步驟了
if (expire_in > 0) {
if (debug_mask & DEBUG_EXPIRE)
pr_info("wake_lock: %s, start expire timer, "
"%ld/n", lock->name, expire_in);
// modify the time wakelock is expired
mod_timer(&expire_timer, jiffies + expire_in);
} else {
if (del_timer(&expire_timer))
if (debug_mask & DEBUG_EXPIRE)
pr_info("wake_lock: %s, stop expire timer/n",
lock->name);
if (expire_in == 0) // 沒有鎖處於active狀態後,准備調用suspend了
{
pr_info("[wake_lock]: suspend_work_queue suspend_work/n ");
queue_work(suspend_work_queue, &suspend_work);
}
}
}
spin_unlock_irqrestore(&list_lock, irqflags);
}
下面是suspend的工作項,經過上面三種情況的檢查,ok之後將會提交該工作項給工作隊列suspend_work_queue,如下:
static void suspend(struct work_struct *work)
{
int ret;
int entry_event_num;
// there are still some wakelock
if (has_wake_lock(WAKE_LOCK_SUSPEND)) {
if (wakelock_debug_mask & DEBUG_SUSPEND)
pr_info("[suspend]: abort suspend/n");
return;
}
entry_event_num = current_event_num;
sys_sync();
if (debug_mask & DEBUG_SUSPEND)
pr_info("suspend: enter suspend/n");
ret = pm_suspend(requested_suspend_state);
// requested_suspend_state這個全局變量在函數request_suspend_state()中被設置,也就是執行了eraly
suspend或者late resume之後,主要是為suspend保留請求的省電狀態。
if (debug_mask & DEBUG_EXIT_SUSPEND) {
struct timespec ts;
struct rtc_time tm;
getnstimeofday(&ts);
rtc_time_to_tm(ts.tv_sec, &tm);
pr_info("suspend: exit suspend, ret = %d "
"(%d-%02d-%02d %02d:%02d:%02d.%09lu UTC)/n", ret,
tm.tm_year + 1900, tm.tm_mon + 1, tm.tm_mday,
tm.tm_hour, tm.tm_min, tm.tm_sec, ts.tv_nsec);
}
if (current_event_num == entry_event_num) {
if (debug_mask & DEBUG_SUSPEND)
pr_info("suspend: pm_suspend returned with no event/n");
wake_lock_timeout(&unknown_wakeup, HZ / 2);
}
}
static DECLARE_WORK(suspend_work, suspend);
@kernel/kernel/power/suspend.c
int pm_suspend(suspend_state_t state)
{
if (state > PM_SUSPEND_ON && state <= PM_SUSPEND_MAX)
return enter_state(state);
// 標准linux的suspend流程函數
return -EINVAL;
}
EXPORT_SYMBOL(pm_suspend);
Wakelock的機制被文件userwakelock.c中的code封裝成了sys的接口sys/power/wake_lock和sys/power/wake_unlock文件,那麼上層如果需要新建wakelock或者注銷wakelock,或者是解鎖wakelock,都是操作這兩個sys接口文件。
四、Android層源碼解析在linux之上經過android的軟件堆層層封裝,最終在上層的java應用程序中使用。休眠喚醒也是從最上層發出的命令,然後一層一層地將參數解析,往最底層傳,最後走上標准linux的休眠喚醒之路。
這一部分將會初略分析休眠喚醒機制上linux之上所走的路線。
在linux之上,存在一個hal層,專門做和linux內核設備打交道的事情,這裡也不例外。休眠喚醒機制的hal層源碼位於:@hardware/libhardware_legacy/power/power.c
該文件源碼比較簡單,下面列舉重點片段:
enum {
ACQUIRE_PARTIAL_WAKE_LOCK = 0,
RELEASE_WAKE_LOCK,
REQUEST_STATE,
OUR_FD_COUNT
};
const char * const NEW_PATHS[] = {
"/sys/power/wake_lock",
"/sys/power/wake_unlock",
"/sys/power/state"
};
static int g_initialized = 0;
static int g_fds[OUR_FD_COUNT];
static const char *off_state = "mem";
static const char *on_state = "on";
static int open_file_descriptors(const char * const paths[])
{
int i;
for (i=0; i<OUR_FD_COUNT; i++) {
int fd = open(paths[i], O_RDWR);
if (fd < 0) {
fprintf(stderr, "fatal error opening /"%s/"/n", paths[i]);
g_error = errno;
return -1;
}
g_fds[i] = fd;
}
g_error = 0;
return 0;
}
static inline void initialize_fds(void)
{
if (g_initialized == 0) {
if(open_file_descriptors(NEW_PATHS) < 0) {
open_file_descriptors(OLD_PATHS);
on_state = "wake";
off_state = "standby";
}
g_initialized = 1;
}
}
int acquire_wake_lock(int lock, const char* id)
{
initialize_fds();
if (g_error) return g_error;
int fd;
if (lock == PARTIAL_WAKE_LOCK) { // 上層傳下來的lock type
fd = g_fds[ACQUIRE_PARTIAL_WAKE_LOCK];
}
else {
return EINVAL;
}
return write(fd, id, strlen(id));
}
int release_wake_lock(const char* id)
{
initialize_fds();
// LOGI("release_wake_lock id='%s'/n", id);
if (g_error) return g_error;
ssize_t len = write(g_fds[RELEASE_WAKE_LOCK], id, strlen(id));
return len >= 0;
}
int set_screen_state(int on)
{
QEMU_FALLBACK(set_screen_state(on));
LOGI("*** set_screen_state %d", on);
initialize_fds();
if (g_error) return g_error;
char buf[32];
int len;
if(on)
len = sprintf(buf, on_state);
else
len = sprintf(buf, off_state);
len = write(g_fds[REQUEST_STATE], buf, len);
if(len < 0) {
LOGE("Failed setting last user activity: g_error=%d/n", g_error);
}
return 0;
}
Hal層的代碼在jni層中被使用,源碼位於:frameworks/base/core/jni/android_os_Power.cpp,代碼片段如下:
static void acquireWakeLock(JNIEnv *env, jobject clazz, jint lock, jstring idObj)
{
if (idObj == NULL) {
throw_NullPointerException(env, "id is null");
return ;
}
const char *id = env->GetStringUTFChars(idObj, NULL);
acquire_wake_lock(lock, id);
env->ReleaseStringUTFChars(idObj, id);
}// 對wakelock加鎖函數
static void releaseWakeLock(JNIEnv *env, jobject clazz, jstring idObj)
{
if (idObj == NULL) {
throw_NullPointerException(env, "id is null");
return ;
}
const char *id = env->GetStringUTFChars(idObj, NULL);
release_wake_lock(id);
env->ReleaseStringUTFChars(idObj, id);
}// 對wakelock解鎖函數
static int setScreenState(JNIEnv *env, jobject clazz, jboolean on)
{
return set_screen_state(on);
}// 休眠喚醒的函數
Jni的方法需要注冊到上層才可以使用,同時也需要在上層的對應java類中聲明了native才可以使用。那麼這裡的方法在java中對應的聲明在哪裡呢?frameworks/base/core/java/android/os/Power.java,該文件定義一個java類,如下:
public class Power
{
// can't instantiate this class
private Power()
{
}
/**
* Wake lock that ensures that the CPU is running. The screen might
* not be on.
*/
public static final int PARTIAL_WAKE_LOCK = 1;
/**
* Wake lock that ensures that the screen is on.
*/
public static final int FULL_WAKE_LOCK = 2;
public static native void acquireWakeLock(int lock, String id);
public static native void releaseWakeLock(String id);
…
/**
* Turn the screen on or off
*
* @param on Whether you want the screen on or off
*/
public static native int setScreenState(boolean on);
…
}
聲明的jni接口應該是被java server在使用,這裡就是專門的電源管理服務:PowerManagerService使用,具體源碼位置在:frameworks/base/services/java/com/android/server/PowerManagerService.java。android在最上層還提供了現場的android.os.PowerManager類
(frameworks/base/core/java/android/os/PowerManager.java)來供app使用,PowerManager類會調用java服務PowerManagerService的方法來完成與wakelock相關的工作。
@ frameworks/base/core/java/android/os/PowerManager.java
類PowerManager中內嵌了一個WakeLock類,另外還定義了wakelock的類型,下面是代碼片段:
public class PowerManager
{
private static final String TAG = "PowerManager";
…
/**
* Wake lock that ensures that the CPU is running. The screen might
* not be on.
*/
public static final int PARTIAL_WAKE_LOCK = WAKE_BIT_CPU_STRONG;
/**
* Wake lock that ensures that the screen and keyboard are on at
* full brightness.
*/
public static final int FULL_WAKE_LOCK = WAKE_BIT_CPU_WEAK | WAKE_BIT_SCREEN_BRIGHT | WAKE_BIT_KEYBOARD_BRIGHT;
/**
* Wake lock that ensures that the screen is on at full brightness;
* the keyboard backlight will be allowed to go off.
*/
public static final int SCREEN_BRIGHT_WAKE_LOCK = WAKE_BIT_CPU_WEAK | WAKE_BIT_SCREEN_BRIGHT;
/**
* Wake lock that ensures that the screen is on (but may be dimmed);
* the keyboard backlight will be allowed to go off.
*/
public static final int SCREEN_DIM_WAKE_LOCK = WAKE_BIT_CPU_WEAK | WAKE_BIT_SCREEN_DIM;
/**
* Wake lock that turns the screen off when the proximity sensor activates.
* Since not all devices have proximity sensors, use
* {@link #getSupportedWakeLockFlags() getSupportedWakeLockFlags()} to determine if
* this wake lock mode is supported.
*
* {@hide}
*/
public static final int PROXIMITY_SCREEN_OFF_WAKE_LOCK
= WAKE_BIT_PROXIMITY_SCREEN_OFF;
…
public class WakeLock
{
…
WakeLock(int flags, String tag)
{
switch (flags & LOCK_MASK) {
case PARTIAL_WAKE_LOCK:
case SCREEN_DIM_WAKE_LOCK:
case SCREEN_BRIGHT_WAKE_LOCK:
case FULL_WAKE_LOCK:
case PROXIMITY_SCREEN_OFF_WAKE_LOCK:
break;
default:
throw new IllegalArgumentException();
}
mFlags = flags;
mTag = tag;
mToken = new Binder();
}
public void acquire()
{
synchronized (mToken) {
if (!mRefCounted || mCount++ == 0) {
try {
mService.acquireWakeLock(mFlags, mToken, mTag);
} catch (RemoteException e) {
}
mHeld = true;
}
}
}
public void release(int flags)
{
synchronized (mToken) {
if (!mRefCounted || --mCount == 0) {
try {
mService.releaseWakeLock(mToken, flags);
} catch (RemoteException e) {
}
mHeld = false;
}
if (mCount < 0) {
throw new RuntimeException("WakeLock under-locked " + mTag);
}
}
}
…
}
…
public WakeLock newWakeLock(int flags, String tag)
{
if (tag == null) {
throw new NullPointerException("tag is
null in PowerManager.newWakeLock");
}
return new WakeLock(flags, tag);
}
public void goToSleep(long time)
{
try {
mService.goToSleep(time);
} catch (RemoteException e) {
}
}
…
public PowerManager(IPowerManager service, Handler handler)
{
mService = service;
mHandler = handler;
}
IPowerManager mService;
Handler mHandler;
}
應用實例:
PowerManager pm = (PowerManager)getSystemService(Context.POWER_SERVICE);
PowerManager.WakeLock wl =
pm.newWakeLock(PowerManager.SCREEN_DIM_WAKE_LOCK, “Tag”);
wl.acquire(); //申請鎖這個裡面會調用PowerManagerService裡面acquireWakeLock()
…
wl.release(); //釋放鎖,顯示的釋放,如果申請的鎖不在此釋放系統就不會進入休眠。
接下來就會調用到java服務PowerManagerService中:
public void acquireWakeLock(int flags, IBinder lock, String tag) {
int uid = Binder.getCallingUid();
if (uid != Process.myUid()) {
mContext.enforceCallingOrSelfPermission(android.Manifest.permission.WAKE_LOCK, null);
}
long ident = Binder.clearCallingIdentity();
try {
synchronized (mLocks) {
acquireWakeLockLocked(flags, lock, uid, tag); // 內部方法
}
} finally {
Binder.restoreCallingIdentity(ident);
}
}
acquireWakeLockLocked(flags, lock, uid, tag)會調用函數power類的方法:
Power.acquireWakeLock(Power.PARTIAL_WAKE_LOCK,PARTIAL_NAME)。
public void releaseWakeLock(IBinder lock, int flags) {
int uid = Binder.getCallingUid();
if (uid != Process.myUid()) {
mContext.enforceCallingOrSelfPermission(android.Manifest.permission.WAKE_LOCK, null);
}
synchronized (mLocks) {
releaseWakeLockLocked(lock, flags, false);
}
}
releaseWakeLockLocked(lock, flags, false)函數會調用power類的方法:
Power.releaseWakeLock(PARTIAL_NAME);
上層休眠喚醒都是調用PowerManagerService類的方法:
goToSleep()
à goToSleepWithReason()
à goToSleepLocked()
à setPowerState()
à setScreenStateLocked()
à Power.setScreenState()
à jni方法
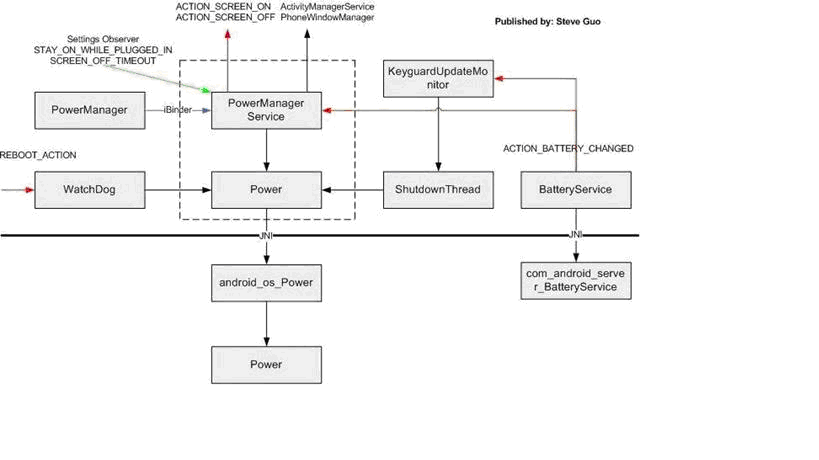
Android層的代碼分析得不是很詳細,這裡只關注框架和流程。下圖是網上的一個框架,可以參考一下: