


毫無疑問, 編譯安裝apache使其支持openssl是很重要的,只有這樣才可以實現https,下面我們一步一步的來。
OpenSSL:SSL的開源實現
libcrypto:通用加密庫,提供了各種加密函數
libssl:TLS/SSL協議的實現,基於會話的、實現了身份認證、數據機密性和會話完整性的TLS/SSL庫
為了簡單,這我都是用的yum安裝的,但是還是告訴大家怎麼編譯安裝。。。。
1,編譯安裝openssl
[root@test4 ~]# tar zxvf openssl-1.0.1c.tar.gz
[root@test4 ~]# cd openssl-1.0.1c
[root@test4 openssl-1.0.1c]# ./config --prefix=/usr/local/openssl --openssldir=/usr/local/openssl zlib-dynamic shared threads
[root@test4 openssl-1.0.1c]# make
[root@test4 openssl-1.0.1c]# make test
[root@test4 openssl-1.0.1c]# make install
--openssldir=OPENSSLDIR
安裝目錄,默認是 /usr/local/ssl 。
--prefix=PREFIX
設置 lib include bin 目錄的前綴,默認為 OPENSSLDIR 目錄。
--install_prefix=DESTDIR
設置安裝時以此目錄作為"根"目錄,通常用於打包,默認為空。
zlib
zlib-dynamic
no-zlib
使用靜態的zlib 壓縮庫、使用動態的zlib 壓縮庫、不使用zlib 壓縮功
能。
threads
no-threads
是否編譯支持多線程的庫。默認支持。
shared
no-shared
是否生成動態連接庫。
asm
no-asm
是否在編譯過程中使用匯編代碼加快編譯過程。
enable-sse2
no-sse2
啟用/禁用SSE2 指令集加速。如果你的CPU 支持SSE2 指令集,就可以打
開,否則就要關閉。
gmp
no-gmp
啟用/禁用GMP 庫
rfc3779
no-rfc3779
啟用/禁用實現X509v3 證書的IP 地址擴展
krb5
no-krb5
啟用/禁用 Kerberos 5 支持
ssl
no-ssl
ssl2
ssl3
no-ssl2
no-ssl3
tls
no-tls
啟用/禁用 SSL(包含了SSL2/SSL3) TLS 協議支持。
dso
no-dso
啟用/禁用調用其它動態鏈接庫的功能。[提示]no-dso 僅在no-shared
的前提下可用。
[提示]為了安裝Apache 的mod_ssl 成功,SSLv2/SSLv3/TLS 都必須開啟。
本文URL地址:http://www.bianceng.cn/OS/Linux/201410/45340.htm
2,編譯安裝apache支持openssl
( 大家記住這裡要安裝mod_ssl包 )
[root@test4 ~]# tar xzvf httpd-2.2.11.tar.gz
[root@test4 ~]# cd httpd-2.2.11
[root@test4 httpd-2.2.11]# ./configure --prefix=/usr/local/apache --enable-so --enable-ssl --with-ssl=/usr/local/openssl/
[root@test4 httpd-2.2.11]# make && make install
3,yum安裝OpenSSL httpd mod_ssl 自簽名配置https
[root@test4 ~]# yum install -y openssl
[root@test4 ~]# yum install -y httpd mod_ssl
[root@test4 ~]#echo 00 > /etc/pki/CA/serial
[root@test4 ~]# touch /etc/pki/CA/index.txt
[root@test4 ~]# (umask 077;openssl genrsa -out /etc/pki/CA/private/cakey.pem -des3 2048 )
[root@test4 ~]# openssl req -new -key /etc/pki/CA/private/cakey.pem -out /etc/pki/CA/cacert.pem -x509 -days 365
[root@test4 ~]# openssl genrsa 1024 > /etc/httpd/ssl/mail.key
[root@test4 ~]# openssl req -new -key /etc/httpd/ssl/mail.key -out /etc/httpd/ssl/mail.csr
[root@test4 ~]# openssl ca -in /etc/httpd/ssl/mail.csr -out /etc/httpd/ssl/mail.crt
上面是自簽名的過程,大家可以看看我的文章數字證書(2),我就不多啰嗦了
https的ssl監控的443端口
[root@test4 ssl]# netstat -antup|grep 443
tcp 0 0 :::443 :::* LISTEN 3843/httpd
vim /etc/httpd/conf.d/ssl.conf
然後在114和121行更改下內容:
114 SSLCertificateFile /etc/httpd/ssl/mail.crt
121 SSLCertificateKeyFile /etc/httpd/ssl/mail.key
4,測試
https://localhost
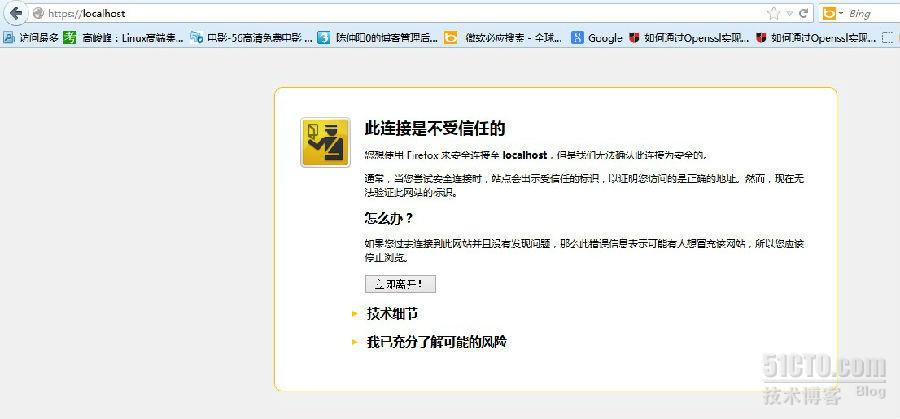
最後就是倒入ca中心的公鑰/etc/pki/CA/cacert.pem,這樣就可以了!!!1
本文出自 “好好活著” 博客,請務必保留此出處http://wolfword.blog.51cto.com/4892126/1214878