一、特性簡介
rsync是類unix系統下的數據鏡像備份工具,從軟件的命名上就可以看出來了——remote sync。它的特性如下:
1、可以鏡像保存整個目錄樹和文件系統。
2、可以很容易做到保持原來文件的權限、時間、軟硬鏈接等等。
3、無須特殊權限即可安裝。
4、優化的流程,文件傳輸效率高。
5、可以使用rcp、ssh等方式來傳輸文件,當然也可以通過直接的socket連接。
6、支持匿名傳輸。
算法介紹:
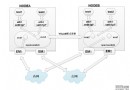
假定在名為α和β的兩台計算機之間同步相似的文件 A 與 B ,其中α對文件 A 擁有訪問權,β對文件 B 擁有訪問權。並且假定主機α與
β之間的網絡帶寬很小。那麼 rsync 算法將通過下面的五個步驟來完成:
1.β將文件 B 分割成一組不重疊的固定大小為 S 字節的數據塊。最後一塊可能會比 S 小。
2.β對每一個分割好的數據塊執行兩種校驗:一種是 32 位的滾動弱校驗,另一種是 128 位的 MD4 強校驗。
3.β將這些校驗結果發給α。
4.α通過搜索文件 A 的所有大小為 S 的數據塊 ( 偏移量可以任選,不一定非要是 S 的倍數 ) ,來尋找與文件 B 的某一塊有著相同的弱
校驗碼和強校驗碼的數據塊。這項工作可以借助滾動校驗的特性很快完成。
5.α發給β一串指令來生成文件 A 在β上的備份。這裡的每一條指令要麼是對文件 B 經擁有某一個數據塊而不須重傳的證明,要麼是一個
數據塊,這個數據塊肯定是沒有與文件 B 的任何一個數據塊匹配上的。
二、配置步驟
1、系統環境
server: Debian 5.0.5 ip: 192.168.206.120
client: Debian 5.0.5 ip: 192.168.206.200
rsync版本
# rsync --version
rsync version 3.0.3 protocol version 30
安裝
server和client端都需要安裝rsync,只不過client端不需要配置:
# apt-get install rsync
2、配置server端的/etc/rsyncd.conf文件
拷貝示例配置文件到/etc目錄
# cp /usr/share/doc/rsync/examples/rsyncd.conf /etc/
查看rsyncd.conf文件,按需要修改即可
# more /etc/rsyncd.conf
# sample rsyncd.conf configuration file
# GLOBAL OPTIONS
#motd file=/etc/motd
log file=/var/log/rsyncd.log
# for pid file, do not use /var/run/rsync.pid if
# you are going to run rsync out of the init.d script.
pid file=/var/run/rsyncd.pid
#syslog facility=daemon
#socket options=
# MODULE OPTIONS
[www] # 這裡是認證的模塊名,在client端需要指定
comment = source high app archive
path = /data/webroot/rsynctest # 需要同步的目錄
use chroot = yes
# max connections=10
lock file = /var/lock/rsyncd
# the default for read only is yes...
read only = no
list = yes
uid = www-data
gid = www-data
# exclude =
# exclude from =
# include =
# include from =
auth users = appbackup # 認證的用戶名,如果沒有這行,則表明是匿名
secrets file = /etc/rsyncd.secrets # 認證密碼文件
strict modes = yes
hosts allow = 192.168.206.200 #充許任何主機連接
# hosts deny =
ignore errors = no # 可以忽略一些無關的IO錯誤
ignore nonreadable = yes
transfer logging = yes
# log format = %t: host %h (%a) %o %f (%l bytes). Total %b bytes.
timeout = 600
refuse options = checksum dry-run
dont compress = *.gz *.tgz *.zip *.z *.rpm *.deb *.iso *.bz2 *.tbz
3、在server端創建密碼文件/etc/rsyncd.secrets
# vi /etc/rsyncd.secrets
1 ;username:password
2 appbackup:123456
4、在server端將rsync以守護進程形式啟動
# vi /etc/default/rsync
RSYNC_ENABLE=true
啟動srync
# /etc/init.d/rsync start
查看監聽端口
# netstat -anp|grep rsync
tcp 0 0 0.0.0.0:873 0.0.0.0:* LISTEN 2533/rsync
tcp6 0 0 :::873 :::* LISTEN 2533/rsync
日志信息
# tail -f /var/log/rsyncd.log
2011/01/25 16:40:36 [30371] name lookup failed for 192.168.206.200: Name or service not known
2011/01/25 16:40:36 [30371] connect from UNKNOWN (192.168.206.200)
2011/01/25 08:40:36 [30371] rsync on www/ from appbackup@unknown (192.168.206.200)
2011/01/25 08:40:36 [30371] building file list
2011/01/25 08:40:36 [30371] sent 263 bytes received 66 bytes total size 2313891
2011/01/27 08:45:05 [2533] rsyncd version 3.0.3 starting, listening on port 873
5、client端測試
創建密碼文件,只填密碼即可,密碼要與server端的一致。
debian-vm:~# vi /etc/rsyncd.secrets
123456
同步
debian-vm:~# /usr/bin/rsync -vzrtopg --delete --progress [email protected]::www /data/webroot --password-
file=/etc/rsyncd.secrets
receiving incremental file list
deleting 20101129.csv
./
ip.txt
2358 100% 2.25MB/s 0:00:00 (xfer#1, to-check=2/7)
sent 81 bytes received 886 bytes 1934.00 bytes/sec
total size is 2375 speedup is 2.46
參數說明:
-vzrtopg裡的v是verbose,z是壓縮,r是recursive,topg都是保持文件原有屬性如屬主、時間的參數。
--progress是指顯示出詳細的進度情況
--delete是指如果服務器端刪除了這一文件,那麼客戶端也相應把文件刪除
6、crontab定期更新腳本
# more rsync.sh
#!/bin/bash
#列表顯示遠程的目錄
/usr/bin/rsync -vzrtopg --delete --progress [email protected]::www --password-file=/etc/rsyncd.secrets
/usr/bin/rsync -vzrtopg --delete --progress [email protected]::www /data/webroot --password-
file=/etc/rsyncd.secrets