在FreeBSD上用mpd5構建PPTP VPN Server
幫一個朋友公司維護服務器,很變態,他們的服務器放在某國企自建機房,設定了僅允許通過朋友公司路由器固定IP地址才能連接訪問,遠程管理維護極不方便。正好平時為了測試和內部版本管理方便,在他們公司內部搭建了一台服務器,就用這個來做個跳板吧。
服務器安裝的是FreeBSD 9.1 64位版,安裝過程就不贅述了,直接進主題:
1、更新ports
#portsnap fetch update
2、安裝MPD5
#cd /usr/ports/net/mpd5
#make install clean
3、配置
#cp /usr/local/etc/mpd5/mpd.conf.sample mpd.conf
#ee /usr/local/etc/mpd5/mpd.conf
修改 startup: default: pptp_server: 這三塊
部分粘貼如下,修改見備注
startup:
# configure mpd users
set user shuqi888 loveosc ### 設置 mpd 的訪問帳號及密碼,通過 telnet 或 web 訪問時需要此帳號,此例中管理員名shuqi888,密碼loveosc
#set user foo1 bar1
# configure the console
set console self 127.0.0.1 5005
set console open
# configure the web server
set web self 0.0.0.0 5006
set web open
# Default configuration is "dialup"
default:
#load dialup 注釋掉dialup
load pptp_server ### 更改默認調用 pptp_server 模塊
pptp_server:
#
# Mpd as a PPTP server compatible with Microsoft Dial-Up Networking clients.
#
# Suppose you have a private Office LAN numbered 192.168.1.0/24 and the
# machine running mpd is at 192.168.1.1, and also has an externally visible
# IP address of 1.2.3.4.
#
# We want to allow a client to connect to 1.2.3.4 from out on the Internet
# via PPTP. We will assign that client the address 192.168.1.50 and proxy-ARP
# for that address, so the virtual PPP link will be numbered 192.168.1.1 local
# and 192.168.1.50 remote. From the client machine's perspective, it will
# appear as if it is actually on the 192.168.1.0/24 network, even though in
# reality it is somewhere far away out on the Internet.
#
# Our DNS server is at 192.168.1.3 and our NBNS (WINS server) is at 192.168.1.4.
# If you don't have an NBNS server, leave that line out.
#
# Define dynamic IP address pool.
set ippool add pool1 192.168.1.50 192.168.1.99 ##這裡可以設定撥入後的私有IP
# Create clonable bundle template named B
create bundle template B
set iface enable proxy-arp
set iface idle 1800
set iface enable tcpmssfix
set ipcp yes vjcomp
# Specify IP address pool for dynamic assigment.
set ipcp ranges 192.168.1.1/32 ippool pool1
set ipcp dns 8.8.8.8 ### 設置 dns,我喜歡谷歌的
#set ipcp nbns 192.168.1.4 ###如果你用不到 wins 的話,可以注釋掉這塊,
# The five lines below enable Microsoft Point-to-Point encryption
# (MPPE) using the ng_mppc(8) netgraph node type.
set bundle enable compression
set ccp yes mppc
set mppc yes e40
set mppc yes e128
set mppc yes stateless
# Create clonable link template named L
create link template L pptp
# Set bundle template to use
set link action bundle B
# Multilink adds some overhead, but gives full 1500 MTU.
set link enable multilink
set link yes acfcomp protocomp
set link no pap chap eap
set link enable chap
# We can use use RADIUS authentication/accounting by including
# another config section with label 'radius'.
# load radius
set link keep-alive 10 60
# We reducing link mtu to avoid GRE packet fragmentation.
set link mtu 1460
# Configure PPTP
set pptp self 192.168.1.201 ###設置 pptp 的監聽 ip 地址,也就是你的網卡的 真實IP 地址,這裡一定要注意,如果是通過路由器端口映射出去的主機,這裡不能填路由器地址,而應該是網卡上配置的真實IP地址。
# Allow to accept calls
set link enable incoming
保存退出。
4、設定及啟動
#ee /etc/rc.conf
加入
mpd_enable="YES"
啟動mpd5
#/usr/local/etc/rc.d/mpd5 start
添加VPN帳號
#ee /usr/local/etc/mpd5/mpd.secret
輸入用戶名和密碼,一行一個,如
vpnuser1 password001
啟用包轉發(不做這一步,雖然可以連上VPN,但只能訪問內網,無法訪問外網)
#sysctl net.inet.ip.forwarding=1
至此安裝配置完成,可以在Windows中新建一個VPN連接了。
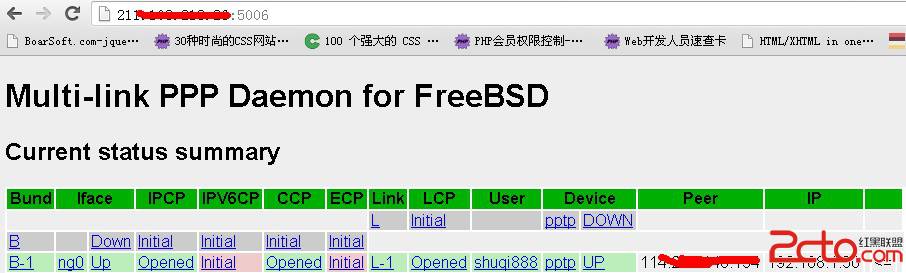
通過web訪問可以看到當前撥入連接的狀態