


./configure \
             --with-cc-opt="-I/usr/local/include" \
             --with-ld-opt="-L/usr/local/lib" \
             --prefix=/opt/openresty

... ...
Configuration summary
  + using system PCRE library
  + using system OpenSSL library
  + md5: using OpenSSL library
  + sha1: using OpenSSL library
  + using system zlib library

  nginx path prefix: "/opt/openresty/nginx"
  nginx binary file: "/opt/openresty/nginx/sbin/nginx"
  nginx configuration prefix: "/opt/openresty/nginx/conf"
  nginx configuration file: "/opt/openresty/nginx/conf/nginx.conf"
  nginx pid file: "/opt/openresty/nginx/logs/nginx.pid"
  nginx error log file: "/opt/openresty/nginx/logs/error.log"
  nginx http access log file: "/opt/openresty/nginx/logs/access.log"
  nginx http client request body temporary files: "client_body_temp"
  nginx http proxy temporary files: "proxy_temp"
  nginx http fastcgi temporary files: "fastcgi_temp"
  nginx http uwsgi temporary files: "uwsgi_temp"
  nginx http scgi temporary files: "scgi_temp"
其中 --prefix=/opt/openresty 指定了安裝目錄,不指定的話默認會安裝到 /usr/local/openresty 目錄下。 編譯安裝: make && make install
[root@localhost src]# cd /opt/openresty/
[root@localhost openresty]# ls
bin  luajit  lualib  nginx
可以看到 /opt/openresty 目錄下四個文件夾,其中包括了 luajit,nginx。 啟動openresty: /opt/openresty/nginx/sbin/nginx -c /opt/openresty/nginx/conf/nginx.conf -p /opt/openresty/nginx/
[root@localhost src]# ps -elf|grep nginx
1 S root      2076     1  0  80   0 - 34999 -      21:24 ?        00:00:00 nginx: master process /opt/openresty/nginx/sbin/nginx -c /opt/openresty/nginx/conf/nginx.conf -p /opt/openresty/nginx/
5 S nobody    2077  2076  0  80   0 - 35045 -      21:24 ?        00:00:00 nginx: worker process
0 S root      2079  1678  0  80   0 -  1088 -      21:24 pts/1    00:00:00 grep nginx
驗證可以訪問: curl 127.0.0.1 2. content_by_lua 和 content_by_lua_file nginx 如何嵌入 lua 腳本。方法就是在nginx的配置文件nginx.conf 中使用 content_by_lua 或者 cotent_by_lua_file 指令: 1) content_by_lua 一般在很簡單的lua腳本時使用:
        location /lua {
                set $test "hello, world.";
                content_by_lua '
                        ngx.header.content_type = "text/plain";
                        ngx.say(ngx.var.test);
                ';
        }
訪問 http://localhost/lua 可以看到輸出到頁面的 hello, world. 2)cotent_by_lua_file 適應於復雜的 lua 腳本,專門放入一個文件中:
        location /lua2 {
            #lua_code_cache off;
            content_by_lua_file lua/hello.lua;
        }
路徑相對於 /opt/openresty/nginx
[root@localhost lua]# pwd
/opt/openresty/nginx/lua
[root@localhost lua]# cat hello.lua
ngx.say('hello ngx_lua!!!!');
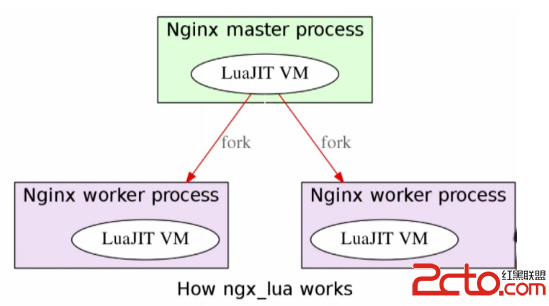
本例子中 hello.lua 只包含一句: ngx.say('hello ngx_lua!!!!'); 訪問 /lua2 : [root@localhost lua]# curl localhost/lua hello ngx_lua!!!! 可以看到訪問成功。 在 nginx.conf 文件的 server {.. ...} 中加入 lua_code_cache off; 可以方便調試lua腳本,修改lua腳本之後,不需要 reload nginx. openresty 中的 nginx 嵌入 luajit 的原理: 每一個nginx的進程中都嵌入了一個 luajit的虛擬機,來執行lua腳本。nginx將lua腳本的執行交給了luajit vm.
 3. ngx_lua 的指令 和 API
上面我們說到 nginx 嵌入 lua 腳本可以使用 content_by_lua 和 content_by_lua_file,它們其實是指令(Directives),類似的指令還有很多,
3. ngx_lua 的指令 和 API
上面我們說到 nginx 嵌入 lua 腳本可以使用 content_by_lua 和 content_by_lua_file,它們其實是指令(Directives),類似的指令還有很多,
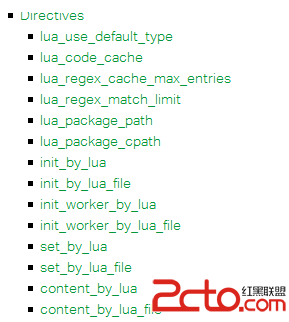 這些指令都是 nginx 訪問 lua 腳本的入口。
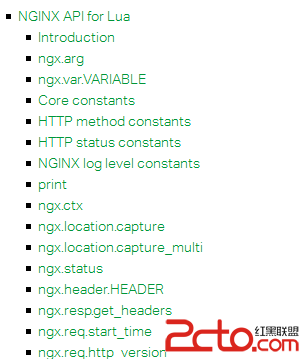
ngx_lua API:
指令是 nginx 訪問 lua 腳本的入口。那麼lua腳本如何調用nginx中的函數呢?就是通過 ngx_lua 的API 。
The various *_by_lua and *_by_lua_file configuration directives serve as gateways to the Lua API within the nginx.conf file. The NGINX Lua API described below can only be called within the user Lua code run in the context of these configuration directives.
The API is exposed to Lua in the form of two standard packages ngx and ndk. These packages are in the default global scope within ngx_lua and are always available within ngx_lua directives.
這些指令都是 nginx 訪問 lua 腳本的入口。
ngx_lua API:
指令是 nginx 訪問 lua 腳本的入口。那麼lua腳本如何調用nginx中的函數呢?就是通過 ngx_lua 的API 。
The various *_by_lua and *_by_lua_file configuration directives serve as gateways to the Lua API within the nginx.conf file. The NGINX Lua API described below can only be called within the user Lua code run in the context of these configuration directives.
The API is exposed to Lua in the form of two standard packages ngx and ndk. These packages are in the default global scope within ngx_lua and are always available within ngx_lua directives.
 其實nginx和Lua的交互開發主要就是指令和API,當然還有lua腳本的語法。指令是nginx訪問lua的入口,API是lua調用nginx的函數,lua是腳本編程語言。
指令其實很簡單,所以主要就是熟悉ngx_lua的 API 和Lua語法。
4. lua 訪問 redis
lua-resty-redis 模塊:https://github.com/openresty/lua-resty-redis (有文檔可以參考)
在nginx.conf中加入:
其實nginx和Lua的交互開發主要就是指令和API,當然還有lua腳本的語法。指令是nginx訪問lua的入口,API是lua調用nginx的函數,lua是腳本編程語言。
指令其實很簡單,所以主要就是熟悉ngx_lua的 API 和Lua語法。
4. lua 訪問 redis
lua-resty-redis 模塊:https://github.com/openresty/lua-resty-redis (有文檔可以參考)
在nginx.conf中加入:
        location /redis_test{
            content_by_lua_file lua/redis_test.lua;
        }
redis_test.lua 內容:
[root@localhost lua]# cat redis_test.lua
local redis = require "resty.redis"
local red = redis:new()

red:set_timeout(1000)

local ok, err = red:connect("127.0.0.1", 6379)
if not ok then
        ngx.say("failed to connect: ", err)
        return
end

ngx.say("set result: ", ok)

local res, err = red:get("dog")
if not res then
        ngx.say("failed to get doy: ", err)
        return
end

if res == ngx.null then
        ngx.say("dog not found.")
        return
end

ngx.say("dog: ", res)

[root@localhost lua]#

訪問:

[root@localhost lua]# curl localhost/redis_test
set result: 1
dog: an animal
[root@localhost lua]#
我們看到訪問成功。 5. lua 訪問mysql openresty的mysql模塊:lua-resty-mysql :https://github.com/openresty/lua-resty-mysql(有文檔可以參考) 在nginx.conf加入如下配置:
    location /mysql_test {
            content_by_lua_file lua/mysql_test.lua;
        }
mysql_test.lua腳本內容:
[root@localhost lua]# pwd
/opt/openresty/nginx/lua
[root@localhost lua]# cat mysql_test.lua
local mysql = require "resty.mysql"
local db, err = mysql:new()

if not db then
        ngx.say("failed to instantiate mysql: ", err)
        return
end

db:set_timeout(1000)

local ok, err, errno, sqlstate = db:connect{
        host = "127.0.0.1",
        port = 3306,
        database = "ngx_lua",
        user = "root",
        password="digdeep",
        max_packet_size = 1024 * 1024
}

if not ok then
        ngx.say("failed to connect: ", err, ": ", errno, " ", sqlstate)
        return
end

ngx.say("connected to mysql.")

local res, err, errno, sqlstate = db:query("drop table if exists cats")
if not res then
        ngx.say("bad result: ", err, ": ", errno, ": ", sqlstate, ".")
        return
end

res, err, errno, sqlstate = db:query("create table cats " .. "(id int not null primary key auto_increment, "
                                        .. "name varchar(30))")
if not res then
        ngx.say("bad result: ", err, ": ", errno, ": ", sqlstate, ".")
        return
end

ngx.say("table cats created.")

res, err, errno, sqlstate = db:query("insert into cats(name) " .. "values (\'Bob\'),(\'\'),(null)")
if not res then
        ngx.say("bad request: ", err, ": ", errno, ": ", sqlstate, ".")
        return
end

ngx.say(res.affected_rows, " rows inserted into table cats ", "(last insert id: ", res.insert_id, ")")

res, err, errno, sqlstate = db:query("select * from cats order by id asc", 10)
if not res then
        ngx.say("bad result ", err, ": ", errno, ": ", sqlstate, ".")
        return
end

local cjson = require "cjson"
ngx.say("result: ", cjson.encode(res))

local ok, err = db:set_keepalive(1000, 100)
if not ok then
        ngx.say("failed to set keepalive: ", err)
        return
end
測試:
[root@localhost lua]# curl localhost/mysql_test
connected to mysql.
table cats created.
3 rows inserted into table cats (last insert id: 1)
result: [{"name":"Bob","id":1},{"name":"","id":2},{"name":null,"id":3}]
測試通過。 5. lua 的 capture 和 capture_multi(子查詢) capture_multi 是 openresty 一個十分強大的功能。它能極大的減少前端浏覽器發送的http請求的數量,突破了浏覽器對於同一個服務器並發請求數量的限制,因為他可以將前端的多個http請求減少為只要一個http請求到nginx,然後nginx使用capture_multi特性,對後端發起多個異步並發請求,然後統一將結果返回給前端。下面看一個例子: 首先在nginx.conf中加入下面的 location 配置,並且配置好 nginx 訪問 php 的配置:
        location /capture {
            content_by_lua_file lua/capture.lua;
            #access_by_lua_file lua/capture.lua;
        }

        location ~ \.php$ {
            root           html;
            fastcgi_pass   127.0.0.1:9000;
            fastcgi_index  index.php;
            fastcgi_param  SCRIPT_FILENAME  $document_root$fastcgi_script_name;
            include        fastcgi_params;
        }
capture.lua 的代碼如下:
[root@localhost lua]# pwd
/opt/openresty/nginx/lua
[root@localhost lua]# cat capture.lua
local res1,res2,res3,res4 = ngx.location.capture_multi{
        {"/mysql_test", {args="t=1&id=1"}},
        {"/redis_test", {args="t=2&id=2"}},
        {"/lua", {args="t=3&id=3"}},
        {"/index.php", {args="t=3&id=3"}},
}

ngx.header.content_type="text/plain"
ngx.say(res1.body)
ngx.say(res2.body)
ngx.say(res3.body)
ngx.say(res4.truncated)
ngx.say(res4.status)
ngx.say(res4.header["Set-Cookie"])

--ngx.say(res4.body)
index.php 代碼:
[root@localhost html]# pwd
/opt/openresty/nginx/html
[root@localhost html]# cat index.php
<?php
        echo phpinfo();
?>
訪問:
[root@localhost html]# curl localhost/capture
connected to mysql.
table cats created.
3 rows inserted into table cats (last insert id: 1)
result: [{"name":"Bob","id":1},{"name":"","id":2},{"name":null,"id":3}]

set result: 1
dog: an animal

hello ngx_lua!!!!

false
200
nil
可以看到訪問成功了。/mysql_test,/redis_test, /lua, /index.php 四個請求的結果都輸出了。 注意: ngx.location.capture_multi{... ...} 中的多個異步並發請求可以是 nginx.conf 中配置的 location(比如 /mysql_test, /redis_test, /lua),也可以不是 location配置的路徑,比如 index.php 就不是。index.php 就是一個簡單的後台php 腳本。當然也可以是一個 java 實現的後台接口。 6. openresty的緩存 lua_shared_dict 定義一個緩存: 在nginx的配置文件 nginx.conf 的 http 端下面加入指令: lua_shared_dict ngx_cache 128m; 就定義了一個 名稱為 ngx_cache 大小為128m的內存用於緩存,注意該緩存是所有nginx work process所共享的。 在lua腳本中訪問緩存:
local ngx_cache = ngx.shared.ngx_cache
local value = ngx_cache:get(key)

local succ, err, forcible = ngx_cache:set(key, value, exptime)
下面測試一下,首先在 nginx.conf的server端中加入:
        location /cache {
            content_by_lua_file lua/cache.lua;
        }
然後編寫 cache.lua 腳本:
[root@localhost lua]# cat cache.lua
local redis = require "resty.redis"
local red = redis:new()

function set_to_cache(key, value, exptime)
        if not exptime then
                exptime = 0
        end
        local ngx_cache = ngx.shared.ngx_cache
        local succ, err, forcible = ngx_cache:set(key, value, exptime)
        return succ
end

function get_from_cache(key)
        local ngx_cache = ngx.shared.ngx_cache;
        local value = ngx_cache:get(key)
        if not value then
                value = get_from_redis(key)
                set_to_cache(key, value)
                return value
        end

        ngx.say("get from cache.")
        return value
end

function get_from_redis(key)
        red:set_timeout(1000)

        local ok, err = red:connect("127.0.0.1", 6379)
        if not ok then
                ngx.say("failed to connect: ", err)
                return
        end

        local res, err = red:get(key)
        if not res then
                ngx.say("failed to get doy: ", err)
                return ngx.null
        end

        ngx.say("get from redis.")
        return res
end

function set_to_redis(key, value)
        red:set_timeout(1000)
        local ok, err = red:connect("127.0.0.1", 6379)
        if not ok then
                ngx.say("failed to connect: ", err)
                return
        end

        local ok, err = red:set(key, value)
        if not ok then
                ngx.say("failed to set to redis: ", err)
                return
        end
        return ok
end

set_to_redis('dog', "Bob")
local rs = get_from_cache('dog')
ngx.say(rs)
測試:
[root@localhost ~]# curl localhost/cache
get from redis.
Bob
[root@localhost ~]# curl localhost/cache
get from cache.
Bob
[root@localhost ~]# curl localhost/cache
get from cache.
Bob
第一次從 redis中獲取,以後每次都從cache中獲取。 可以使用 ab 測試一下rps(Requests per second): ab -n 1000 -c 100 -k http://127.0.0.1/cache 7. 解決緩存失效風暴 lua-resty-lock 緩存失效風暴是指緩存因為時間過期而失效時,會導致所有的請求都去訪問 後台的redis或者mysql,而導致CPU性能即刻增長的現象。所以關鍵是當緩存失效時,用lock保證只有一個線程去訪問後台的redis或者mysql,然後更新緩存。需要使用到 lua-resty-lock 模塊的加鎖、解鎖功能。 lua-resty-lock 文檔:https://github.com/openresty/lua-resty-lock 首先在nginx.conf 的 http 端下面加入指令: lua_shared_dict ngx_cache 128m; # cache lua_shared_dict cache_lock 100k; # lock for cache 然後在nginx.conf的server端中加入:
        location /cache_lock {
            content_by_lua_file lua/cache_lock.lua;
        }
cache_lock.lua代碼: 測試:
[root@localhost lua]# curl localhost/cache_lock
get from cache.
Bob
[root@localhost lua]# curl localhost/cache_lock
get from cache.
Bob
7. openresty 執行階段 nginx的執行階段分成了很多個階段,所以第三方模塊就可以在某個適當的階段加入一些處理。openresty進行了簡化成了7個階段:
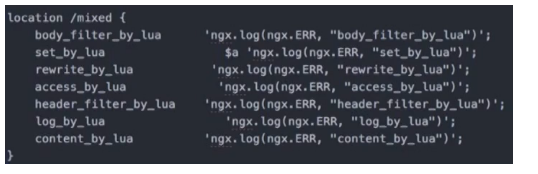 7個階段的執行順序如下:
set_by_lua: 流程分支判斷,判斷變量初始哈
rewrite_by_lua: 用lua腳本實現nginx rewrite
access_by_lua: ip准入,是否能合法性訪問,防火牆
content_by_lua: 內存生成
header_filter_by_lua:過濾http頭信息,增加頭信息
body_filter_by_lua: 內容大小寫,內容加密
log_by_lua: 本地/遠程記錄日志
但是其實我們可以只用 content_by_lua,所有功能都在該階段完成,也是可以的。
7個階段的執行順序如下:
set_by_lua: 流程分支判斷,判斷變量初始哈
rewrite_by_lua: 用lua腳本實現nginx rewrite
access_by_lua: ip准入,是否能合法性訪問,防火牆
content_by_lua: 內存生成
header_filter_by_lua:過濾http頭信息,增加頭信息
body_filter_by_lua: 內容大小寫,內容加密
log_by_lua: 本地/遠程記錄日志
但是其實我們可以只用 content_by_lua,所有功能都在該階段完成,也是可以的。